React Native Tutorial: Integrating in an Existing App
In this React Native tutorial, you’ll learn how to integrate React Native into an existing app, demonstrating one approach to adoption of the framework. By Christine Abernathy.
Sending Events from the Native App
You can also communicate from native apps to JavaScript through events. The bridge has a dispatcher that can send arbitrary messages to JavaScript. Your JavaScript code can listen to events it’s interested in by subscribing to them.
You’ll send an event back to the React Native app when the save occurs. Open AddRatingManager.swift and modify its subclass:
class AddRatingManager: RCTEventEmitter {
Subclassing RCTEventEmitter allows you to customize the data you send with an event.
Delete the bridge variable declaration to use the superclass variable instead.
Next, override supportedEvents():
override func supportedEvents() -> [String]! {
  return ["AddRatingManagerEvent"]
}
This defines the events that this module will emit.
Then, add the following statement to the end of save(_:rating:forIdentifier):
self.sendEvent(
  withName: "AddRatingManagerEvent",
  body: ["name": "saveRating", "message": rating, "extra": identifier])
This calls the event emitter’s sendEvent(_:body:), passing in a name for the event and JSON representing the message to send. The message you’re sending back corresponds to information about the view and the save parameters.
Open AddRatingApp.js and add code to subscribe to the event. You’ll add the code to the root component even though any component can subscribe to events. First import NativeEventEmitter which handles event subscriptions:
  ...
  NativeEventEmitter,
} from 'react-native';
In the constructor, initialize a private _subscription variable that you’ll use to add and remove event listeners by adding the following after the super(props) statement:
this._subscription = null;
Subscribe to the event in componentDidMount() by adding the following code to the class definition:
componentDidMount() {
  const AddRatingManagerEvent = new NativeEventEmitter(AddRatingManager);
  this._subscription = AddRatingManagerEvent.addListener(
    'AddRatingManagerEvent',
    (info) => {
      console.log(JSON.stringify(info));
    }
  );
}
This code logs the event’s message.
Then, unsubscribe to the event in componentWillUnmount():
componentWillUnmount() {
  this._subscription.remove();
}
Rebuild the project in Xcode. Navigate to a mixer, rate it, and save. Check your Xcode console log, and you should see something similar to the following:
2016-09-21 23:15:45.703 [info][tid:com.facebook.react.JavaScript] {"name":"saveRating","extra":2,"message":3}
Running in Production Mode
There are a few things you need to do to get your app ready for production. So far in this React Native tutorial you’ve been serving the bundle that represents your JavaScript code from a development server. In production, you should use an offline bundle to represent your app.
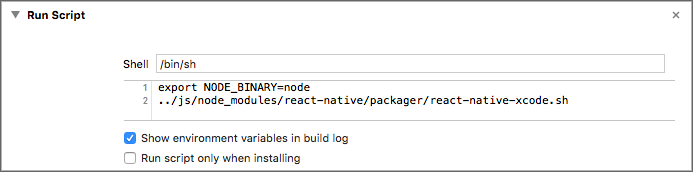
In Xcode, add a Run Script to the build phase of your target. Go to Targets\Mixer\Build Phases. Click + and select New Run Script Phase. In the newly created Run Script, add the following to the shell script content:
export NODE_BINARY=node
../js/node_modules/react-native/packager/react-native-xcode.sh
Your Xcode project should look like this:
Open MixerReactModule.swift and modify sourceURLForBridge(_:) to use the offline bundle that will be generated as part of the build:
func sourceURL(for bridge: RCTBridge!) -> URL! {
  return Bundle.main.url(forResource: "main", withExtension: "jsbundle")
}
From the Xcode menu, go to Product\Scheme\Edit Scheme… and change Build Configuration from Debug to Release.
Run your app; the build may take a little longer than usual to complete. In Xcode, tap the Report Navigator menu in the project bar and select your last build to view the build results. You should see something like the following that shows the offline bundle being written out to main.jsbundle:

Note: If you get a build error about being unable to open package.json then edit js/node_modules/react-native/packager/react-native-xcode.sh and replace cd .. with cd ${REACT_NATIVE_DIR}/../..
To test the offline script, kill the development server by hitting Ctrl-C in the Terminal window where you had previously started it. Then in the simulator, navigate to the add rating view for a mixer.
Notice that the bundle loading indicator doesn’t show up and no debug logs are shown in Xcode. You’ll also notice that the load time of the view is much faster.

Where to Go From Here?
Congratulations! as you’ve worked through this React Native tutorial, you’ve learnt how to add React Native to your existing Swift app. You can download the completed project to see the finished version. To run the project, execute the following commands in Terminal:
cd Mixer-Completed/js
npm install
npm start
In another Terminal window run the following:
cd Mixer-Completed/ios
pod install
open Mixer.xcworkspace
Run the project
Note: If you get a build error saying that Xcode can’t find the React lib, then make sure that the Framework Search Path only has $(inherited) set.

As you get more comfortable with React Native you can look into adding more views.
Up for a challenge? Add a new React Native view to the mixer details view that displays a message when a rating is saved. A few hints to get you going:
- Think about creating the view using the same methods you did for the add rating view.
- Consider setting up a new React Native module for this view.
- You can register the additional module in index.ios.js.
Check out the challenge solution and look for “Challenge” to view the changes.
For more details check out Facebook’s Integrating with Existing Apps tutorial, as well as additional information on Native Modules and Native UI Components.
There’s lots more to learn about communicating between native and React Native and Tadeu Zagallo has an in-depth article on Bridging in React Native that’s worth a read.
If you have any questions or comments, please join the discussion below!