React Native Tutorial: Integrating in an Existing App
In this React Native tutorial, you’ll learn how to integrate React Native into an existing app, demonstrating one approach to adoption of the framework. By Christine Abernathy.
Communicating With the React Native View
When you instantiate RCTRootView, you can pass data into the initialProperties parameter. This data is then passed on as initial props to the root component. You can also update the properties later on by passing new values to your RCTRootView instance’s appProperties property.
Open AddRatingViewController.swift and modify the addRatingView assignment to pass in the mixer identifier and current rating as follows:
addRatingView = MixerReactModule.sharedInstance.viewForModule(
      "AddRatingApp",
      initialProperties: ["identifier": mixer.identifier, "currentRating": currentRating])
Since you’ve made a native code change, rebuild and run the app from Xcode. Pick the first mixer and tap Add Rating.
Check the Xcode console. You should see the data you sent reflected in the logs:
2016-09-21 17:49:23.075 [info][tid:com.facebook.react.JavaScript] Running application "AddRatingApp" with appParams: {"rootTag":1,"initialProps":{"currentRating":0,"identifier":1}}. __DEV__ === true, development-level warning are ON, performance optimizations are OFF
Communicating With the Native App
Earlier in this React Native tutorial, you saw how the bridge helped manage communications between native and JavaScript. For example, the View component made JavaScript calls through the bridge to an Objective-C class that eventually displayed a UIView. React Native provides you with hooks to build custom native modules that JavaScript can call.
You’ll have noticed that once the add rating view presents itself, you’re stuck since the Cancel and Save buttons don’t do much. You’ll fix the Cancel button action so it will dismiss the React Native view. To do this, you’ll create a custom native module that will be invoked when you press the button.
Create a new, empty Swift file named AddRatingManager.swift and save it in the Mixer directory. Replace its contents with the following:
import Foundation
import React

@objc(AddRatingManager)
class AddRatingManager: NSObject {

  var bridge: RCTBridge!

  @objc func dismissPresentedViewController(_ reactTag: NSNumber) {
    DispatchQueue.main.async {
      if let view = self.bridge.uiManager.view(forReactTag: reactTag) {
        let presentedViewController: UIViewController! = view.reactViewController()
        presentedViewController.dismiss(animated: true, completion: nil)
      }
    }
  }
}
This class contains dismissPresentedViewController(_:), which takes in a tag tied to the root view. The method then executes code on the main thread, looks for a view registered to that tag and finds the corresponding view controller. It then dismisses the view controller.
Now you’ll create a bridge implementation to make your module known to the bridge.
Create a new, empty Objective-C file named AddRatingManagerBridge.m and save it in the Mixer folder. When prompted, do not create an Objective-C bridging header file.
Add the following content to AddRatingManagerBridge.m:
#import "RCTBridgeModule.h"

@interface RCT_EXTERN_MODULE(AddRatingManager, NSObject)

RCT_EXTERN_METHOD(dismissPresentedViewController:(nonnull NSNumber *)reactTag)

@end
When the bridge initializes, it looks for custom native modules declared via RCT_EXTERN_MODULE and registers them. In the code above, AddRatingManager ends up on a NativeModules list. The bridge is aware of exported methods via the RCT_EXTERN_METHOD declaration.
Your next task is to edit AddRatingApp.js to wire up the Cancel button to calls the native code.
First, import the NativeModules library, like so:
  ...
  NativeModules,
} from 'react-native';
Then, import the AddRatingManager native module by adding the following statement just before the spot where you define the styles:
const { AddRatingManager } = NativeModules;
Modify _renderNavLeftItem to call the dismiss method defined in the native module. Replace onPress with the code below:
onPress={() => {
  AddRatingManager.dismissPresentedViewController(this.props.rootTag);
}}
Note that you’re passing in the rootTag prop that was previously passed during the root view set up. It provides a handle back to the React Native view that’s displayed.
Rebuild the app in Xcode and navigate to your React Native view. Tap Cancel and the React Native view should dismiss:

Adding Save Logic
Create a new JavaScript file named Rating.js and save it in the js directory. Add the following content to the file:
'use strict';

import React from 'react';
import ReactNative, {
  StyleSheet,
  Text,
  View,
  Image,
  TouchableOpacity,
} from 'react-native';

const styles = StyleSheet.create({
  container: {
    flex: 1,
    marginTop: 100,
    alignItems: 'center',
    backgroundColor: 'white',
  },
  instructions: {
    fontSize: 20,
    color: 'black',
    marginBottom: 20,
  },
  ratings: {
    flexDirection: 'row',
  },
  icon: {
    width: 52,
    height: 58,
    margin: 5
  },
});

class Rating extends React.Component {
  // 1
  _onPress(rating) {
    console.log("Rating selected: " + rating);
  }

  render() {
    // 2
    var ratings = [];
    for (var k = 1; k <= 5; k++) {
      var key = 'rating-'+k;
      // 3
      var ratingImage = (k <= this.props.rating) ?
        <Image style={styles.icon} source={require('./images/star_on.png')} /> :
        <Image style={styles.icon} source={require('./images/star_off.png')} />;
      // 4
      var rating =
        <TouchableOpacity key={key} onPress={this._onPress.bind(this, k)}>
          {ratingImage}
        </TouchableOpacity>;
      ratings.push(rating);
    }
    // 5
    return (
      <View style={styles.container}>
        <Text style={styles.instructions}>What did you think about this mixer?</Text>
        <View style={styles.ratings}>
          {ratings}
        </View>
      </View>
    );
  }
}

module.exports = Rating;
Here are the interesting parts in the above code:
- Create a handler that’s invoked when you tap a rating image.
- Loop through the maximum number of ratings.
- Based on the passed in rating, decide whether to show a highlighted rating image.
- Wrap the image in
TouchableOpacityto handle touch events. - Return the view with a call to action and the rating images.
Open AddRatingApp.js; you need to configure it to use the new Rating component.
First, import the component:
const Rating = require('./Rating');
Then, replace _renderScene() with the following code:
_renderScene(route, navigator) {
  return (
    <Rating
      title={route.title}
      navigator={navigator}
      rating={this.props.currentRating}
    />
  );
}
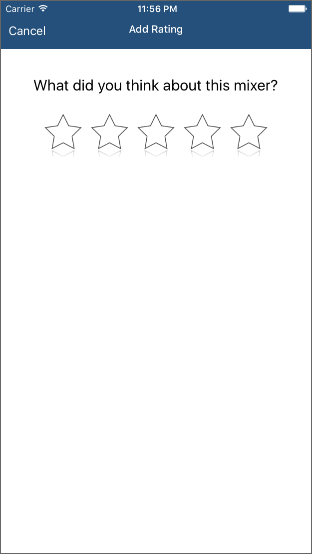
Navigate to an add rating view in your simulator. Reload the app and you should see the star ratings. Tap any of the stars:

While you won’t see any star ratings light up, you can verify that Xcode logs the correct selection:
2016-09-21 18:16:03.391 [info][tid:com.facebook.react.JavaScript] Rating selected: 2
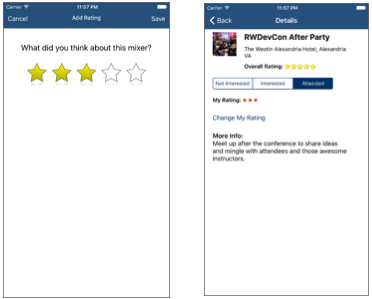
Once you’ve finished adding the save logic, the stars should change color to reflect your selection.
You’ll first work on the native side of the save logic by exporting a method you can call from JavaScript.
Open AddRatingManager.swift and add the following code just before the end of the class:
@objc func save(_ reactTag: NSNumber, rating: Int, forIdentifier identifier: Int) -> Void {
  // Save rating
  UserDefaults.standard.set(rating, forKey: "currentRating-\(identifier)")
  dismissPresentedViewController(reactTag)
}
This saves the passed in rating to NSUserDefaults with a key tied to the mixer’s identifier. It then dismisses the view controller by calling the previously defined dismissPresentedViewController(_:).
Next, open AddRatingManagerBridge.m and add the following before the end:
RCT_EXTERN_METHOD(save:(nonnull NSNumber *)reactTag rating:(NSInteger *)rating forIdentifier:(NSInteger *)forIdentifier)
Since you’ve made changes to the native side, rebuild and run the app in Xcode. There should be no changes in behavior at this point.
Now that the native side is all set up, it’s time to turn your attention to the JavaScript side. Open AddRatingApp.js and add a constructor to store the mixer identifier and rating in the component’s state:
constructor(props) {
  super(props);
  this.state = {
    identifier: props.identifier,
    currentRating: props.currentRating,
  }
}
Next, create the following handler to store the user-selected rating in the currentRating state variable:
onRatingSelected(selectedRating) {
  this.setState({
    currentRating: selectedRating,
  });
}
You’ll call this new method shortly from the Rating component.
In _renderScene, update Rating to look like the following:
<Rating
  title={route.title}
  navigator={navigator}
  rating={this.state.currentRating}
  ratingSelectionHandler={this.onRatingSelected.bind(this)}
/>
Instead of passing in currentRating from props to the Rating component, you pass it in from state. You also pass the in a new prop for the handler that will trigger on a rating selection.
Open Rating.js and modify _onPress to call the newly passed in prop with the selected rating:
_onPress(rating) {
  if (this.props.ratingSelectionHandler) {
    this.props.ratingSelectionHandler(rating);
  }
}
The code passes back the selected rating which updates the current rating state in the parent component. This in turn re-renders the Rating component.
In the simulator, navigate to a mixer and tap Add Rating. Now when you make a selection, the corresponding number of stars are illuminated. Yay!

Time to finish the save action. Open AddRatingApp.js and replace the code that renders the Save button with the following:
_renderNavRightItem(route, navigator, index, navState) {
  if (this.state.currentRating > 0) {
    return (
      <TouchableOpacity
        onPress={() => {
          AddRatingManager.save(
            this.props.rootTag,
            this.state.currentRating,
            this.state.identifier
          );
        }}
        style={styles.navBarRightButton}>
        <Text style={[styles.navBarText, styles.navBarButtonText]}>
          Save
        </Text>
      </TouchableOpacity>
    );
  }
  return null;
}
The Save button will now be hidden until you make a rating selection. The onPress handler now calls the AddRatingManager native module’s save() to save the selection in the native side.
Reload the app, and you’ll notice that the Save button is initially hidden:
Select a rating and the Save button should appear. Tap Save, and the view should be dismissed and the rating reflected in the detail view: