Windows and WindowController Tutorial for macOS
In this Windows and WindowController Tutorial for macOS, learn how to create a document based Cocoa app using modal windows and Sierra new tabbed interface. By Warren Burton.
Setting Up the Word Count Window
Open the Object library and drag 4 Label instances on to the contentView of the Word Count window. Line them up like the image below. Since this window can’t be resized, you don’t have to worry about automatic layout.

Select the Attributes Inspector. Change the labels’ titles to Word Count, Paragraph Count, 123456 and 123456 as in the screenshot below. (Since you’re not using Auto Layout to dynamically adjust the label’s width, you use a long placeholder text like 123456 to make sure the label is wide enough at runtime and the numbers are not truncated). Now change the alignment of all the labels to right justified.

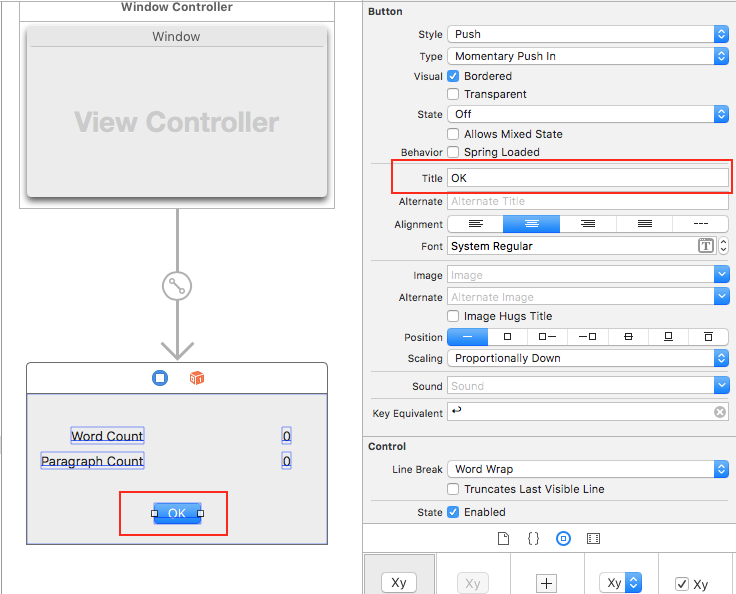
Next, drag a Push Button on to the content view.

Change the button title to OK.
Create the Word Count View Controller Class
You’ll create an NSViewController subclass for the Word Count View Controller like this:
- Select File / New / File…, choose macOS / Source / Cocoa Class.
- In the Choose Options dialog, enter
WordCountViewControllerin the Class field. - Enter
NSViewControllerin the Subclass of field. - Make sure that “Also create XIB for user interface” is unchecked.

Click Next and create the new file.
Open Main.storyboard. Select the proxy icon for the word count view controller and open the Identity Inspector. Select WordCountViewController from the Class drop-down.

Bind the Count Labels to the View Controller
Next, you’ll use Cocoa Bindings to show the count values in the view controller. Open WordCountViewController.swift, add the following inside the class implementation:
dynamic var wordCount = 0
dynamic var paragraphCount = 0
The dynamic modifier makes the two properties compatible with Cocoa Bindings.
Open Main.storyboard and select the numeric text field for the word count. Then open the Bindings inspector and do the following:
- Expand the Value binding by clicking on its disclosure triangle.
- Select Word Count View Controller from the Bind To pull down.
- Check Bind To
- Type
wordCountin the Model Key Path

Repeat the same for the paragraph count numeric label, but this time use paragraphCount into the Model Key Path.

Finally, assign a Storyboard ID to the controller.
Select the Window Controller of the Word Count window. Then, open the Identity Inspector, and enter Word Count Window Controller in the Storyboard ID field.

Presenting and Dismissing a Modal Window
You now have the storyboard components for the Word Count window ready and waiting. It’s time to open those windows and let some air in :]
In the next few sections you’ll add the code to present the window and to make it go away again. You are almost done. So, hang in there!
Show Me the Modal
Open ViewController.swift and add the following method to the class implementation:
@IBAction func showWordCountWindow(_ sender: AnyObject) {

  // 1
  let storyboard = NSStoryboard(name: "Main", bundle: nil)
  let wordCountWindowController = storyboard.instantiateController(withIdentifier: "Word Count Window Controller") as! NSWindowController

  if let wordCountWindow = wordCountWindowController.window, let textStorage = text.textStorage {

    // 2
    let wordCountViewController = wordCountWindow.contentViewController as! WordCountViewController
    wordCountViewController.wordCount = textStorage.words.count
    wordCountViewController.paragraphCount = textStorage.paragraphs.count

    // 3
    let application = NSApplication.shared()
    application.runModal(for: wordCountWindow)
    // 4
    wordCountWindow.close()
  }
}
Taking it step-by-step:
- Instantiate the Word Count window controller using the Storyboard ID you specified before.
- Set the values retrieved from the text view’s storage object (word and paragraph count) as the relevant word count view controller properties. Thanks to Cocoa Bindings, the text fields will automatically display those values.
- Show the Word Count window modally.
- Close the Word Count window once the modal state is over. Note that this statement does not execute till the modal state is completed.
Go Away, Modal
Next, you’ll add code to dismiss the Word Count window. In WordCountViewController.swift, add the following code to the class:
@IBAction func dismissWordCountWindow(_ sender: NSButton) {
  let application = NSApplication.shared()
  application.stopModal()
}
This is an IBAction that will be invoked when the user clicks the OK button on the Word Count window.
In this method you simply stop the modal session you started earlier. A modal session must always be explicitly stopped to return the app to normal operations.
Open Main.storyboard. Click on the OK button, then hold Ctrl down and drag to the proxy icon of the Word Count View Controller. Release the mouse and select dismissWordCountWindow: from the presented list:

Add UI to Invoke Modal
Still in Main.storyboard, go to the Main Menu, expand the Edit menu item, and do the following:
- From the Object Library, drag a Menu Item to the bottom of the Edit menu.
- Select the Attributes Inspector and set the title to Word Count.
- Create a keyboard shortcut by entering Command – K as the key equivalent.

Now, you’ll connect the new menu item to the showWordCountWindow method in ViewController.swift.
Click on the Word Count menu item, then hold Ctrl down and drag over to the First Responder in the Application scene. Select showWordCountWindow: from the list.

Here, you connected the menu item to the first responder, not directly to showWordCountWindow in ViewController. This is because the application main menu and view controller are in different storyboard scenes, and can’t be connected directly.
Build and run the app, select Edit / Word Count (or press Cmd-K), and the word count window should present itself.

Click OK to dismiss the window.
Where To Go From Here?
Here is the final version of BabyScript.
You covered a lot of ground in this windows and window controllers for macOS tutorial:
- The MVC design pattern in action.
- How to create a multi-window app.
- Typical app architecture for macOS apps.
- How to position and arrange windows with Interface Builder and via code.
- Passing actions from UI to the responder chain.
- Using modal windows to display additional information.
And more!
But it’s just the tip of the iceberg as far as what you can do with windows and window controllers. I strongly recommend that you explore Apple’s Window Programming Guide if you want to learn even more about the subject.
For a better understanding of Cocoa and how it works with the types of apps mentioned at the beginning, check out the Mac App Programming Guide. This document also expands upon the concept of multi-window document-based apps, so you’ll find ideas to keep improving BabyScript there.
If you would like to see the complete version, with saving and opening documents working, download this more complete app. It gives you an idea of how little work is needed to implement a complete document based app.
I look forward to hearing your ideas, experiences and any questions you have in the forums below!