Windows and WindowController Tutorial for macOS
In this Windows and WindowController Tutorial for macOS, learn how to create a document based Cocoa app using modal windows and Sierra new tabbed interface. By Warren Burton.
Update note: This Windows and WindowController Tutorial for macOS has been updated to Xcode 8 and Swift 3 by Warren Burton. The original tutorial was written by Gabriel Miro.
Windows are the “containers” for the user interfaces presented by all macOS apps. They define the area on the screen that the app is currently responsible for, and allow users to interact using a well-understood multi-tasking paradigm. macOS apps fall into one of the following categories:
- Single-window utility like Calculator
- Single-window library-style “shoebox” like Photos
- Multi-window document-based like TextEdit
Regardless of which category an app falls into, nearly every macOS app makes use of the Model-View-Controller (MVC) relationship, a core design pattern.
In Cocoa, a window is an instance of the NSWindow class, and the associated controller object is an instance of the NSWindowController class. In a well-designed app, you typically see a one-to-one relationship between a window and its controller. The third component of the MVC paradigm, the model layer, varies according to your app type and design.
In this tutorial, you’ll create BabyScript, a multi-window document-based app inspired by TextEdit. In the process, you’ll learn about:
- Windows and window controllers
- The document architecture
NSTextView- Modal windows
- The menu bar and menu items
Prerequisites
This tutorial is aimed at beginners. However, you will need some basic knowledge of the following topics:
- Swift 3.1
- The latest Xcode, and in particular, storyboards
- Creating a simple Mac (macOS) app
- The First Responder and the responder chain.
If you’re not familiar with any of the above, you can brush up with some other tutorials in the Getting Started section of the macOS tutorials page.
Getting Started
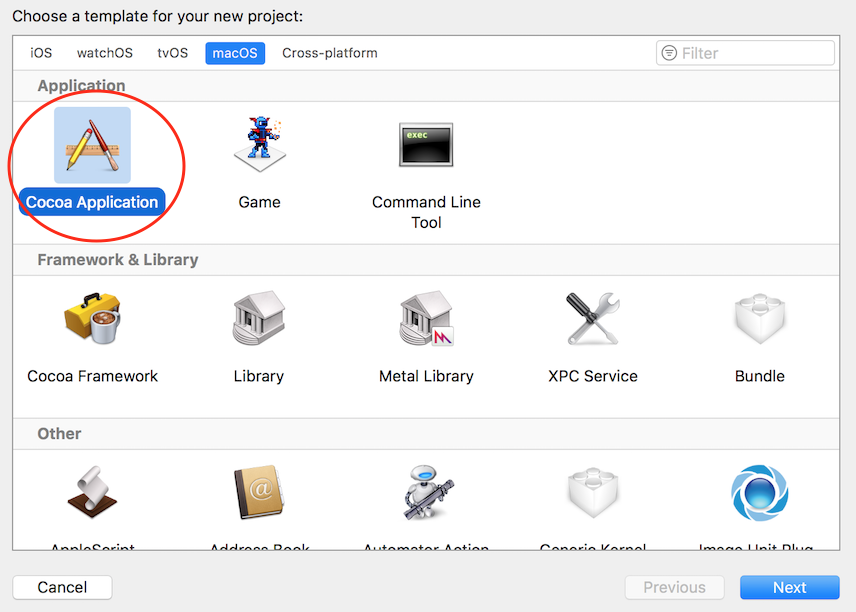
Launch Xcode, and choose File / New / Project…. Select macOS / Application / Cocoa Application, and click Next.
In the next screen, fill out the fields as indicated below. Make sure that Create Document-Based Application is checked, that the Document Extension is set to “babyscript”, and the rest of the options are unchecked.
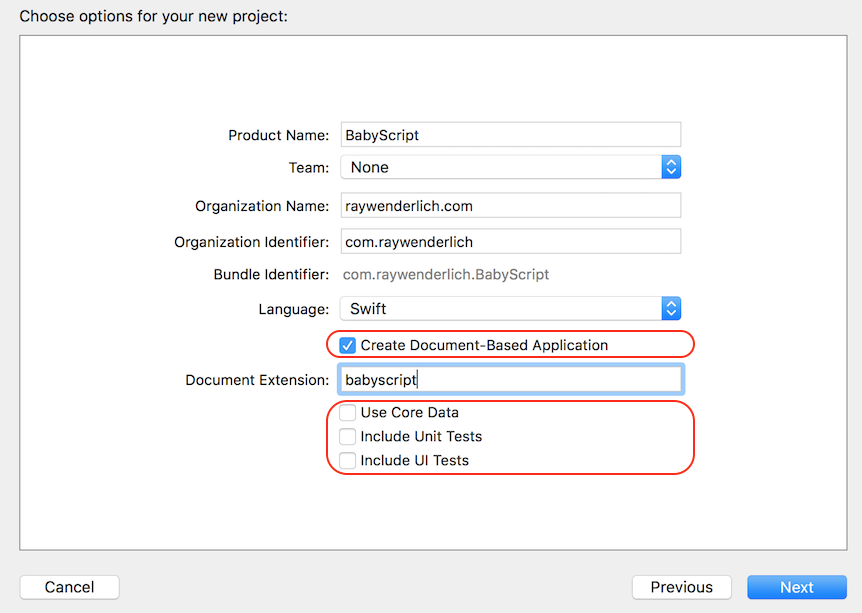
Click Next and save your project.
Build and run, and you will see this window:

To open more documents, select File / New (or press Command-N). All the new documents are positioned in the same place, so you’ll only see the top document until you drag them around. You will fix this very soon.

Documents: Under the Hood
Now you’ve seen it in action, let’s take a few minutes to see how a document based app works.
Document Architecture
A document is an instance of the NSDocument class that acts as the controller for the data or model in memory – you can view this model in a window. It can be written to or read from a disk or iCloud.
NSDocument is an abstract class, which means that you always create a subclass of it because on its own it does not provide enough functionality to work.
The other two major classes in the document architecture are NSWindowController and NSDocumentController.
These are the roles of each primary class:
-
NSDocument: Creates, presents and stores document data -
NSWindowController: Manages a window in which a document is displayed -
NSDocumentController: Manages all of the document objects in the app
Here’s a chart that shows how these classes work together:

Disabling Document Saving and Opening
The document architecture provides built-in mechanisms for saving/opening documents. However, this is one of the things you need to complete for yourself in a subclass.
Open Document.swift. You’ll find the empty implementation of data(ofType:), for writing to files, and read(from:ofType:) for reading from files.
Saving and opening documents is outside the scope of this tutorial, so you’ll make some changes to disable this behaviour and avoid any confusion in functionality.
Open Document.swift and replace the autosavesInPlace implementation with this:
override class func autosavesInPlace() -> Bool {
  return false
}
The above disables the autosave feature. Now, you need to disable all menu items related to opening and saving. But before you do, notice that all the functionality you would expect is already there. For example, build and run, then select File / Open. Notice the Finder dialog box, including controls, sidebar, toolbar etc., is there:

When it has no action defined, a menu item is rendered useless. So, you’ll disconnect actions that are defined for the menu items you need to disable.

Open Main.storyboard. Go to the Application Scene and select File / Open menu item in the Main Menu. Then, switch to the Connections Inspector tab on the right sidebar. As you can see, it connects the menu action to the first responder via the openDocument: selector. Delete this connection by clicking on the x as shown below:

Repeat this step to delete the actions for Save, Save As and Revert to Saved menu items.
And then, delete the Open Recent menu item entirely.
Now, open Document.swift and add this method to the class implementation to show an alert when you try to save. You’ll see this alert later on in the tutorial.
override func save(withDelegate delegate: Any?, didSave didSaveSelector: Selector?, contextInfo: UnsafeMutableRawPointer?) {
  let userInfo = [NSLocalizedDescriptionKey: "Sorry, no saving implemented in this tutorial. Click \"Don't Save\" to quit."]
  let error =  NSError(domain: NSOSStatusErrorDomain, code: unimpErr, userInfo: userInfo)
  let alert = NSAlert(error: error)
  alert.runModal()
}
Build and Run. Select the File menu and check that it looks like this:

Now that you’ve finished breaking the windows, you can begin to put some new glass in :]
Window Position
The first thing you’ll fix is the issue of windows appearing exactly on top of each other when you create new documents.
You will do this by creating a subclass of NSWindowController and adding some code to it to control the initial location of the document window.
Create a Subclass of NSWindowController
Select the BabyScript group in the Project Navigator, and choose File / New / File…. In the dialog that pops up, select macOS / Source / Cocoa Class and click Next.
Create a new class called WindowController and make it a subclass of NSWindowController. Make sure the checkbox to create a XIB is unchecked, and the Language is set to Swift.

Click Next and choose the location to save the new file.
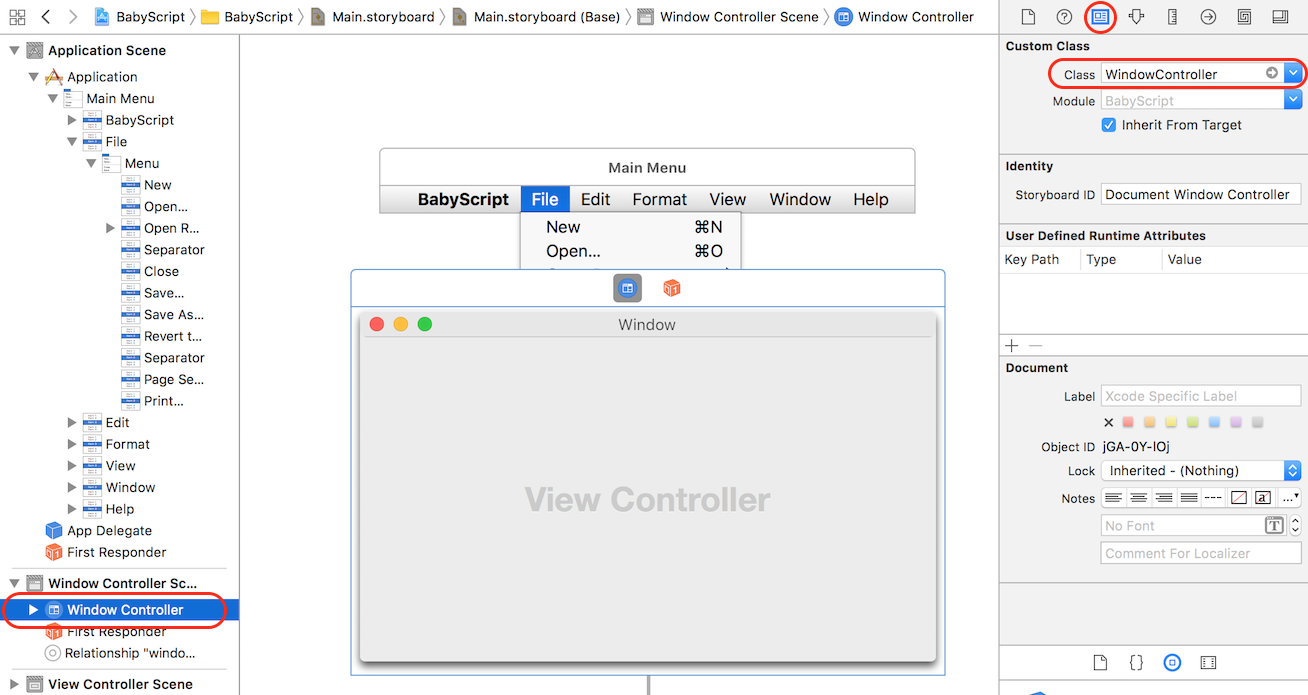
Next, you need to make sure that your window controller on the storyboard is an instance of WindowController. Open Main.storyboard, and select Window Controller in the Window Controller Scene. Open the Identity Inspector and select WindowController in the Class drop-down.