Windows and WindowController Tutorial for macOS
In this Windows and WindowController Tutorial for macOS, learn how to create a document based Cocoa app using modal windows and Sierra new tabbed interface. By Warren Burton.
Enable the Font Panel
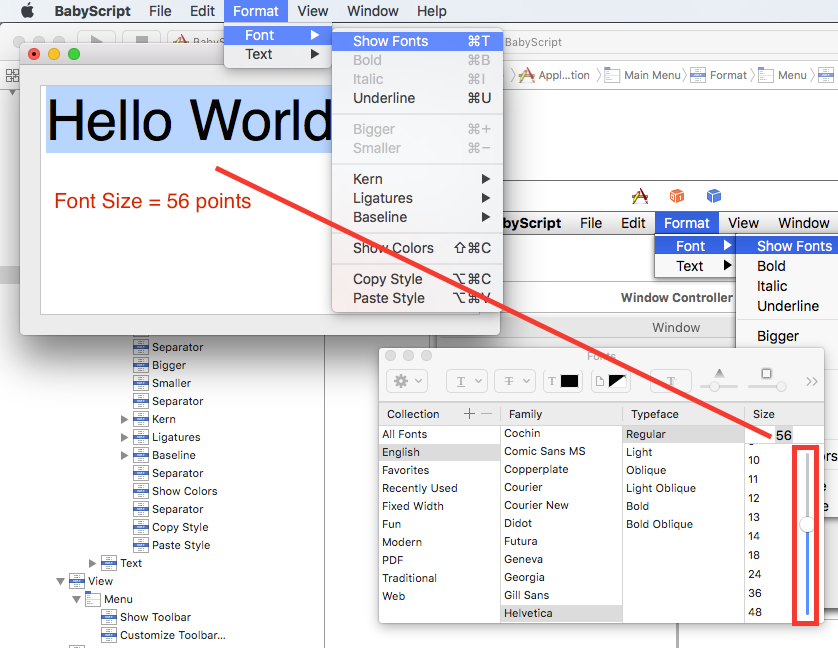
In Main.storyboard, go to the main menu, click on the Format menu, then on Font, then on Show Fonts.
Go to the Connections Inspector and you’ll see that no actions are defined for this menu item. This explains why the menu item is disabled, but what do you connect it to?
The action is already defined in the code imported indirectly by Xcode as part of Cocoa – you just need to make the connection. Here’s what you do:
- While holding down the Ctrl key click Show Fonts and drag it to the First Responder in the Application Scene. Then release the mouse.
- A window with a scrollable list of all the available actions will pop up. Look for and select
orderFrontFontPanel:. You can also start typingorderFrontFontPanelto find it more quickly. - Take a look at the Connections Inspector with Show Fonts selected. You’ll see the menu is now connected to
orderFrontFontPanel:of the first object in the responder chain that responds to this selector.

Build and run the app, then enter some text and select it. Choose Format / Font / Show Fonts to open the fonts panel (or press Cmd-T). Play with the vertical slider on the right side of the font panel, and observe how the text size changes in real time.
You didn’t write a single line of code, yet you have the power to change the font size. How did that work? That’s because the NSFontManager and NSTextView classes do most of the heavy lifting for you.
-
NSFontManageris the class that manages the font conversion system. It implements the methodorderFrontFontPanel, so when the responder chain forwards the message to it, it shows the system’s default font panel. - When you change the font attributes in the panel,
NSFontManagersends achangeFontmessage to the First Responder. -
NSTextViewimplementschangeFontand it’s the first object in the responder chain because you just selected some text. So, when the font attributes change, it automatically modifies the font of the selected text accordingly.
Initialize the Text View with Rich Text
To see the full power of NSTextView, download some formatted text from here, to use as the initial text for the text view.
Open it with TextEdit, select all the text and copy it to the clipboard. Then, open Main.storyboard and select the Text View. Open the Attributes Inspector and paste the copied text into the Text field.
Now, switch on the Graphics and Image Editing check boxes to allow images in the text view.

Build and run, and you should see:

The image from the original text you copied is gone! How come?
You can’t add images to the Interface Builder text storage field – so the image was not stored in the storyboard. But you can drag in, or paste images in, to the text view when BabyScript is running. Have a go if you want.

After you’ve made some changes to the text, or pasted in an image, try to close the window. In the alert box that pops up, chose to save the document. You’ll now see the error alert that you set up right at the start of the tutorial. :]

Show the Ruler by Default
To show the ruler automatically when a BabyScript window opens, you’ll need an IBOutlet connected to the text view. Open ViewController.swift, and delete the default viewDidLoad implementation. Then add the following code:
@IBOutlet var text: NSTextView!

override func viewDidLoad() {
  super.viewDidLoad()
  text.toggleRuler(nil)
}
This code defines an outlet for the text view, and in viewDidLoad calls the text view toggleRuler method to show the ruler – the ruler is hidden by default.
Now you need to connect the text view to this outlet in Interface Builder.
Open Main.storyboard and click on the ViewController proxy. Hold down Ctrl, drag into the text view until it highlights, and then release the mouse. A small window with the list of Outlets will show. Select the text outlet:

Build and run, and now each editor window shows the ruler:

With two lines of code and the default functionality provided by Cocoa, you have created a mini word processor!
Stand up, stretch, have a drink, and get ready for the next section :]
Modal Windows
Modal windows are the attention seekers of the window world. Once presented, they consume all events until they are dismissed. You use them to do an activity that demands all of the user’s focus. The save and open panels that all macOS apps use are good examples of modals.
There are 3 ways to present a modal window:
- As a regular window using
NSApplication.runModal(for:). - As a sheet modal from a window using
NSWindow.beginSheet(_:completionHandler:). - Via a modal session. This is an advanced topic which won’t be covered in this tutorial.
Sheet modals appear from the top of the window that presents them. The save alert in BabyScript is an example.

You won’t take sheet modals in this tutorial any further. Instead, in the next sections you’ll learn how to present a detached modal window that shows the word and paragraph count for the active document.
Add a New Window to the Scene
Open Main.storyboard. Drag a new Window Controller from the Object Library into the canvas. This creates two new scenes: a Window Controller Scene and a View Controller Scene for its content:

Select the Window from the new Window Controller Scene and use the Size Inspector to set its width to 300 and height to 150.

With the window still selected, select the Attributes Inspector and uncheck the Close, Resize and Minimize controls. Then, set its title to Word Count.

The Close button would introduce a serious bug because clicking the button will close the window, but won’t call stopModal, so the app would remain in a “modal state”.
Having minimize and resize buttons in the title bar would be strange. Also, it’s a violation of Apple’s Human Interface Guidelines (HIG).
Now, select the View from the new View Controller Scene and use the Size Inspector to set its width to 300 and height to 150.
