Creating a PDF in Swift with PDFKit
Learn how to create a PDF, work with Core Text and Core Graphics and share the created document by building an app that displays the user’s input on a flyer that can be shared with other iOS apps. By Bill Morefield.
Adding Images
The starter project lets the user select an image from the photo library or the camera. The chosen image can be horizontal or vertical and of any size. Adding an image to the page requires sizing the image while retaining the image’s aspect ratio and orientation.
To get started, add the following method at the end of PDFCreator:
func addImage(pageRect: CGRect, imageTop: CGFloat) -> CGFloat {
  // 1
  let maxHeight = pageRect.height * 0.4
  let maxWidth = pageRect.width * 0.8
  // 2
  let aspectWidth = maxWidth / image.size.width
  let aspectHeight = maxHeight / image.size.height
  let aspectRatio = min(aspectWidth, aspectHeight)
  // 3
  let scaledWidth = image.size.width * aspectRatio
  let scaledHeight = image.size.height * aspectRatio
  // 4
  let imageX = (pageRect.width - scaledWidth) / 2.0
  let imageRect = CGRect(x: imageX, y: imageTop,
                         width: scaledWidth, height: scaledHeight)
  // 5
  image.draw(in: imageRect)
  return imageRect.origin.y + imageRect.size.height
}
Here’s how this code fits the image onto the page.
- Define that the image can be at most 40% of the page’s height and 80% of the page’s width.
- Next, you calculate the ratio of the maximum width to the actual width of the image, then do the same for the height. You take the smaller of these two ratios as the dimension to resize the image against. This ratio maximizes the size of the image while ensuring that it fits within the constraints.
- Calculate the scaled height and width for the image using the ratio.
- Calculate the horizontal offset to center the image, just as you did earlier with the title text. Create a rectangle at this coordinate with the size you’ve calculated.
- Draw the image using
draw(in:)onUIImage. This method scales the image to fit within the rectangle. Finally, return the coordinate of the bottom of the image to the caller, just as you did with the title text.
You’ll insert the image between the title and the body text to match the flyer design. In createFlyer(), replace the call to addBodyText(pageRect:textTop:) with the following:
let imageBottom = addImage(pageRect: pageRect, imageTop: titleBottom + 18.0)
addBodyText(pageRect: pageRect, textTop: imageBottom + 18.0)
Next, you need to pass the image to PDFCreator. Open FlyerBuilderViewController.swift and replace the implementation of prepare(for:sender:) with:
if
  let title = flyerTextEntry.text,
  let body = bodyTextView.text,
  let image = imagePreview.image {
    let pdfCreator = PDFCreator(title: title, body: body,
                                image: image, contact: "")
    vc.documentData = pdfCreator.createFlyer()
}
Build and run the app and you should see your image on the page. Try photos of different sizes and orientations and you can see how the code fits them onto the page.

Drawing Graphics
Flyers often include tear-offs at the bottom with contact information that readers can take with them. Your next step will add that feature to the flyer.
You’ll implement the tear-offs in two steps. First, you’ll add lines on the page to separate the tear-off tabs. Then you’ll add the contact information to each tab.
Begin by adding a new method at the end of PDFCreator.
// 1
func drawTearOffs(_ drawContext: CGContext, pageRect: CGRect,
                  tearOffY: CGFloat, numberTabs: Int) {
  // 2
  drawContext.saveGState()
  // 3
  drawContext.setLineWidth(2.0)

  // 4
  drawContext.move(to: CGPoint(x: 0, y: tearOffY))
  drawContext.addLine(to: CGPoint(x: pageRect.width, y: tearOffY))
  drawContext.strokePath()
  drawContext.restoreGState()

  // 5
  drawContext.saveGState()
  let dashLength = CGFloat(72.0 * 0.2)
  drawContext.setLineDash(phase: 0, lengths: [dashLength, dashLength])
  // 6
  let tabWidth = pageRect.width / CGFloat(numberTabs)
  for tearOffIndex in 1..<numberTabs {
    // 7
    let tabX = CGFloat(tearOffIndex) * tabWidth
    drawContext.move(to: CGPoint(x: tabX, y: tearOffY))
    drawContext.addLine(to: CGPoint(x: tabX, y: pageRect.height))
    drawContext.strokePath()
  }
  // 7
  drawContext.restoreGState()
}
- This new method takes several parameters. First comes the graphics context to draw on (more on that in a moment) and then comes the rectangle for the page. You also pass the location for the top of the tabs along with the number of tabs to create.
- You save the current state of the graphics context. Later, you'll restore the context, undoing all changes made between the two calls. This pairing keeps the environment consistent at the start of each step.
- The code then sets the width of stroked lines to two points.
- Next, you draw a horizontal line from the left to right side of the page at the passed height and then restore the state saved earlier.
- After saving the current context, you draw dashed vertical lines between the tabs. To create a dashed line in Core Graphics, you define an array with the length of the alternating solid and empty segments. Here, the array defines both the dashes and the spaces as 0.2 inches long.
- To calculate the width of each tab in points, you divide the width of the page by the number of tabs. Next, you loop and draw the dashed line between each tab.
- Within the loop, you calculate the horizontal location of the dividing line by multiplying the tab number by the width of each line. Then you draw the line from the top of the tab, where you drew the horizontal line, to the bottom of the page.
- After you've drawn all the lines, you restore the graphics state.
You need a Core Graphics context to pass to this method. Use cgContext on the UIGraphicsPDFRendererContext to get one.
To do this, go to createFlyer() and add the following code after addBodyText(pageRect:textTop:):
let context = context.cgContext
drawTearOffs(context, pageRect: pageRect, tearOffY: pageRect.height * 4.0 / 5.0,
             numberTabs: 8)
Build and run the app. Enter a title, body and image for the flyer and tap Preview. You should see the tear-off lines at the bottom of the page.
You'll still need to cut along the dotted lines yourself. Apps can't do everything yet. :]

So you have your tear-off tabs, but they are still blank. In the next step, you'll add contact information to the tabs.
Adding Rotated Text
Of course, you want your text to run across the long side of your pull-off tags, so you'll need to rotate the text. To do this, open PDFCreator.swift and add the following method to the end of the class:
func drawContactLabels(
    _ drawContext: CGContext,
    pageRect: CGRect, numberTabs: Int) {
  let contactTextFont = UIFont.systemFont(ofSize: 10.0, weight: .regular)
  let paragraphStyle = NSMutableParagraphStyle()
  paragraphStyle.alignment = .natural
  paragraphStyle.lineBreakMode = .byWordWrapping
  let contactBlurbAttributes = [
    NSAttributedString.Key.paragraphStyle: paragraphStyle,
    NSAttributedString.Key.font: contactTextFont
  ]
  let attributedContactText = NSMutableAttributedString(
                                string: contactInfo,
                                attributes: contactBlurbAttributes
                              )
  // 1
  let textHeight = attributedContactText.size().height
  let tabWidth = pageRect.width / CGFloat(numberTabs)
  let horizontalOffset = (tabWidth - textHeight) / 2.0
  drawContext.saveGState()
  // 2
  drawContext.rotate(by: -90.0 * CGFloat.pi / 180.0)
  for tearOffIndex in 0...numberTabs {
    let tabX = CGFloat(tearOffIndex) * tabWidth + horizontalOffset
    // 3
    attributedContactText.draw(at: CGPoint(x: -pageRect.height + 5.0, y: tabX))
  }
  drawContext.restoreGState()
}
This method is an extension of the process used to add the body text to the PDF. To make the text run vertically upward, you use a rotation transform. Rotation changes how you determine the layout. Here are the changes caused by rotating the text:
- You use
size()to find the smallest size required to draw the string in the current context. The rotation swaps the horizontal and vertical elements in the drawn text. So you use the height of the text to determine the offset to center the text in the tab, rather than the width. - You want to rotate the text 90 degrees counterclockwise. You indicate counterclockwise with a negative angle transform. Core Graphics expects angles specified in radians.
- The rotation also affects the coordinate system, as shown in the diagram below. This rotation changes the direction of the axis and the direction the coordinate increases. While the origin hasn't moved, you swap the X and Y values, as the X coordinate now decreases down the page and the Y coordinate increases to the right on the page.

Add the following line to the end of createFlyer() to draw the contact info:
drawContactLabels(context, pageRect: pageRect, numberTabs: 8)
You need to send the contact information to PDFCreator. Open FlyerBuilderViewController.swift and — one last time — replace the implementation of prepare(for:sender:) with:
guard
  segue.identifier == "previewSegue",
  let vc = segue.destination as? PDFPreviewViewController,
  let title = flyerTextEntry.text,
  let body = bodyTextView.text,
  let image = imagePreview.image,
  let contact = contactTextView.text
  else {
    return
}

let pdfCreator = PDFCreator(
  title: title,
  body: body,
  image: image,
  contact: contact
)
vc.documentData = pdfCreator.createFlyer()
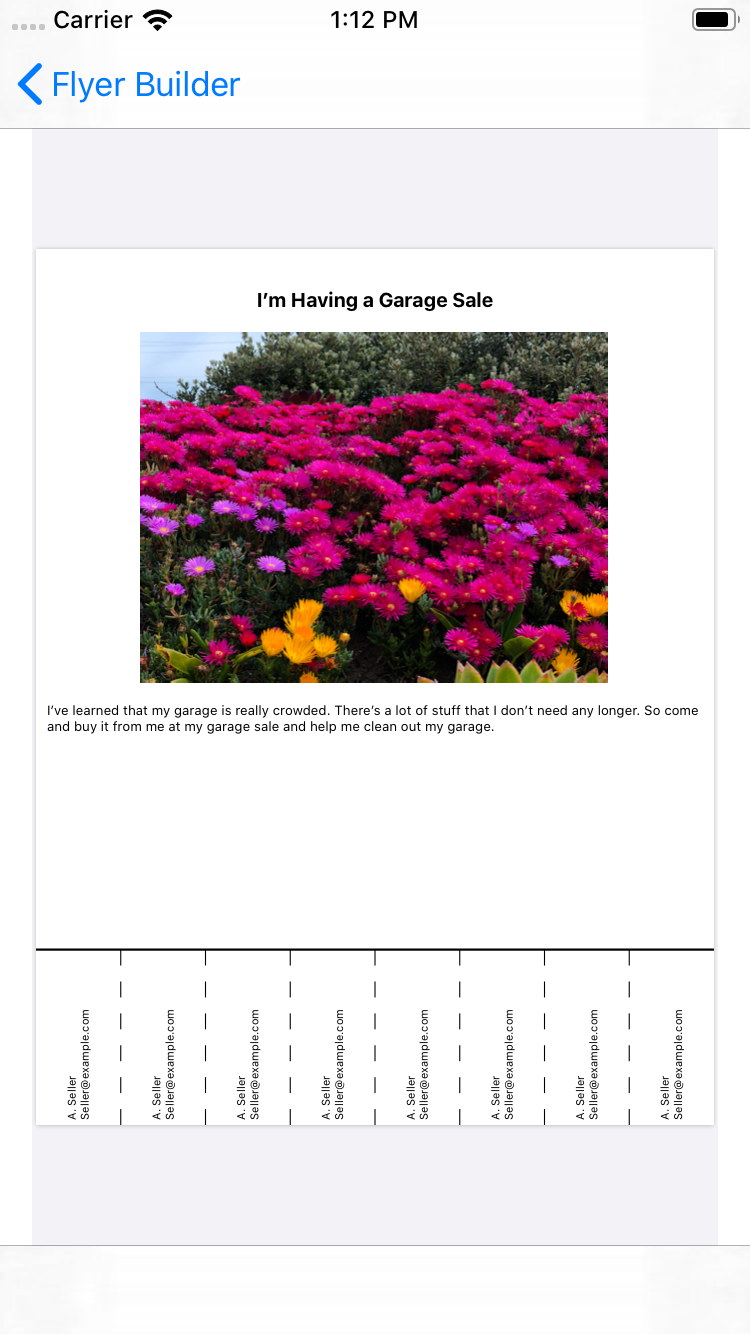
Build and run your app, enter information for all fields and then tap Preview. You should see the final PDF.
Your app creates a PDF, but it's not that useful trapped inside the app. So in the next step, you'll add the ability to share the PDF to the app.