iOS Unit Testing and UI Testing Tutorial
Learn how to add unit tests and UI tests to your iOS apps, and how you can check on your code coverage. By David Piper.
Testing Performance
From Apple’s documentation:
A performance test takes a block of code that you want to evaluate and runs it ten times, collecting the average execution time and the standard deviation for the runs. The averaging of these individual measurements form a value for the test run that can then be compared against a baseline to evaluate success or failure.
It’s simple to write a performance test: Just place the code you want to measure into the closure of measure(). Additionally, you can specify multiple metrics to measure.
Add the following test to BullsEyeTests:
func testScoreIsComputedPerformance() {
  measure(
    metrics: [
      XCTClockMetric(),
      XCTCPUMetric(),
      XCTStorageMetric(),
      XCTMemoryMetric()
    ]
  ) {
    sut.check(guess: 100)
  }
}
This test measures multiple metrics:
-
XCTClockMetricmeasures elapsed time. -
XCTCPUMetrickeeps track of CPU activity including CPU time, cycles and number of instructions. -
XCTStorageMetrictells you how much data the tested code writes to storage. -
XCTMemoryMetrictracks the amount of used physical memory.
Run the test, then click the icon that appears next to the beginning of the measure() trailing closure to see the statistics. You can change the selected metric next to Metric.

Click Set Baseline to set a reference time. Run the performance test again and view the result — it might be better or worse than the baseline. The Edit button lets you reset the baseline to this new result.
Baselines are stored per device configuration, so you can have the same test executing on several different devices. Each can maintain a different baseline dependent upon the specific configuration’s processor speed, memory, etc.
Any time you make changes to an app that might impact the performance of the method being tested, run the performance test again to see how it compares to the baseline.
Enabling Code Coverage
The code coverage tool tells you what app code your tests are actually running, so you know what parts of the app aren’t tested — at least, not yet.
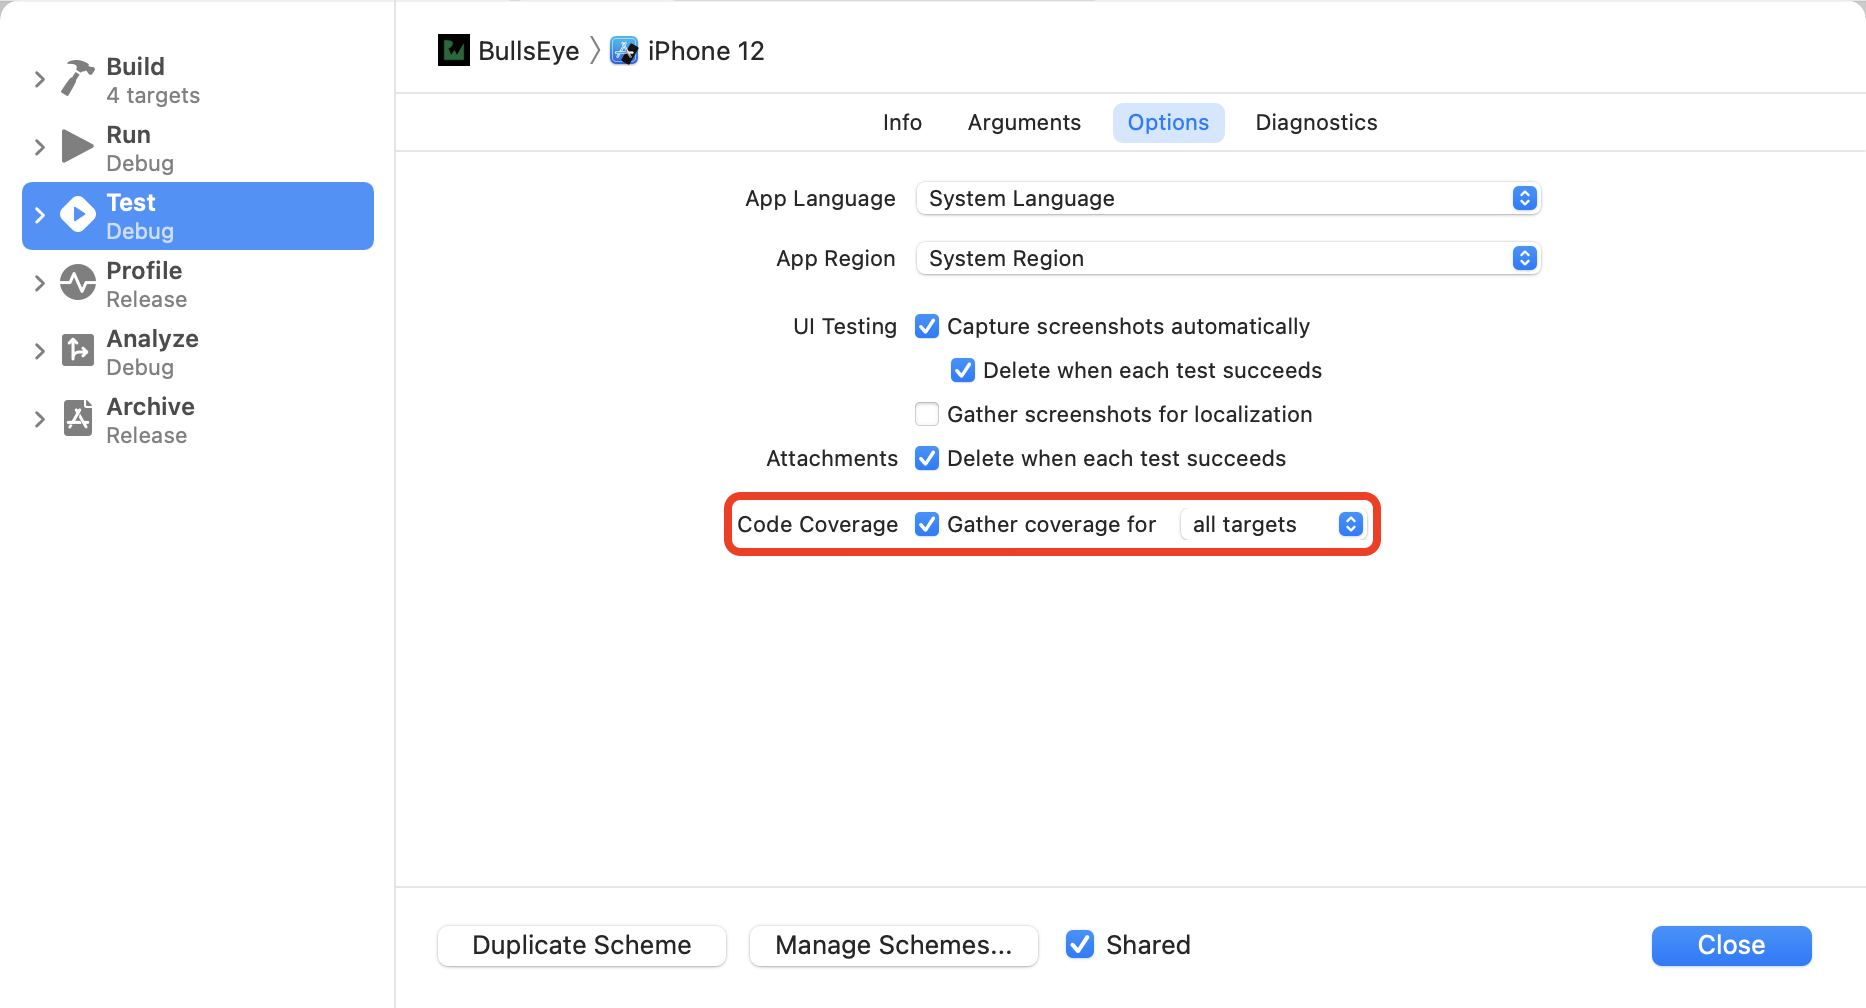
To enable code coverage, edit the scheme’s Test action and check the Gather coverage for checkbox under the Options tab:
Run all tests with Command-U, then open the Report navigator with Command-9. Select Coverage under the top item in that list:

Click the disclosure triangle to see the list of functions and closures in BullsEyeGame.swift:
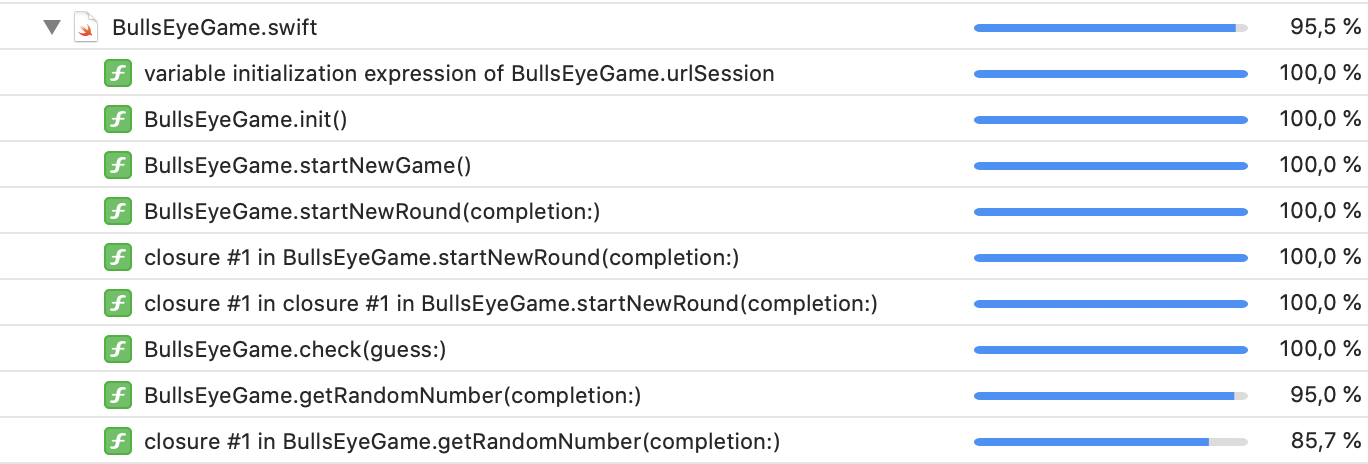
Scroll to getRandomNumber(completion:) to see that coverage is 95.0%.
Click the arrow button for this function to open the source file to the function. As you mouse over the coverage annotations in the right sidebar, sections of code highlight green or red:

The coverage annotations show how many times a test hits each code section. Sections that weren’t called are highlighted in red.
Achieving 100% Coverage?
How hard should you strive for 100% code coverage? Just Google “100% unit test coverage”, and you’ll find a range of arguments for and against this, along with debate over the very definition of “100% coverage”. Arguments against it say the last 10%–15% isn’t worth the effort. Arguments for it say the last 10%–15% is the most important, because it’s so hard to test. Google “hard to unit test bad design” to find persuasive arguments that untestable code is a sign of deeper design problems.
Where to Go From Here?
You can download the completed version of the project using the Download Materials button at the top or bottom of this tutorial. Continue developing your skills by adding additional tests of your own.
You now have some great tools to use in writing tests for your projects. I hope this iOS Unit Testing and UI Testing tutorial has given you the confidence to test all the things!
Here are some resources for further study:
Then, have a look at Apple’s Automating the Test Process with Xcode Server and xcodebuild, and Wikipedia’s continuous delivery article, which draws on expertise from ThoughtWorks.
- WWDC has several videos on the topic of testing. Two good ones from WWDC17 are: Engineering for Testability and Testing Tips & Tricks.
- The next step is automation: Continuous Integration and Continuous Delivery. Start with our tutorials Continuous Integration With GitHub, Fastlane & Jenkins and Xcode Server for iOS: Getting Started.
- If you already have an app but haven’t written tests for it yet, you might want to refer to Working Effectively with Legacy Code by Michael Feathers, because code without tests is legacy code!
- Jon Reid’s Quality Coding sample app archives are great for learning more about Test-Driven Development.
We hope you enjoyed this tutorial, and if you have any questions or comments, please join the forum discussion below!