iOS Unit Testing and UI Testing Tutorial
Learn how to add unit tests and UI tests to your iOS apps, and how you can check on your code coverage. By David Piper.
Debugging a Test
There’s a bug built into BullsEyeGame on purpose, and you’ll practice finding it now. To see the bug in action, you’ll create a test that subtracts 5 from targetValue in the given section and leaves everything else the same.
Add the following test:
func testScoreIsComputedWhenGuessIsLowerThanTarget() {
  // given
  let guess = sut.targetValue - 5

  // when
  sut.check(guess: guess)

  // then
  XCTAssertEqual(sut.scoreRound, 95, "Score computed from guess is wrong")
}
The difference between guess and targetValue is still 5, so the score should still be 95.
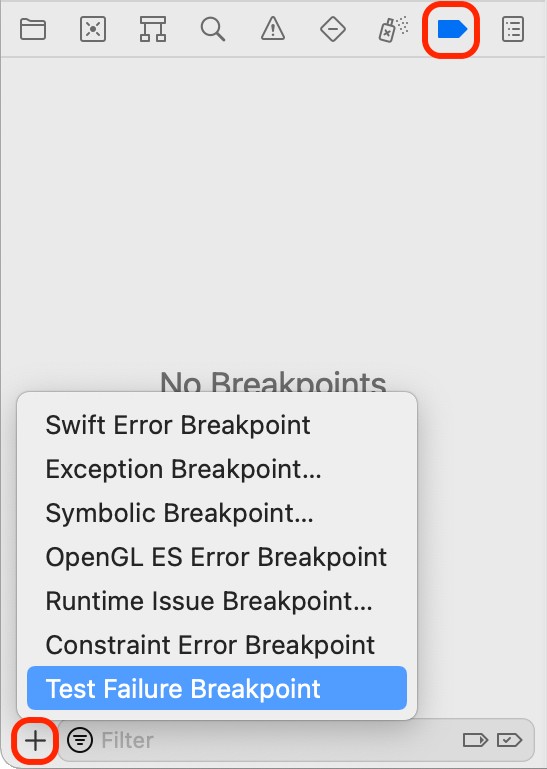
In the Breakpoint navigator, add a Test Failure Breakpoint. This stops the test run when a test method posts a failure assertion.
Run your test, and it should stop at the XCTAssertEqual line with a test failure.
Inspect sut and guess in the debug console:

guess is targetValue − 5 but scoreRound is 105, not 95!
To investigate further, use the normal debugging process: Set a breakpoint at the when statement and also one in BullsEyeGame.swift, inside check(guess:), where it creates difference. Then, run the test again, and step over the let difference statement to inspect the value of difference in the app:
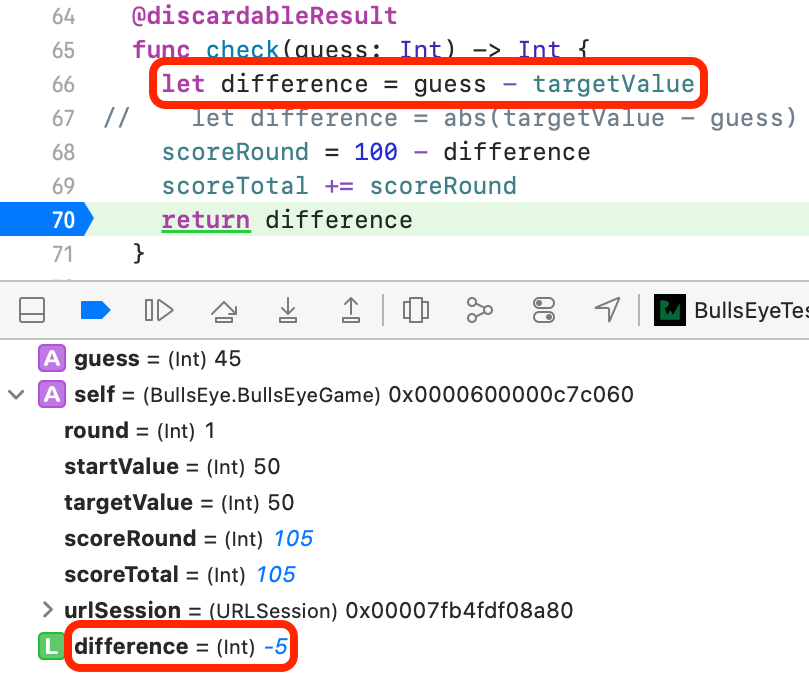
The problem is that difference is negative, so the score is 100 − (−5). To fix this, you should use the absolute value of difference. In check(guess:), uncomment the correct line and delete the incorrect one.
Remove the two breakpoints and run the test again to confirm that it now succeeds.
Using XCTestExpectation to Test Asynchronous Operations
Now that you’ve learned how to test models and debug test failures, it’s time to move on to testing asynchronous code.
BullsEyeGame uses URLSession to get a random number as a target for the next game. URLSession methods are asynchronous: They return right away but don’t finish running until later. To test asynchronous methods, use XCTestExpectation to make your test wait for the asynchronous operation to complete.
Asynchronous tests are usually slow, so you should keep them separate from your faster unit tests.
Create a new unit test target named BullsEyeSlowTests. Open the brand new test class BullsEyeSlowTests and import the BullsEye app module just below the existing import statement:
@testable import BullsEye
All the tests in this class use the default URLSession to send requests, so declare sut, create it in setUpWithError() and release it in tearDownWithError(). To do this, replace the contents of BullsEyeSlowTests with:
var sut: URLSession!

override func setUpWithError() throws {
  try super.setUpWithError()
  sut = URLSession(configuration: .default)
}

override func tearDownWithError() throws {
  sut = nil
  try super.tearDownWithError()
}
Next, add this asynchronous test:
// Asynchronous test: success fast, failure slow
func testValidApiCallGetsHTTPStatusCode200() throws {
  // given
  let urlString =
    "http://www.randomnumberapi.com/api/v1.0/random?min=0&max=100&count=1"
  let url = URL(string: urlString)!
  // 1
  let promise = expectation(description: "Status code: 200")

  // when
  let dataTask = sut.dataTask(with: url) { _, response, error in
    // then
    if let error = error {
      XCTFail("Error: \(error.localizedDescription)")
      return
    } else if let statusCode = (response as? HTTPURLResponse)?.statusCode {
      if statusCode == 200 {
        // 2
        promise.fulfill()
      } else {
        XCTFail("Status code: \(statusCode)")
      }
    }
  }
  dataTask.resume()
  // 3
  wait(for: [promise], timeout: 5)
}
This test checks that sending a valid request returns a 200 status code. Most of the code is the same as what you’d write in the app, with these additional lines:
-
expectation(description:): Returns
XCTestExpectation, stored inpromise.descriptiondescribes what you expect to happen. - promise.fulfill(): Call this in the success condition closure of the asynchronous method’s completion handler to flag that the expectation has been met.
-
wait(for:timeout:): Keeps the test running until all expectations are fulfilled or the
timeoutinterval ends, whichever happens first.
Run the test. If you’re connected to the internet, the test should take about a second to succeed after the app loads in the simulator.
Failing Fast
Failure hurts, but it doesn’t have to take forever.
To experience failure, simply change the URL in testValidApiCallGetsHTTPStatusCode200() to an invalid one:
let url = URL(string: "http://www.randomnumberapi.com/test")!
Run the test. It fails, but it takes the full timeout interval! This is because you assumed the request would always succeed, and that’s where you called promise.fulfill(). Since the request failed, it finished only when the timeout expired.
You can improve this and make the test fail faster by changing the assumption. Instead of waiting for the request to succeed, wait only until the asynchronous method’s completion handler is invoked. This happens as soon as the app receives a response — either OK or error — from the server, which fulfills the expectation. Your test can then check whether the request succeeded.
To see how this works, create a new test.
But first, fix the previous test by undoing the change you made to url.
Then, add the following test to your class:
func testApiCallCompletes() throws {
  // given
  let urlString = "http://www.randomnumberapi.com/test"
  let url = URL(string: urlString)!
  let promise = expectation(description: "Completion handler invoked")
  var statusCode: Int?
  var responseError: Error?

  // when
  let dataTask = sut.dataTask(with: url) { _, response, error in
    statusCode = (response as? HTTPURLResponse)?.statusCode
    responseError = error
    promise.fulfill()
  }
  dataTask.resume()
  wait(for: [promise], timeout: 5)

  // then
  XCTAssertNil(responseError)
  XCTAssertEqual(statusCode, 200)
}
The key difference is that simply entering the completion handler fulfills the expectation, and this only takes about a second to happen. If the request fails, the then assertions fail.
Run the test. It should now take about a second to fail. It fails because the request failed, not because the test run exceeded timeout.
Fix url and then run the test again to confirm that it now succeeds.
Failing Conditionally
In some situations, executing a test doesn’t make much sense. For example, what should happen when testValidApiCallGetsHTTPStatusCode200() runs without a network connection? Of course, it shouldn’t pass, because it won’t receive a 200 status code. But it also shouldn’t fail, because it didn’t test anything.
Fortunately, Apple introduced XCTSkip to skip a test when preconditions fail. Add the following line below the declaration of sut:
let networkMonitor = NetworkMonitor.shared
NetworkMonitor wraps NWPathMonitor, providing a convenient way to check for a network connection.
In testValidApiCallGetsHTTPStatusCode200(), add XCTSkipUnless at the beginning of the test:
try XCTSkipUnless(
  networkMonitor.isReachable,
  "Network connectivity needed for this test.")
XCTSkipUnless(_:_:) skips the test when no network is reachable. Check this by disabling your network connection and running the test. You’ll see a new icon in the gutter next to the test, indicating that the test neither passed nor failed.

Enable your network connection again and rerun the test to make sure that it still succeeds under normal conditions. Add the same code to the beginning of testApiCallCompletes().