ConstraintLayout Tutorial for Android: Complex Layouts
In this ConstraintLayout tutorial, you’ll learn how to dynamically position UI elements in relation to other elements on the screen and to animate your views. By Fuad Kamal.
Animating the Bounds of a View
Not only can you change the position of elements onscreen by affecting their constraints, but you can also change their size.
Open keyframe1.xml and select the galaxy icon, whose ID is galaxyIcon. Change the layout_height property from 90dp to 10dp.
Note: In activity_main.xml, the height is still set to 90dp.
Build and run the app and tap the button at the bottom repeatedly. Now you can witness the expansion of the galaxy in action! :]
Using Custom Transitions to Make Animation Easier
You now have a couple of animations tied to the switch, but wouldn’t it be nice for the view to animate automatically when it first loads?
You’ll do that next, but first you’ll create a custom animation instead of using the default animation, and you’ll also customize the animation’s timing.
Add the following function to MainActivity.kt, adding the import for android.transition.AutoTransition if it isn’t added automatically:
override fun onEnterAnimationComplete() { //1
  super.onEnterAnimationComplete()

  constraintSet2.clone(this, R.layout.activity_main) //2

  //apply the transition
  val transition = AutoTransition() //3
  transition.duration = 1000 //4
  TransitionManager.beginDelayedTransition(constraintLayout, transition) //5

  constraintSet2.applyTo(constraintLayout) //6
}
- Activities can’t draw anything while the view is animating.
onEnterAnimationComplete()is the point in the app life cycle where the view animation has completed and it’s safe to call on drawing code. - This pulls the layout information from your final layout into
constraintSet2. - This creates a custom transition. In this case, you are using a built-in transition,
AutoTransition(), which first fades out disappearing targets, then moves and resizes existing targets, and finally fades in appearing targets. - This sets a duration of 1,000 milliseconds for the animation, so that it’s slow enough to be seen.
- This calls Transition Manager’s
beingDelayedTransitionfunction, but this time you also supply your custom transition. - This applies the new
ConstraintSetto the currently-displayedConstraintLayout.
Build and run the app. Now, all of the animations occur as soon as the view loads.
Animating the Circular Constraint
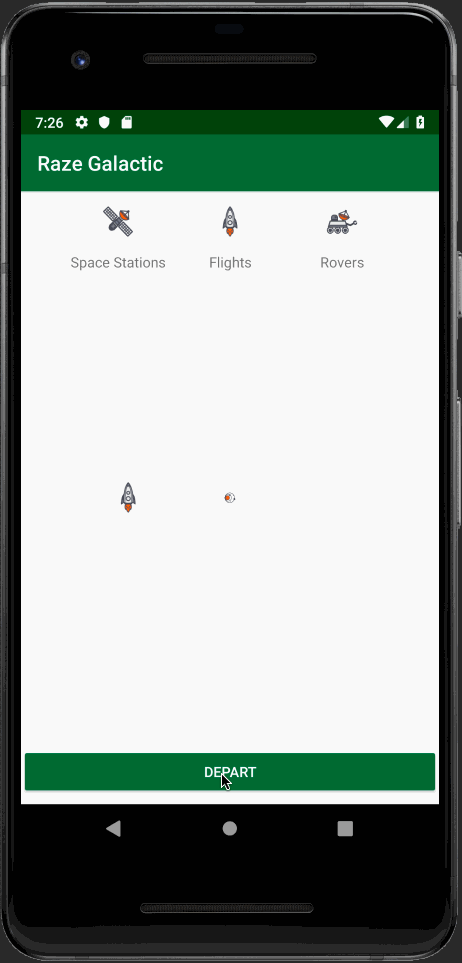
Remember that funny circular constraint you added earlier? Time to add the grand finale animation by flying the rocket around the galaxy!
To animate the rocket around the galaxy, you have to alter two properties: the angle of the circular constraint, which moves the position of the rocket around the circle, and the rotation of the rocket to complete the illusion. You also check the One Way / Round Trip switch value to determine whether the rocket should fly half a circle or one full circle.
Replace the click listener for the DEPART button in onCreate() as follows:
departButton.setOnClickListener {
  //1
  val layoutParams = rocketIcon.layoutParams as ConstraintLayout.LayoutParams
  val startAngle = layoutParams.circleAngle
  val endAngle = startAngle + (if (switch1.isChecked) 360 else 180)

  //2
  val anim = ValueAnimator.ofFloat(startAngle, endAngle)
  anim.addUpdateListener { valueAnimator ->

    //3
    val animatedValue = valueAnimator.animatedValue as Float
    val layoutParams = rocketIcon.layoutParams as ConstraintLayout.LayoutParams
    layoutParams.circleAngle = animatedValue
    rocketIcon.layoutParams = layoutParams

    //4
    rocketIcon.rotation = (animatedValue % 360 - 270)
  }
  //5
  anim.duration = if (switch1.isChecked) 2000 else 1000

  //6
  anim.interpolator = LinearInterpolator()
  anim.start()
}
- Set
startAngleto the current angle of the rocket before animation start. Depending on One Way / Round Trip switch,endAngleis either 180 or 360 degree in addition tostartAnglevalue. -
ValueAnimatorclass provides a simple timing engine for running animations between two values. Here you providestartAngleandendAngleto create the instance ofValueAnimator. - Inside update listener of
ValueAnimatorinstance, obtain the animated value and assign it to the rocket’scircleAngleinlayoutParams. - Rotate the rocket with animated value. This will make the rocket fly in more natural direction.
- This is quite straightforward. One way animation takes 1 second, while round trip animation takes 2 seconds.
- Choose
LinearInterpolatorto make sure passengers have pleasant flight. You can tryAnticipateOvershootInterpolatorto see what will happen :] Last but not least, start the animation!
Build and run the app. Click the DEPART button and toggle the switch to make the rocket fly around the galaxy:

Congratulations! You’ve built a complex UI layout for a space travel Android app, and you’ve added some cool animations to it with just a few lines of code.
Where to Go From Here?
You can download the final version of this project using the Download Materials button at the top or bottom of this tutorial.
If you enjoyed building the view animations, you might like to try the more sophisticated animation possibilities provided by MotionLayout, which is in alpha as of this writing. As always, you can also look at the documentation for ConstraintLayout.
For more on MotionLayout see this presentation: New Features in ConstraintLayout 2.0: Designing With Constraints — Sean McQuillan — Android Summit 2018 — YouTube.
Hopefully, you’ve enjoyed this tutorial. If you have any comments, feel free to hop into the forum below!