iOS App with Kotlin/Native: Getting Started
In this tutorial, you’ll build an iOS app using Kotlin/Native. You’ll also take a look at the AppCode IDE from JetBrains! By Eric Crawford.
Adding an Objective-C Third-Party Library
Now that you have one mock data pin showing on the map, how about livening up the map with some real data?
Thanks to NASA, you have access to a rich collection of historical meteorite data. You can view the tabular format here, but your app will be consuming the JSON API located here.
Now that you can locate historical meteorite data, how do you do a network call to get it? You will use a popular third-party Objective-C library called AFNetworking. The framework is already included in the project as AFNetworking.framework; you just need to make it Kotlin friendly.
Kotlin/Native provides headers for the iOS platform frameworks out of the box, but how can you call third-party iOS libraries?
Creating your own headers for interoperability is done via a tool called cinterop. This tool converts C and Objective-C headers into a Kotlin API that your code can use.
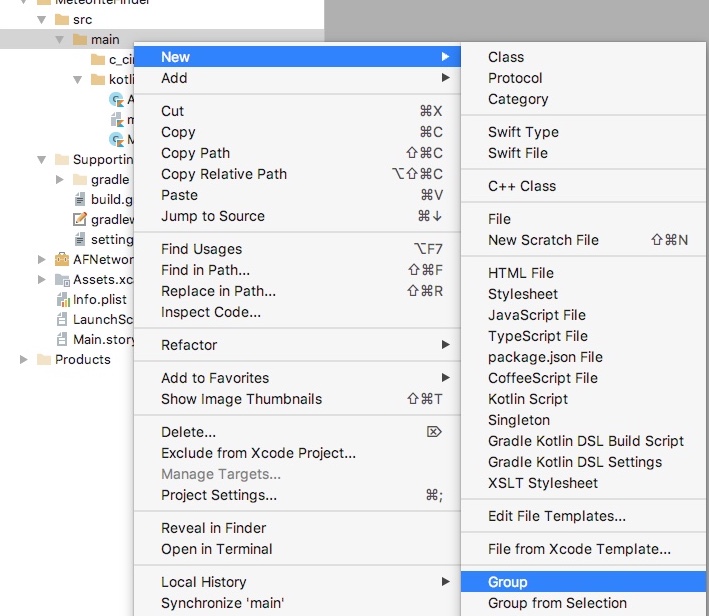
Before running this tool, you will need to create a .def file that details what frameworks to convert and how to convert them. Return to AppCode. Right-click on the main folder, then select New ▸ Group. Name the folder c_interop.
Note: This is the default location that the cinterop tool will look for def files.

Next, right-click on the c_interop folder and select New ▸ File to create a new file. Name the file afnetworking.def. Add the following to the file:
language = Objective-C
headers = AFURLSessionManager.h AFURLResponseSerialization.h AFHTTPSessionManager.h
compilerOpts = -framework AFNetworking
linkerOpts = -framework AFNetworking
Going through the snippet above:
-
languageinforms the tool of the framework language. -
headersis the list of headers to generate Kotlin API’s. Here, you set three headers that your app will use from AFNetworking. -
compilerOptsandlinkerOptsare compiler and linker options that will be passed to the tool.
That’s all the configuration needed to run the cinterop tool. Gradle provides support that will allow you to automate the cinterop tasks when you build the project.
Open build.gradle and at the end of the components.main section add the following:
// 1
dependencies {
    // 2
    cinterop('AFNetworking'){
        packageName 'com.afnetworking'
        compilerOpts "-F${productsDir}"
        linkerOpts "-F${productsDir}"
        // 3
        includeDirs{
            allHeaders "${productsDir}/AFNetworking.framework/Headers"
        }
    }
}
Reviewing this in turn:
- The
dependenciesblock lists the libraries the app depends on. -
cinteropis the block that will call into the cinterop tool. Passing a string as incinterop('AFNetworking')will use AFNetworking to name the Gradle tasks and the generated Kotlin file. You also give the library a package name so that the code is namespaced. Finally, you pass in compiler and linker options which define where to find the library. - In
includeDirs, you let cinterop search for header files inAFNetworking.framework/Headers.
The next time that you build the project, the cinterop tool will create a Kotlin friendly API around the AFNetworking library that your project can use.
Making Network Requests
With AFNetworking ready to make network calls on your behalf, you can start pulling in some real data. But first, you will create a model for the data. Under the kotlin folder, create a new file named Meteorite.kt and add the following:
// 1
class Meteorite(val json:Map<String, Any?>) {

    // 2
  val name:String by json
  val fall:String by json
  val reclat:String by json
  val reclong:String by json
  val mass:String by json
  val year:String by json

  // 3
  companion object {
      fun fromJsonList(jsonList:List<HashMap<String, Any>>):List<Meteorite> {
        val meteoriteList = mutableListOf<Meteorite>()
        for (jsonObject in jsonList) {
          val newMeteorite = Meteorite(jsonObject)
          if (newMeteorite.name != null
                        && newMeteorite.fall != null
                        && newMeteorite.reclat != null
                        && newMeteorite.reclong != null
                        && newMeteorite.mass != null
                        && newMeteorite.year != null) {
            meteoriteList.add(newMeteorite)
          }
        }
        return meteoriteList
    }
  }
}
Reviewing the code above:
- Create a
classthat models the JSON data that you will receive. - Add several properties that use Map Delegation from Kotlin to get their values. The name of each property is the key in the Map.
- Add
fromJsonList()inside of a companion object so that it can be called on the class type. This function takes a list of map objects and returns a list of valid Meteorite objects. A valid Meteorite object is one wherein none of the properties are null.
You’ll now set up a network request to retrieve real meteorite data. Go back to MeteoriteMapViewController.kt. Start by importing the AFNetworking package so that you can use it in the class:
import com.afnetworking.*
Next, under the mapView property declaration add properties to hold collections of Meteorite and MKPointAnnotation objects:
var meteoriteList = listOf<Meteorite>()
val meteoriteAnnotations = mutableListOf<MKPointAnnotation>()
Then add the following method that will load the data:
private fun loadData() {
  val baseURL = "https://data.nasa.gov/"
  val path = "resource/y77d-th95.json"
  val params = "?\$where=within_circle(GeoLocation,38.8935754,-77.0847873,500000)"

  // 1
  val url = NSURL.URLWithString("$baseURL$path$params")

  // 2
  val manager = AFHTTPSessionManager.manager()

  // 3
  manager.responseSerializer = AFJSONResponseSerializer.serializer()

    // 4
  manager.GET(url?.absoluteString!!, null, null, { _:NSURLSessionDataTask?, responseObject:Any? ->
    // 5
    val listOfObjects = responseObject as? List<HashMap<String, Any>>
    listOfObjects?.let {
      meteoriteList = Meteorite.fromJsonList(it)
      for (meteorite in meteoriteList) {
        meteoriteAnnotations.add(createAnnotation(meteorite))
       }
       mapView.addAnnotations(meteoriteAnnotations)
     }
  }, { _:NSURLSessionDataTask?, error:NSError? ->
    // 6
    NSLog("Got a error ${error}")
  })
}
Unpacking the snippet part by part:
-
NSURL.URLWithStringcreates anNSURLobject to make requests. Theparamspassed in will limit our responses to around a 300-mile radius of Arlington, VA. -
AFHTTPSessionManager.manager()is your first call to the AFNetworking framework. - Set the
managerto pass all responses back to the app as JSON using AFJSONResponseSerializer. - Invoke a
GETrequest on themanager. You passed in the absolute url, two null values, and a lambda block to handle a successful or failed response, respectively. - Successful responses are returned in this lambda. The response is cast into a list of HashMaps. Then, that list is converted into a list of Meteorite. Finally, create map annotations for each Meteorite and add it to the
mapView. - This lambda will be called if there are any networking errors; you’re just logging the error.
Finally, change the call from createAnnotation() in the viewDidLoad() method to instead be to loadData(), and update the method createAnnotation() to be the following:
private fun createAnnotation(meteorite:Meteorite) = MKPointAnnotation().apply {
  val latitude = meteorite.reclat.toDouble()
  val longitude = meteorite.reclong.toDouble()

  setCoordinate(CLLocationCoordinate2DMake(latitude, longitude))
  setTitle(meteorite.name)
  setSubtitle("Fell in ${meteorite.year.substringBefore("-")}" +
            " with a mass of ${meteorite.mass} grams")
}
With these changes, you’re passing Meteorite objects and dynamically adding pins to the map using MKPointAnnotation. You’re also using Kotlin’s Single-Expression Function format combined with the apply function to ease the process of instantiating MKPointAnnotation objects and populating their values.
Build and run the app again, then get ready to begin your quest to discover the fallen meteorites.

To zoom in/out in the iOS simulator, hold down the Option key and drag across the map.
Note: As stated earlier, Kotlin/Native is in beta and there are still some rough edges. If you are still seeing your mock meteorite, you may need to delete the build folder to force a clean build of the project.