iOS App with Kotlin/Native: Getting Started
In this tutorial, you’ll build an iOS app using Kotlin/Native. You’ll also take a look at the AppCode IDE from JetBrains! By Eric Crawford.
Kotlin has seen tremendous growth on the Java Virtual Machine (JVM). Having roughly 100% interoperability with Java allows developers to work without giving up the rich ecosystem of libraries and tools. But Java developers are not the only ones who can benefit from the language; Kotlin has spread its tentacles outside the JVM with two other variations:
- Kotlin/JS for JavaScript Development.
- Kotlin/Native for C and iOS Development.
Kotlin/Native comes with a friendly API for the iOS platform, giving developers the ability to call pretty much all of the Cocoa Touch frameworks. This means that Kotlin developers can transfer their development skills over to creating iOS apps (assuming you have a spare macOS device lying around).
In this tutorial, you will build a map-based iOS app that displays where meteorites have fallen to earth. The entire app will focus on using Kotlin/Native. We’ll keep the references to iOS classes and frameworks light in this tutorial, giving you just a taste of the possibilities without overwhelming you if you’ve never developed for iOS.
Note: This tutorial assumes that you are already familiar with the basics of Kotlin programming. If you are new to Kotlin, check out our Kotlin For Android tutorial. If you are new to Android development, check out our introductory Android tutorials first. If you’re ready to learn iOS development, check out our path to learning iOS guide on the site.
Getting Started
Prerequisites: This tutorial utilizes Kotlin/Native 0.9.3, Kotlin 1.3.0, Xcode 10.0 (CLI) and iOS 12.0. The available versions may be higher by the time you read this tutorial.
As a first step, download the materials for this tutorial by clicking the Download materials button at the top or bottom of the page. Once you’ve downloaded the materials, open the starter project in Xcode by double-clicking on the MeteoriteFinder.xcodeproj file, and then run the app by clicking on the triangle button, shown below:
![]()
Since this is the first time running the app, the Kotlin/Native compiler, which is named Konan, will download itself. Depending on your network speed, this can take 5-20 minutes or so. Subsequent builds of the app will be much faster. When the download is done and the build completes, Xcode will start the simulator and you will be greeted by a basic Hello screen.

Nice! You’ve just run your first iOS app from Kotlin, without any Objective-C or Swift source code in this project.

Now that you have the project running, it’s helpful to tour some elements of the project.
Using Kotlin/Native
It may seem magical to push a button and have Kotlin code running on an iOS device. But there are several tools and scripts behind the scenes that help pull off this illusion.
As stated earlier, the Kotlin/Native platform has its own compiler, but manually running it every time you want to build your project would not be an efficient use of time. The the Kotlin team has you covered with Gradle.
Kotlin/Native uses the Gradle Build Tool to automate the entire build process of Kotlin/Native within Xcode. The use of Gradle here means the developer can take advantage of its internal incremental build architecture, only building and downloading what’s needed, saving a developer’s precious time.
Build Phase Script
This is done from the Build Phases panel in Xcode, which you can reach by clicking on the MeteoriteFinder project ▸ MeteoriteFinder under TARGETS ▸ Build Phases. Then, expand Compile Kotlin/Native.

The script calls the gradlew tool that is part of the Gradle Build System and passes in the build environment and debugging options. Then, gradlew invokes a custom task called copyExecutable, which copies the artifacts that gradlew builds (a .kexe file) to the iOS project build directory. Finally, the script includes the artifact in the iOS executable.
Gradle Build Script
Gradle uses a build script (named build.gradle) to configure your project. You can find the build.gradle file under the Supporting Files folder in Xcode.
Look at the build.gradle file:
// 1
plugins {
    id "org.jetbrains.kotlin.platform.native" version "1.3.0"
}

components.main {
    // 2
    def productsDir = new File("").absolutePath
    // 3
    targets = ['ios_arm64', 'ios_x64']
    // 4
    outputKinds = [EXECUTABLE]
    // 5
    allTargets {
        linkerOpts '-rpath', '@executable_path/Frameworks'
        linkerOpts "-F${productsDir}"
    }
}

// 6
task copyExecutable() {
    doLast {
        def srcFile = tasks['compileDebugIos_x64KotlinNative'].outputFile
        def targetDir = getProperty("konan.configuration.build.dir")
        copy {
            from srcFile.parent
            into targetDir
        }
    }
}
In more detail:
- The
pluginsblock contains theidandversionof the Kotlin/Native Gradle plugin that you will use. - Saves the absolute path of this project in the
productsDirvariable, which you will use later. - Lists the target iOS architectures.
ios_x64is the architecture used for the iOS simulators. There are many other targets, for exampleios_arm64, which targets a physical iOS device. -
outputKindsis a list of artifacts that you would like to produce.EXECUTABLEwill produce a standalone executable that can be used to run the app. If you wanted to create a framework, you would use theFRAMEWORKoutput kind. - In the
allTargetsblock, you are passing linker options to the compiler. - The
copyExecutableblock is the task that you saw in the Build Phases section of Xcode. This script copies the generated executable from the Gradle build folder to the iOS build folder.
Necessary iOS Classes
The Build Phases script and Gradle script are required for building and loading the Kotlin aspect of the project.
There are a couple of files that any iOS project must have. In Xcode, there is the following folder structure: MeteoriteFinder project ▸ MeteoriteFinder ▸ src ▸ main ▸ kotlin. Expand these folders, and you will see two files:
- AppDelegate.kt: Works alongside the app object to ensure your app interacts properly with the system and with other apps.
- main.kt: Just holds the main method to start the app.
You won’t be touching AppDelegate.kt or main.kt, but it is good to know that you have these Kotlin files to run the app.
Now that you know how the project is built, time to start finding some Meteorites!
Adding a MKMapView to the Storyboard
First you’ll add a MKMapview component to the storyboard. This will show the locations of the Meteorites. Open Main.storyboard and delete the label hello.
Note: You may or may not have heard of a storyboard when it comes to iOS development. If you haven’t, just think of it as a file used to visually create your app’s layout.
In the Xcode toolbar, click on the Library button. When a pop-up appears, search for Map Kit View (which corresponds to MKMapView) like below:

Next, drag the Map Kit View to the phone scene where you just deleted the label. Then, drag the edges of the Map Kit View to take up the full screen.
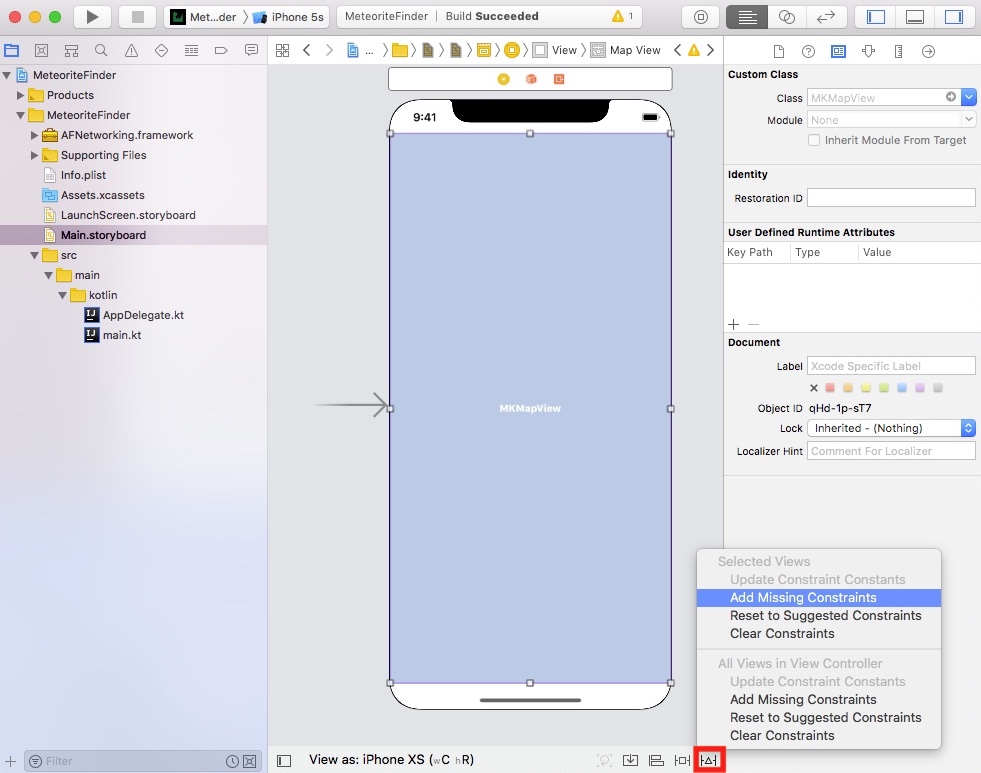
In order to show the map correctly on different device screen sizes, you’ll need to adjust the constraints. Since you only have one view to worry about, Xcode will set the constraints for you.
Select the MKMapview component you added. Then, click on the Resolve Auto Layout Issues button on the Xcode bottom toolbar. After that, select Add Missing Constraints.
Now that the Map Kit View scene has been set in the storyboard with some constraints, you’ll next add a ViewController.