Today Extension Tutorial: Getting Started
Learn how to create a today extension for your app – allowing it to present information in the notification center, search screen and lock screen. By Michael Katz.
Spruce up the UI
This looks OK, but it can still benefit from some visual tweaking. Since iOS places the widget on a blurred background, they are practically (and literally) begging for the ‘vibrancy’ effect.
Adding Vibrancy
Open MainInterface.storyboard again.
Drag a Visual Effect View with Blur from the object browser into the main view.
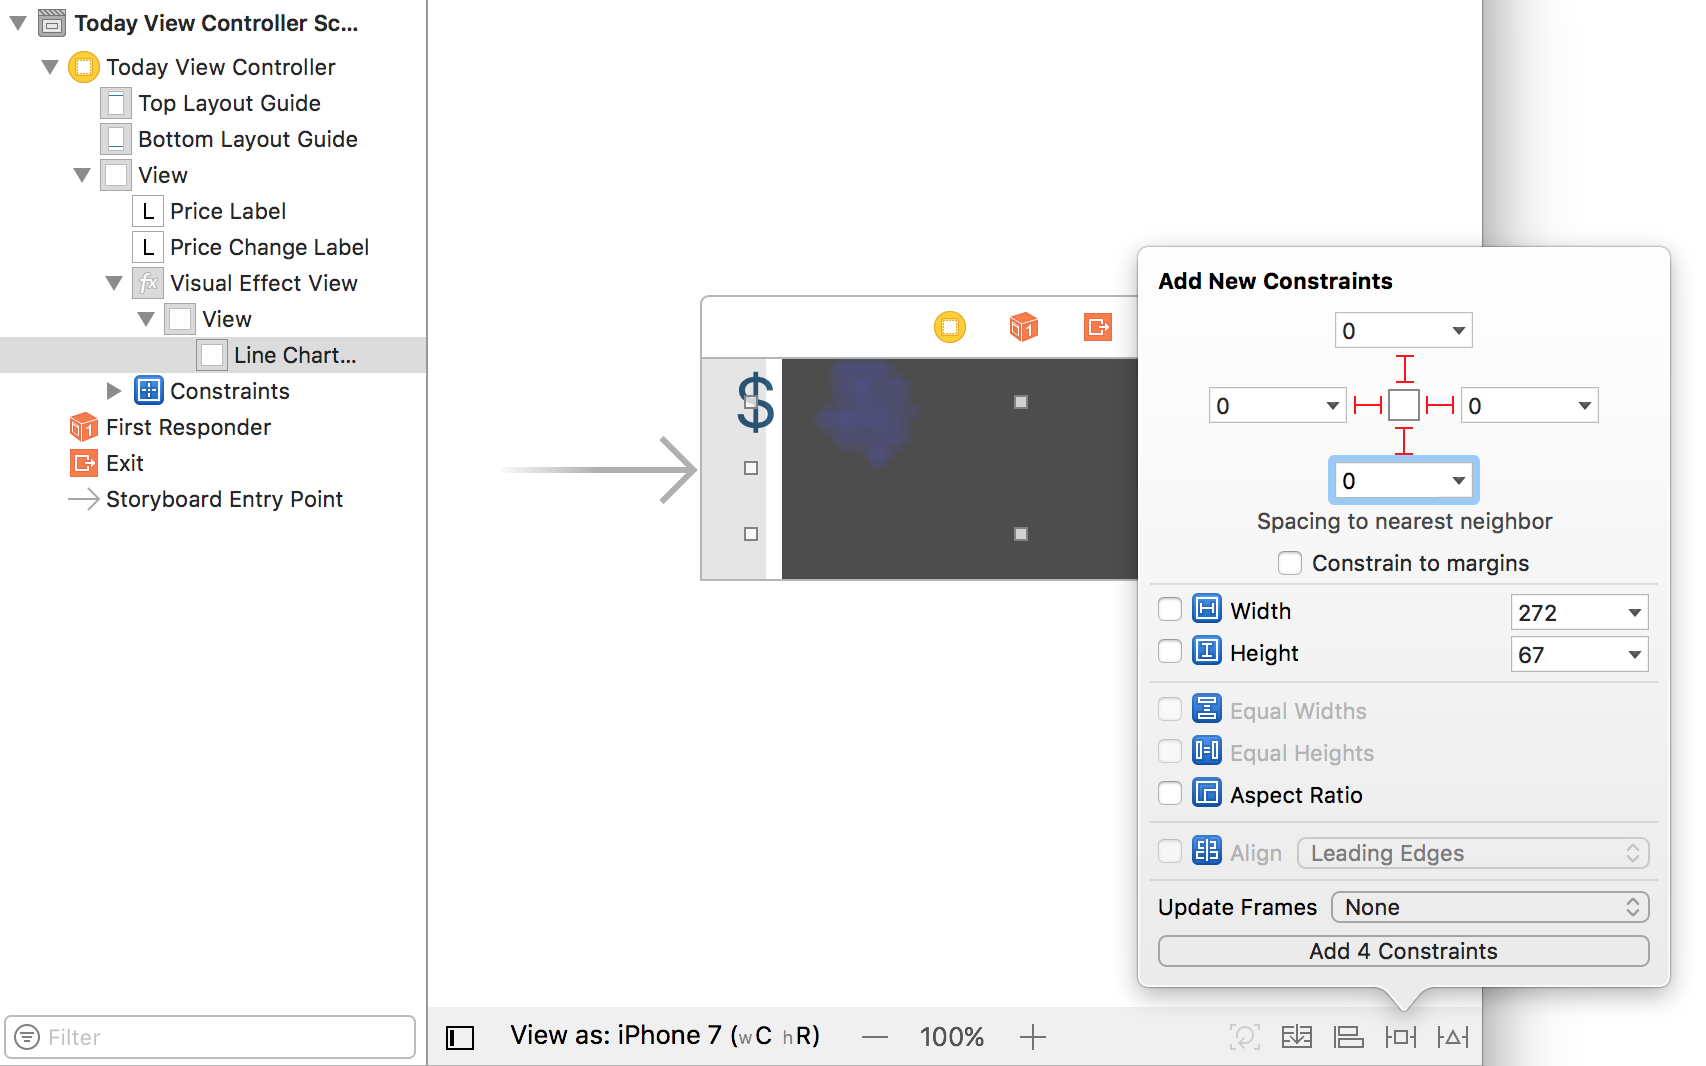
Drag the Line Chart View from the main view into the effect view’s subview. Click the Add New Constraints button and pin all four edges to the parent view with 0 padding. Make sure “Constrain to margins” is not selected. Then click Add 4 Constraints.
Next, select the Visual Effect View and recreate the line chart’s previous constraints:
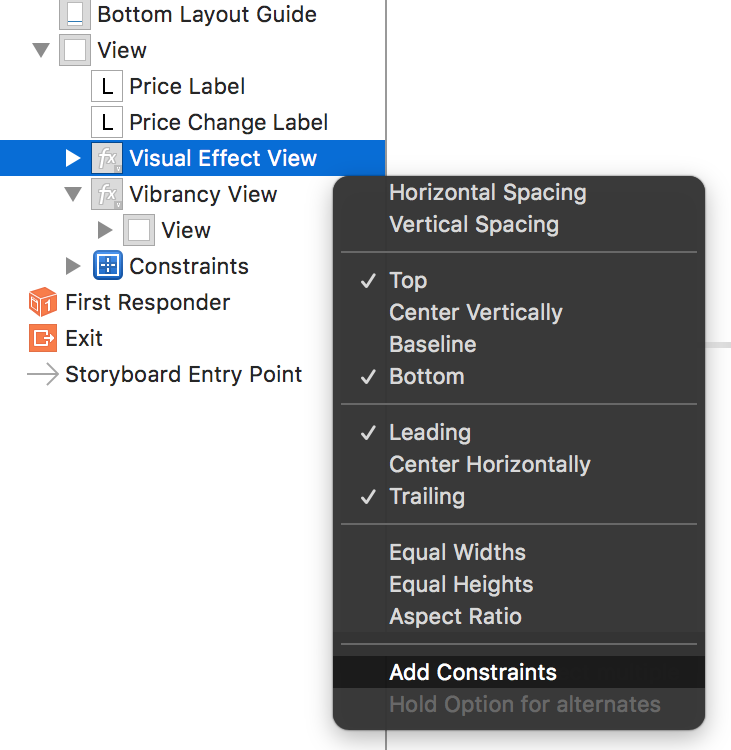
- Ctrl+drag from the effect view to the main view to bring up the constraint popup. Hold shift and select Leading Space to Container Margin, Trailing Space to Container Margin, and Vertical Spacing to Bottom Layout Guide. Then click Add Contraints.

- Ctrl+drag from the effect view to the Price Label and select Vertical Spacing.

- In the Size Inspector, change the Trailing and Leading Space constants to
0, and the Top Space and Bottom Space constants to8.

- From the menu bar, choose Editor\Resolve Auto Layout Issues\All Views in Today View Controller\Update Frames.


Finally, in the Attributes Inspector check the Vibrancy box in the Visual Effect View section. This will cause the view to change from a dark color to a clear color.
Wire up the new view
Now open the Assistant Editor. Make sure TodayViewController.swift is the active file on the right.
Ctrl+drag from Visual Effects View in the storyboard editor to the top of the TodayViewController class. In the popup dialog make sure Connection is set to Outlet, Type is set to UIVisualEffectView, and enter vibrancyView for the Name. Click Connect.

Then add the following line to the bottom of viewDidLoad:
vibrancyView.effect = UIVibrancyEffect.widgetPrimary()
This sets the vibrancy effect to the system-defined one for today extensions, ensuring that the coloring will be appropriate on screen.
Add the following to TodayViewController:
override func lineChartView(_ lineChartView: JBLineChartView!, colorForLineAtLineIndex lineIndex: UInt) -> UIColor! {
  return lineChartView.tintColor
}
The vibrancy effect sets the tintColor of anything in the contentView on a visual effect view. This is how labels and template images are automatically drawn with a vibrancy effect. For a custom view like JBLineChartView, the effect has to be applied manually. The lineChartView(_:colorForLineAtLineIndex:) delegate method is the place to do that here.
Build and run again.

Very nice! Just a tweak to the line width and this could be downright beautiful.
At the top of TodayViewController add the following:
var lineWidth: CGFloat = 2.0
This variable will be used to control the line width.
Add this method:
private func toggleLineChart() {
  let expanded = extensionContext!.widgetActiveDisplayMode == .expanded
  if expanded {
    lineWidth = 4.0
  } else {
    lineWidth = 2.0
  }
}
This uses widgetActiveDisplayMode to determine if the widget is expanded or collapsed and sets the line width for the chart accordingly.
override func lineChartView(_ lineChartView: JBLineChartView!, widthForLineAtLineIndex lineIndex: UInt) -> CGFloat {
  return lineWidth
}
This delegate method returns lineWidth for the chart drawing routine’s use.
Finally, add the following to the bottom of widgetActiveDisplayModeDidChange:
toggleLineChart()
This calls your new method to propagate the line width.
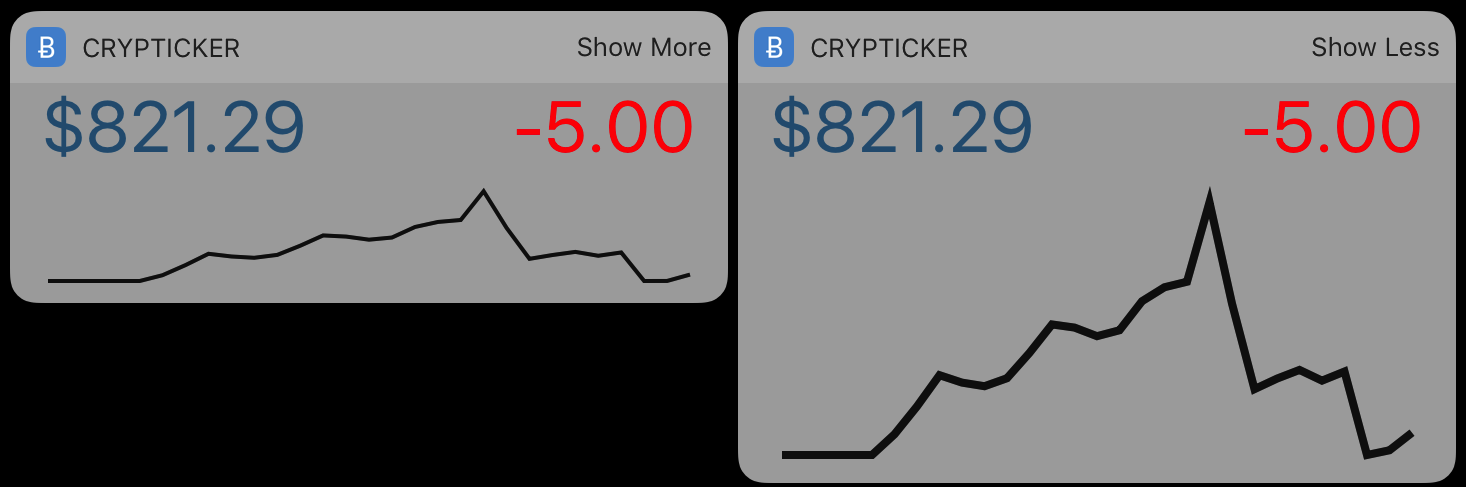
Build and run again. This time, the line width will change along with the size change. How snazzy!
To really see the vibrancy effect pop, set a colorful background. This can be done on the simulator by:
- Open the Photos app.
- Select an image.
- Tap the share icon.
- Select Use as Wallpaper from the bottom row.
- Tap Set and then Set Both.
- Build and run, again.

Make it Interactive
Widgets can be more than simple data displays, by supporting user interaction. The Crypticker app already supports tapping a position on the chart to display the price at that location. You can add that functionality to the widget when it’s expanded.
Go back to MainInterface.storyboard once again.
Drag a another Visual Effect View with Blur from the object browser into the main view.
In the Attributes Inspector check Vibrancy. This will cause the view to change from a dark color to a clear color.
In the Document Outline ctrl+drag from the new Visual Effect View to the previous Vibrancy View. Hold down Shift and select Top, Bottom, Leading, and Trailing. Click Add Constraints. This will place this new view in the same spot and size as the chart view.
Next, drag a Label into the subview of the Visual Effect View. Pin this label to the top and center of its parent view by ctrl+dragging from the label into the parent view and selecting Top Space to Visual Effect View and Center Horizontally in Visual Effect View.

Change the label’s text to be empty.
Select Editor\Resolve Auto Layout Issues\All Views in Today View Controller\Update Frames to rearrange the views. The label should now be invisible on the storyboard, but don’t worry… it’s still there :]

In the Document Outline, ctrl+drag from the Today View Controller to the new label, and set its outlet to priceOnDayLabel.
Now the new label is almost wired up.
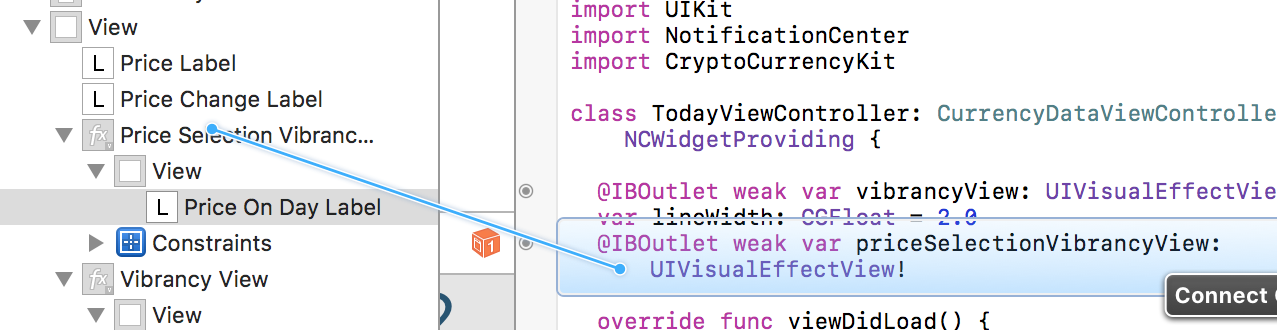
Open the Assistant Editor once again, and create an outlet for the new visual effects view in TodayViewController. Call it priceSelectionVibrancyView.
In viewDidLoad add this line to set the vibrancy effect:
priceSelectionVibrancyView.effect = UIVibrancyEffect.widgetSecondary()
The widgetSecondary vibrancy is a slightly different effect to be used for data that is ancillary to the main data. For this widget, the price at an earlier date on the graph certainly meets that criteria.
Note: Each UIVisualEffectView view can only have one type of vibrancy effect. Two different effects views are needed here to support both types of vibrancy.
Next, update toggleLineChart as follows:
private func toggleLineChart() {
  let expanded = extensionContext!.widgetActiveDisplayMode == .expanded
  if expanded {
    lineWidth = 4.0
    priceOnDayLabel.isHidden = false
  } else {
    lineWidth = 2.0
    priceOnDayLabel.isHidden = true
  }
  priceOnDayLabel.text = ""
}
In addition to changing the chart line width, this now hides or shows the label.
Now add these delegate methods:
func lineChartView(_ lineChartView: JBLineChartView!, didSelectLineAtIndex lineIndex: UInt, horizontalIndex: UInt) {
  if let prices = prices {
    let price = prices[Int(horizontalIndex)]
    updatePriceOnDayLabel(price)
  }
}

func didUnselectLineInLineChartView(_ lineChartView: JBLineChartView!) {
  priceOnDayLabel.text = ""
}
These simply update the label’s text when the user taps on the line chart.
Build and run. Expand the widget and tap on a point in the graph. You will see the price displayed, and at a slightly lighter color than the graph line.

Note: If you’re testing on the Simulator a quick ‘tap’ may not be enough to trigger displaying the label – so try a holding the mouse button down a little longer to make it appear.