iOS Accessibility: Getting Started
In this iOS accessibility tutorial, learn how to make apps more accessible using VoiceOver and the Accessibility inspector. By Fayyazuddin Syed.
Additional Inspector Settings
Although they’re outside the scope of this tutorial, it’s good to know the Accessibility Inspector also lets you test the following accessibility settings:
- Invert colors
- Increase contrast
- Reduce transparency
- Reduce motion
- Change font size
You no longer have to use the Settings app to enable these features. The Accessibility Inspector currently offers only these five options, but Apple plans to add more in the future.

The Accessibility Inspector saves time when testing your app. Remember, however, you should still test VoiceOver manually to try out the actual user experience. This final step helps you catch any problems the inspector misses.
Now you’ve taken a tour of the Accessibility Inspector’s features, it’s time to get to work your app.
Making the Recipe App Accessible
When you tested your app on your device with VoiceOver, you noted the images’ descriptions weren’t very useful. The audit tool showed you the reason why: The image view didn’t have an accessibility label. You’re going to fix this now.
In Xcode, open RecipeCell.swift and add the following code to the bottom of the file:
// MARK: Accessibility

extension RecipeCell {
  func applyAccessibility(_ recipe: Recipe) {
    // 1
    foodImageView.accessibilityTraits = .image
    // 2
    foodImageView.accessibilityLabel = recipe.photoDescription
  }
}
This code fills in the missing accessibility properties based on the Recipe object for the cell. Here’s how it works:
-
accessibilityTraitstakes a mask of traits that characterize the accessibility element. In this case,.imageindicates it is an image. - You use
accessibilityLabelto describe the element in VoiceOver. Here, it’s set torecipe.photoDescription, which is a string that describes the contents of the image.
Now, you want to apply this to future recipes, too. Find configureCell(_:) in the RecipeCell class. Add the following line to the end of the method:
applyAccessibility(recipe)
Every time you create a cell, this code will apply the accessibility attributes to the image using properties in the recipe object.
Build and run on your device and enable VoiceOver with three taps on the home button. Test the recipe list to see if the image descriptions are more meaningful.
Much better! Instead of simply hearing “Image,” which provided no specific details, you now hear a full description of the image. The user can now visualize the food instead of being frustrated at not knowing what the image is.
With the app still running in the simulator, run the Accessibility Inspector again and navigate to the recipe list. Make sure you clear all warnings in the inspector and tap Run Audit.

WOOt — no more description warnings! After successfully adding descriptions to the images, the core of this view is now fully accessible.
Now, it’s time to make the difficulty level of a recipe accessible.
Transforming the Difficulty Labels
In the Accessibility Inspector, you see potentially inaccessible text warnings, which tell you the difficulty labels are invisible to a user with visual impairments. To fix these, you need to make the labels accessible and update their properties with a meaningful description.
For your next step, go to RecipeCell.swift and add the following to the end of applyAccessibility(_:):
// 1
difficultyLabel.isAccessibilityElement = true
// 2
difficultyLabel.accessibilityTraits = .none
// 3
difficultyLabel.accessibilityLabel = "Difficulty Level"
// 4
switch recipe.difficulty {
case .unknown:
  difficultyLabel.accessibilityValue = "Unknown"
case .rating(let value):
  difficultyLabel.accessibilityValue = "\(value)"
}
Here’s some more detail about what this code does:
-
isAccessibilityElementis a flag that makes the item visible to accessibility features whentrue. For most UIKit classes, the default istrue, but for UILabel it’sfalse. -
accessibilityTraitshelps characterize the accessibility element. Since you don’t need any interactions, you set it to have no traits. - Next, you have VoiceOver concisely identify the intent of this label.
Difficulty Levellets the user know exactly what they’re dealing with. - VoiceOver will read the
accessibilityValueas part of the label description. Setting the difficulty level here makes this element much more useful.
Build and run your app on a physical device, triple tap the home button to enable VoiceOver and swipe through the recipe list.
As you scroll through the different accessibility elements, VoiceOver reads a full description of each cell, including the difficulty level.
Checking for Warnings
Every time you expose a new accessibility element, as you did here with the difficulty level, you should run the audit again.
Start the Accessibility Inspector, if it isn’t already running. Run the app on your device or the simulator and set the inspector target accordingly. Now, select the audit toggle button and tap Run audit.

Fewer warnings appeared! The remaining ones are about the labels not supporting dynamic text. You’ll fix those next.
Making the Text Dynamic
The auditor is warning you that you are missing an important step to make your app usable by everyone: dynamic text. This is an important feature for accessibility, allowing users with partial vision impairments to increase the font size for readability. The non-dynamic font your app currently uses doesn’t allow this.
Click the Fix Suggestions icon to see what the auditor recommends:

It tells you to use a UIfont preferred font and to set adjustsFontForContentSizeCategory to true. You’ll do this now.
Within RecipeCell.swift add the following code inside applyAccessibility(_:) at the very bottom:
dishNameLabel.font = .preferredFont(forTextStyle: .body)
dishNameLabel.adjustsFontForContentSizeCategory = true

difficultyLabel.font = .preferredFont(forTextStyle: .body)
difficultyLabel.adjustsFontForContentSizeCategory = true
This sets the preferredFont to a body style, which means iOS will style text as it would the body of a document. The specifics of the size and font depend on the accessibility settings. adjustsFontForContentSizeCategory indicates the font should update automatically when the user changes the text content size.
Testing how your app handles resizing fonts is easy, thanks to the Accessibility Inspector.
Build and run the recipe app alongside the Accessibility Inspector. Run the audit again and all your warnings should be gone.

Testing Some Other Options
Navigate to the Settings toggle in the inspector and experiment with some of the tools:
- Invert Colors to preview what your interface looks like with this accessibility feature. This is useful for people with light sensitivities, poor vision and in some cases, color blindness.
- You can also test out dynamic font size changes in real-time for the users who prefer larger font sizes.
As you test your app, it probably looks a lot like this:
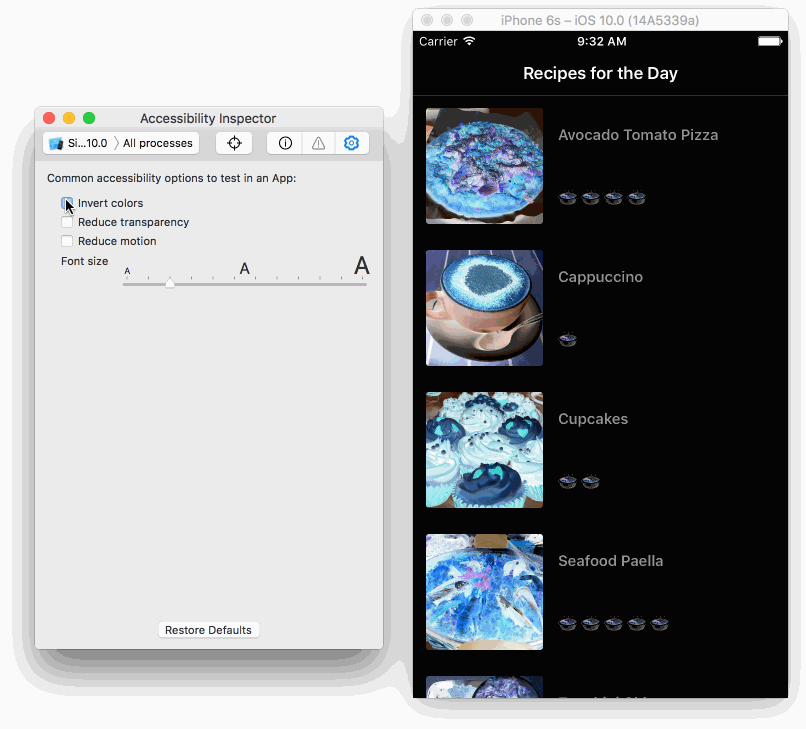
The inspector makes testing accessibility cases easy. From this, you can tell the recipe list will work well for users with visual impairments.