Speech Recognition Tutorial for iOS
Learn how to transcribe live or pre-recorded audio in your iOS app with the same engine used by Siri in this speech recognition tutorial for iOS. By Jeff Rames.
Connect to the audio buffer
To do this, you’ll have to configure the audio engine and hook it up to a recognition request. But before you start recording and transcribing, you need to request authorization to use speech recognition in this controller.
Open LiveTranscribeViewController.swift and add the following to the top of the file by the other imports:
import Speech
Now the live transcription controller has access to Speech Recognition.
Next find viewDidLoad() and replace the line startRecording() with the following:
SFSpeechRecognizer.requestAuthorization {
  [unowned self] (authStatus) in
  switch authStatus {
  case .authorized:
    self.startRecording()
  case .denied:
    print("Speech recognition authorization denied")
  case .restricted:
    print("Not available on this device")
  case .notDetermined:
    print("Not determined")
  }
}
Just as you did with pre-recorded audio, you’re calling requestAuthorization(_:) to obtain or confirm access to Speech Recognition.
For the authorized status, you call startRecording() which currently just does some preparation — you’ll implement the rest shortly. For failures, you print relevant error messages.
Next, add the following properties at the top of LiveTranscribeViewController:
let audioEngine = AVAudioEngine()
let speechRecognizer = SFSpeechRecognizer()
let request = SFSpeechAudioBufferRecognitionRequest()
var recognitionTask: SFSpeechRecognitionTask?
-
audioEngineis anAVAudioEngineobject you’ll use to process input audio signals from the microphone. -
speechRecognizeris theSFSpeechRecognizeryou’ll use for live transcriptions. -
requestis theSFSpeechAudioBufferRecognitionRequestthe speech recognizer will use to tap into the audio engine. -
recognitionTaskwill hold a reference to theSFSpeechRecognitionTaskkicked off when transcription begins.
Now find startRecording() in a LiveTranscribeViewController extension in this same file. This is called when the Face Replace view loads, but it doesn’t yet do any recording. Add the following code to the bottom of the method:
// 1
let node = audioEngine.inputNode
let recordingFormat = node.outputFormat(forBus: 0)

// 2
node.installTap(onBus: 0, bufferSize: 1024,
                format: recordingFormat) { [unowned self]
  (buffer, _) in
  self.request.append(buffer)
}

// 3
audioEngine.prepare()
try audioEngine.start()
This code does the following:
-
Obtains the input audio
nodeassociated with the device’s microphone, as well as its correspondingoutputFormat. -
Installs a tap on the output bus of
node, using the same recording format. When the buffer is filled, the closure returns the data inbufferwhich is appended to theSFSpeechAudioBufferRecognitionRequest. Therequestis now tapped into the live input node. -
Prepares and starts the
audioEngineto start recording, and thus gets data going to the tap.
Because starting the audio engine throws, you need to signify this on the method. Change the method definition to match the following:
fileprivate func startRecording() throws {
With this change, you likewise need to modify where the method gets called. Find viewDidLoad() and replace self.startRecording() with the following:
do {
  try self.startRecording()
} catch let error {
  print("There was a problem starting recording: \(error.localizedDescription)")
}
startRecording() is now wrapped in a do-catch, printing the error if it fails.
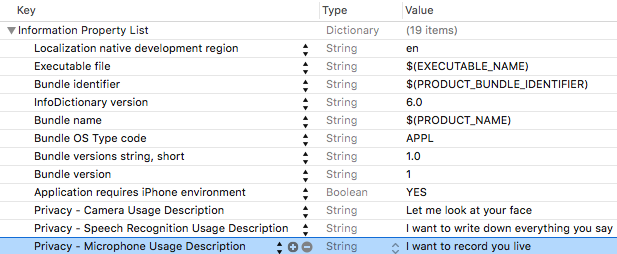
There is one last thing to do before you can kick off a recording — ask for user permission. The framework does this for you, but you need to provide another key in the plist with an explanation. Open Info.plist and add the key Privacy - Microphone Usage Description providing the String value I want to record you live.
Build and run, choose a recording, then select Face Replace from the navigation bar. You’ll immediately be greeted with a prompt requesting permission to use the microphone. Hit OK so that Gangstribe can eventually transcribe what you say:

With the tap in place, and recording started, you can finally kick off the speech recognition task.
In LiveTranscribeViewController.swift, go back to startRecording() and add the following at the bottom of the method:
recognitionTask = speechRecognizer?.recognitionTask(with: request) {
  [unowned self]
  (result, _) in
  if let transcription = result?.bestTranscription {
    self.transcriptionOutputLabel.text = transcription.formattedString
  }
}
recognitionTask(with:resultHandler:) is called with the request connected to the tap, kicking off transcription of live audio. The task is saved in recognitionTask for later use.
In the closure, you get bestTranscription from the result. You then update the label that displays the transcription with the formatted string of the transcription.
Build and run, and tap the Face Replace button in the navigation bar. Start talking, and you’ll now see a real time transcription from speech recognition!

But there’s a problem. If you try opening Face Replace enough times, it will crash spectacularly. You’re currently leaking the SFSpeechAudioBufferRecognitionRequest because you’ve never stopping transcription or recording!
Add the following method to the LiveTranscribeViewController extension that also contains startRecording():
fileprivate func stopRecording() {
  audioEngine.stop()
  request.endAudio()
  recognitionTask?.cancel()
}
Calling stop() on the audio engine releases all resources associated with it. endAudio() tells the request that it shouldn’t expect any more incoming audio, and causes it to stop listening. cancel() is called on the recognition task to let it know its work is done so that it can free up resources.
You’ll want to call this when the user taps the Done! button before you dismiss the controller. Add the following to handleDoneTapped(_:), just before the dismiss:
stopRecording()
The audio engine and speech recognizer will now get cleaned up each time the user finishes with a live recording. Good job cleaning up your toys! :]
Transcription segments
The live transcription below your video is pretty cool, but it’s not what you set out to do. It’s time to dig into these transcriptions and use them to trigger the emoji face replacement!
First, you need to understand a bit more about the data contained in the SFTranscription objects returned in SFSpeechRecognitionResult objects. You’ve been accessing these with the bestTranscription property of results returned to the recognitionTask(with:resultHandler:) closure.
SFTranscription has a segments property containing an array of all SFTranscriptionSegment objects returned from the request. Among other things, a SFTranscriptionSegment has a substring containing the transcribed String for that segment, as well as its duration from the start of the transcription. Generally, each segment will consist of a single word.
Each time the live transcription returns a new result, you want to look at the most recent segment to see if it matches an emoji keyword.
First add the following property to at the top of the class:
var mostRecentlyProcessedSegmentDuration: TimeInterval = 0
mostRecentlyProcessedSegmentDuration tracks the timestamp of the last processed segment. Because the segment duration is from the start of transcription, the highest duration indicates the latest segment.
Now add the following to the top of startRecording():
mostRecentlyProcessedSegmentDuration = 0
This will reset the tracked duration each time recording starts.
Now add the following new method to the bottom of the last LiveTranscribeViewController extension:
// 1
fileprivate func updateUIWithTranscription(_ transcription: SFTranscription) {
  self.transcriptionOutputLabel.text = transcription.formattedString

  // 2
  if let lastSegment = transcription.segments.last,
    lastSegment.duration > mostRecentlyProcessedSegmentDuration {
    mostRecentlyProcessedSegmentDuration = lastSegment.duration
    // 3
    faceSource.selectFace(lastSegment.substring)
  }
}
Here’s what this code does:
-
This defines a new method that accepts an
SFTranscriptionand uses it to update the UI with results. First, it updates the transcription label at the bottom of the screen with the results; this will soon replace similar code found instartRecording(). -
This unwraps the
lastsegment from the passedtranscription. It then checks that the segment’s duration is higher than themostRecentlyProcessedSegmentDurationto avoid an older segment being processed if it returns out of order. The new duration is then saved inmostRecentlyProcessedSegmentDuration. -
selectFace(), part of the Face Replace code, accepts thesubstringof this new transcription, and completes a face replace if it matches one of the emoji names.
In startRecording(), replace the following line:
self.transcriptionOutputLabel.text = transcription.formattedString
with:
self.updateUIWithTranscription(transcription)
updateUIWithTranscription() is now called each time the resultHandler is executed. It will update the transcription label as well as triggering a face replace if appropriate. Because this new method updates the transcription label, you removed the code that previously did it here.
Build and run and select Face Replace. This time, say the name of one of the emojis. Try “cry” as your first attempt.
The speech recognizer will transcribe the word “cry” and feed it to the FaceSource object, which will attach the cry emoji to your face. What a time to be alive!

names array. Each of these map to one of the emojis in the faces array above it.