Speech Recognition Tutorial for iOS
Learn how to transcribe live or pre-recorded audio in your iOS app with the same engine used by Siri in this speech recognition tutorial for iOS. By Jeff Rames.
Transcribing the file
Back in RecordingViewController.swift, find the RecordingViewController extension at the bottom of the file. Add the following method to transcribe a file found at the passed url:
fileprivate func transcribeFile(url: URL) {

  // 1
  guard let recognizer = SFSpeechRecognizer() else {
    print("Speech recognition not available for specified locale")
    return
  }

  if !recognizer.isAvailable {
    print("Speech recognition not currently available")
    return
  }

  // 2
  updateUIForTranscriptionInProgress()
  let request = SFSpeechURLRecognitionRequest(url: url)

  // 3
  recognizer.recognitionTask(with: request) {
    [unowned self] (result, error) in
    guard let result = result else {
      print("There was an error transcribing that file")
      return
    }

    // 4
    if result.isFinal {
      self.updateUIWithCompletedTranscription(
        result.bestTranscription.formattedString)
    }
  }
}
Here are the details on how this transcribes the passed file:
-
The default
SFSpeechRecognizerinitializer provides a recognizer for the device’s locale, returningnilif there is no such recognizer.isAvailablechecks if therecognizeris ready, failing in such cases as missing network connectivity. -
updateUIForTranscriptionInProgress()is provided with the starter to disable the Transcribe button and start an activity indicator animation while the transcription is in process. ASFSpeechURLRecognitionRequestis created for the file found aturl, creating an interface to the transcription engine for that recording. -
recognitionTask(with:resultHandler:)processes the transcriptionrequest, repeatedly triggering a completion closure. The passedresultis unwrapped in a guard, which prints an error on failure. -
The
isFinalproperty will be true when the entire transcription is complete.updateUIWithCompletedTranscription(_:)stops the activity indicator, re-enables the button and displays the passed string in a text view.bestTranscriptioncontains the transcription Speech Recognizer is most confident is accurate, andformattedStringprovides it in String format for display in the text view.
bestTranscription, there can of course be lesser ones. SFSpeechRecognitionResult has a transcriptions property that contains an array of transcriptions sorted in order of confidence. As you see with Siri and Keyboard Dictation, a transcription can change as more context arrives, and this array illustrates that type of progression.
Now you need to call this new code when the user taps the Transcribe button. In handleTranscribeButtonTapped(_:) replace //TODO: Kick off the transcription with the following:
self.transcribeFile(url: recording.audio)
After successful authorization, the button handler now calls transcribeFile(url:) with the URL of the currently selected recording.
Build and run, select Gangsta’s Paradise, and then tap the Transcribe button. You’ll see the activity indicator for a while, and then the text view will eventually populate with the transcription:
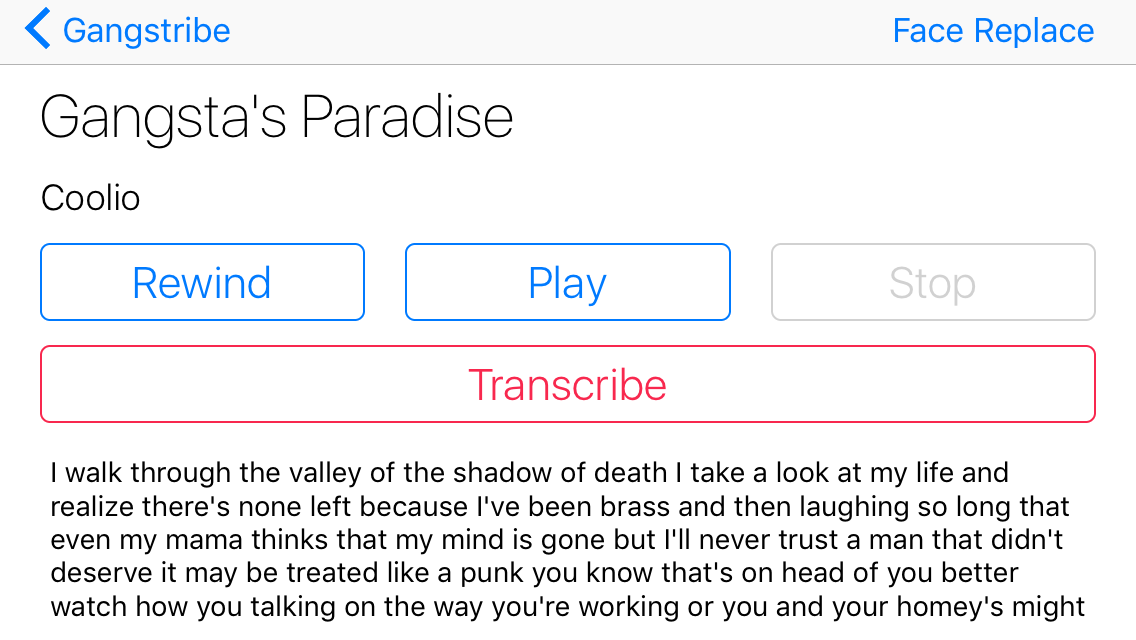
Transcription and Locales
The results aren’t bad, considering Coolio doesn’t seem to own a copy of Webster’s Dictionary. Depending on the locale of your device, there could be another reason things are a bit off. The above screenshot was a transcription completed on a device configured for US English, while DJ Sammy D has a slightly different dialect.
But you don’t need to book a flight overseas to fix this. When creating a recognizer, you have the option of specifying a locale — that’s what you’ll do next.
Still in RecordingViewController.swift, find transcribeFile(url:) and replace the following two lines:
fileprivate func transcribeFile(url: URL) {
  guard let recognizer = SFSpeechRecognizer() else {
with the code below:
fileprivate func transcribeFile(url: URL, locale: Locale?) {
  let locale = locale ?? Locale.current

  guard let recognizer = SFSpeechRecognizer(locale: locale) else {
You’ve added an optional Locale parameter which will specify the locale of the file being transcribed. If locale is nil when unwrapped, you fall back to the device’s locale. You then initialize the SFSpeechRecognizer with this locale.
Now to modify where this is called. Find handleTranscribeButtonTapped(_:) and replace the transcribeFile(url:) call with the following:
self.transcribeFile(url: recording.audio, locale: recording.locale)
You use the new method signature, passing the locale stored with the recording object.
recordingNames array up top. Each element contains the song name, artist, audio file name and locale. You can find information on how locale identifiers are derived in Apple’s Internationalization and Localization Guide here — apple.co/1HVWDQa
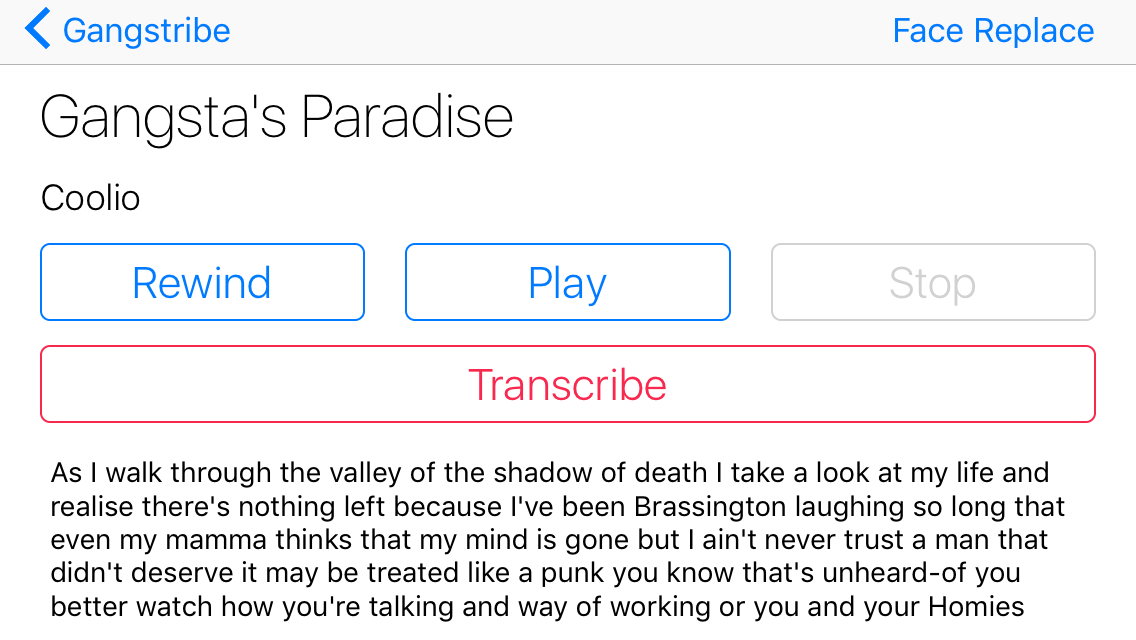
Build and run, and complete another transcription on Gangsta’s Paradise. Assuming your first run was with a locale other than en_GB, you should see some differences.
You can probably understand different dialects of languages you speak pretty well. But you’re probably significantly weaker when it comes to understanding languages you don’t speak. The Speech Recognition engine understands over 50 different languages and dialects, so it likely has you beat here.
Now that you are passing the locale of files you’re transcribing, you’ll be able to successfully transcribe a recording in any supported language. Build and run, and select the song Raise Your Hands, which is in Thai. Play it, and then tap Transcribe to see the transcribed content.
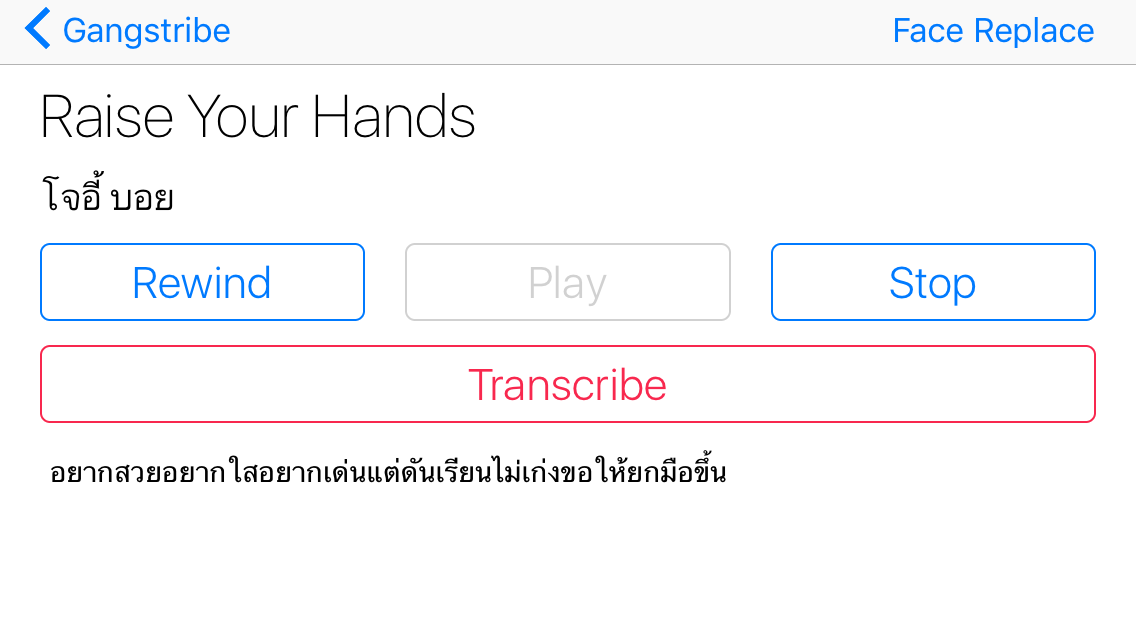
Flawless transcription! Presumably.
Live Speech Recognition
Live transcription is very similar to file transcription. The primary difference in the process is a different request type — SFSpeechAudioBufferRecognitionRequest — which is used for live transcriptions.
As the name implies, this type of request reads from an audio buffer. Your task will be to append live audio buffers to this request as they arrive from the source. Once connected, the actual transcription process will be identical to the one for recorded audio.
Another consideration for live audio is that you’ll need a way to stop a transcription when the user is done speaking. This requires maintaining a reference to the SFSpeechRecognitionTask so that it can later be canceled.
Gangstribe has some pretty cool tricks up its sleeve. For this feature, you’ll not only transcribe live audio, but you’ll use the transcriptions to trigger some visual effects. With the use of the FaceReplace library, speaking the name of a supported emoji will plaster it right over your face!