Create ML Tutorial: Getting Started
In this Create ML tutorial, you’ll learn how to transfer your learning to Turi Create, and gain familiarity with machine learning toolsets and terminology. No math needed! By Audrey Tam.
Using the Image Classifier
This is a continuation of Apple’s spectacular party trick :]. The Create ML GUI exports a Core ML model, then you just drag your model into the old Core ML project, change one word in the code, and you’re good to go!
Click the disclosure symbol next to ImageClassifier to see a different set of options. Click on the text, and change it to PetsClassifier. Change the Where location to the starter folder, then click Save:

Open the ClassifyingImagesWithVisionAndCoreML project in the starter folder. This is Apple’s 2017 project: I’ve updated it to Swift 4.2, and fixed the photo picker call. It uses MobileNet.mlmodel, which is 17.1 MB:

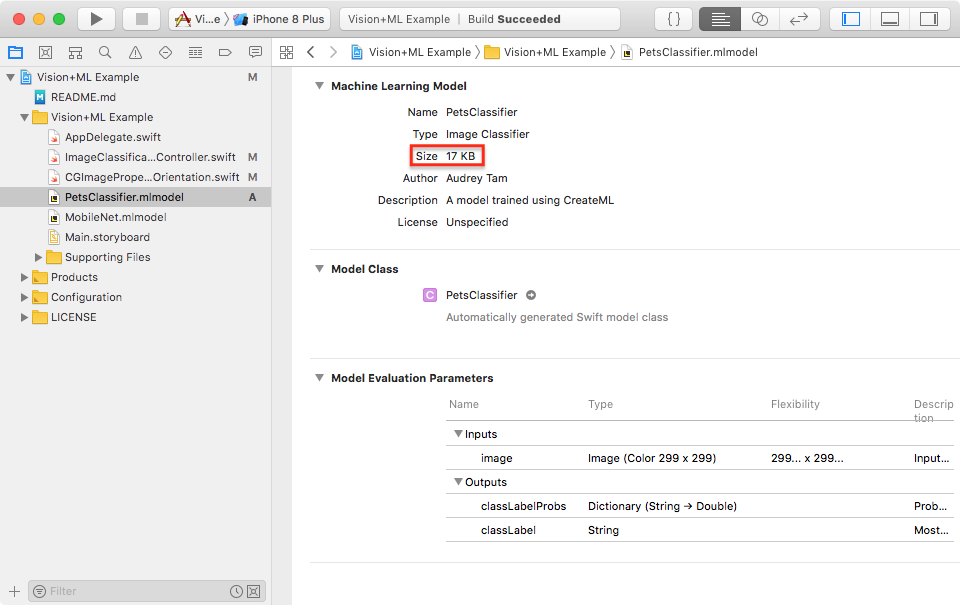
Drag PetsClassifier.mlmodel into the project navigator. It’s 17 KB:
Search the project for MobileNet:

In the let model code statement, replace MobileNet with PetsClassifier:
let model = try VNCoreMLModel(for: PetsClassifier().model)
Build and run. Click the camera icon to open the photo picker, then drag some dog and cat images into Photos:

Select one; the app classifies it as a dog or a cat by showing the probability of each label:

Turi Create Image Classifier
Here’s the code from the Turi Create image classifier example for the same dataset — the full 25,000-image dataset:
import turicreate as tc

# 1. Load images (Note: you can ignore 'Not a JPEG file' errors)
data = tc.image_analysis.load_images('PetImages', with_path=True)

# 2. From the path-name, create a label column
data['label'] = data['path'].apply(lambda path: 'dog' if '/Dog' in path else 'cat')

# Note: If you have more than two classes, extract the folder names like this:
# train_data["label"] = train_data["path"].apply(lambda path: os.path.basename(os.path.split(path)[0]))

# 3. Make a train-test split
train_data, test_data = data.random_split(0.8)

# 4. Create the model
model = tc.image_classifier.create(train_data, target='label')

# 5. Save predictions to an SArray
predictions = model.predict(test_data)

# 6. Evaluate the model and save the results into a dictionary
metrics = model.evaluate(test_data)
print(metrics['accuracy'])

# 7. Save the model for later use in Turi Create
model.save('mymodel.model')

# 8. Export for use in Core ML
model.export_coreml('MyCustomImageClassifier.mlmodel')
It’s a lot more code than you wrote in the playground, but you’ll soon see that it’s similar to the Create ML text classifier code.
Matching up the steps with what you did in Create ML:
- Steps 1 to 4 correspond to creating the Training and Testing folders, then dragging the Training folder onto the view. Turi Create must extract the class labels from the paths of the images, but step 3 randomly allocates 20% of the dataset to
test_data, which saves you the work of creating the Training and Testing folders, and you also get a different testing dataset each time you run this code.
os.path.split() splits the path into two pieces: the name of the file (like 42.jpg) and everything leading up to it. Then os.path.basename() is the name of the last folder, which is the one with the class name.
- Steps 5 and 6 correspond to dragging the Testing folder onto the view. A Jupyter notebook can display the
predictionsarray as easily as the Create ML view. You can also filter the array to find the wrong classifications, instead of scrolling through the test images. - Step 7 saves the model for later use, so you could load it again and run it on a different testing dataset.
- Step 8 exports the Core ML model.
So Turi Create image classification is more manual, but more flexible than Create ML. The turicreate.create() documentation lists several optional parameters. You can specify the underlying model to match Create ML. Note the difference in the sizes of the Core ML models! You can also supply a fixed validation_set, if you’ve created one that really represents your real test data and don’t want the model to use a random selection from your training data.
Image classification is a very special case in Create ML: The MLImageClassifierBuilder GUI removes the need — and the opportunity — to write code. In the next section, you’ll see that other Create ML models also require more code.
Text Classifier
Now compare how Create ML and Turi Create train and test a text classifier model. The Turi Create model needs test text converted into a bag of words — this is a straightforward transformation that’s built into the Create ML model, so it accepts test text directly.
Create ML
Here’s the code for the Create ML text classifier example:
import CreateML

// 1. Load data from a JSON file
let data = try? MLDataTable(contentsOf: URL(fileURLWithPath: "<#/path/to/read/data.json#>"))

// 2. Make a train-test split
let (trainingData, testingData) = data.randomSplit(by: 0.8, seed: 5)

// 3. Create the model
let sentimentClassifier = try? MLTextClassifier(trainingData: trainingData,
  textColumn: "text", labelColumn: "label")

// 4. Training accuracy as a percentage
let trainingAccuracy = (1.0 - sentimentClassifier.trainingMetrics.classificationError) * 100

// 5. Validation accuracy as a percentage
let validationAccuracy = (1.0 - sentimentClassifier.validationMetrics.classificationError) * 100

// 6. Evaluation accuracy as a percentage
let evaluationMetrics = sentimentClassifier.evaluation(on: testingData)
let evaluationAccuracy = (1.0 - evaluationMetrics.classificationError) * 100

// 7. Add metadata
let metadata = MLModelMetadata(author: "John Appleseed",
  shortDescription: "A model trained to classify movie review sentiment", version: "1.0")

// 8. Export for use in Core ML
try? sentimentClassifier.write(to: URL(fileURLWithPath: "<#/path/to/save/SentimentClassifier.mlmodel#>"),
    metadata: metadata)
- Step 1 loads data into a table with
textandlabelcolumns, where the value oflabelispositive,negativeorneutral. The WWDC 2018 Session 703 video shows an alternative way to load text data using separate text files in folders namedpositiveandnegative, similar to the way you load images to train an image classifier. This is a special extra in Create ML; it isn’t available in Turi Create.
let trainDirectory = URL(fileURLWithPath: “/Users/createml/Desktop/train”)
let testDirectory = URL(fileURLWithPath: “/Users/createml/Desktop/test”)
// Create Model
let classifier = try MLTextClassifier(trainingData: .labeledDirectories(at: trainDirectory))
Back to the main text classifier code:
- Step 2 does the same as Turi Create’s
random_split(), randomly allocating 20% of the data totestingData. The optionalseedparameter sets the seed for the random number generator. - Step 3 does the same as Turi Create’s
sentence_classifier.create(). - Steps 4-6 calculate training, validation and evaluation accuracy metrics.
- Steps 7 and 8 export the Core ML model with some metadata.