How To Make a Custom Control Tutorial: A Reusable Knob
Custom UI controls are extremely useful when you need some new functionality in your app — especially when they’re generic enough to be reusable in other apps. This custom control tutorial covers the creation of a control kind of like a circular slider inspired by a control knob, such as those found on a mixer. By Lorenzo Boaro.
Exposing Appearance Properties in the API
Currently, all of the properties which manipulate the look of the knob are hidden away in the private renderer.
To allow developers to change the control’s appearance, add the following properties to the Knob class:
var lineWidth: CGFloat {
  get { return renderer.lineWidth }
  set { renderer.lineWidth = newValue }
}

var startAngle: CGFloat {
  get { return renderer.startAngle }
  set { renderer.startAngle = newValue }
}

var endAngle: CGFloat {
  get { return renderer.endAngle }
  set { renderer.endAngle = newValue }
}

var pointerLength: CGFloat {
  get { return renderer.pointerLength }
  set { renderer.pointerLength = newValue }
}
The four properties are simple proxies for the properties in the renderer.
To test that the new API bits are working as expected, add this code to the end of viewDidLoad() in ViewController.swift:
knob.lineWidth = 4
knob.pointerLength = 12
Build and run again. You’ll see that the line thickness and the length of the pointer have both increased based on the values you just set:
Setting the Control’s Value Programmatically
The knob doesn’t actually do anything. In this next phase, you’ll modify the control to respond to programmatic interactions — that is, when the value property of the control changes.
At the moment, the value of the control is saved when the value property is modified directly or when you call setValue(_:animated:). However, there isn’t any communication with the renderer, and the control won’t re-render.
The renderer has no concept of value; it deals entirely in angles. You’ll need to update setValue(_:animated:) in Knob so that it converts the value to an angle and passes it to the renderer.
In Knob.swift, replace setValue(_:animated:) with the following code:
func setValue(_ newValue: Float, animated: Bool = false) {
  value = min(maximumValue, max(minimumValue, newValue))

  let angleRange = endAngle - startAngle
  let valueRange = maximumValue - minimumValue
  let angleValue = CGFloat(value - minimumValue) / CGFloat(valueRange) * angleRange + startAngle
  renderer.setPointerAngle(angleValue, animated: animated)
}
The code above works out the appropriate angle for the given value by mapping the minimum and maximum value range to the minimum and maximum angle range and sets the pointerAngle property on the renderer.
Note you’re just passing the value of animated to the renderer, but nothing is actually animating at the moment — you’ll fix this later.
Although the pointerAngle property is being updated, it doesn’t yet have any effect on your control. When the pointer angle is set, the layer containing the pointer should rotate to the specified angle to give the impression that the pointer has moved.
Update setPointerAngle(_:animated:) as follows:
func setPointerAngle(_ newPointerAngle: CGFloat, animated: Bool = false) {
  pointerLayer.transform = CATransform3DMakeRotation(newPointerAngle, 0, 0, 1)

  pointerAngle = newPointerAngle
}
This simply creates a rotation transform which rotates the layer around the z-axis by the specified angle.
The transform property of CALayer expects to be passed a CATransform3D, not a CGAffineTransform like UIView. This means that you can perform transformations in three dimensions.
CGAffineTransform uses a 3×3 matrix and CATransform3D uses a 4×4 matrix; the addition of the z-axis requires the extra values. At their core, 3D transformations are simply matrix multiplications. You can read more about matrix multiplication in this Wikipedia article.
To demonstrate that your transforms work, you’re going to link the UISlider with the knob control in the view controller. As you adjust the slider, the value of the knob will change.
The UISlider has already been linked to handleValueChanged(_:). Open ViewController.swift and add the following to that method:
knob.setValue(valueSlider.value)
Now the knob value is set to match the valueSlider as it slides.
Build and run. Now, change the value of the UISlider and you’ll see the pointer on the knob control move to match as shown below:

Despite the fact that you haven’t started coding any of the animations yet, your control is animating. Why?
Core Animation is quietly calling implicit animations on your behalf. When you change certain properties of CALayer — including transform — the layer animates smoothly from the current value to the new value.
Now try sliding quickly from the end to the start. Rather than rotating counter-clockwise, the pointer will rotate clockwise over the end of the track, and into the bottom. That’s not what you want!
To solve this, you need to disable these animations. Update setPointerAngle(_:animated:) by replacing the CATransform3DMakeRotation line with:
CATransaction.begin()
CATransaction.setDisableActions(true)

pointerLayer.transform = CATransform3DMakeRotation(newPointerAngle, 0, 0, 1)

CATransaction.commit()
You wrapped the property change in a CATransaction and disable animations for that interaction.
Build and run once more. You’ll see that as you move the UISlider, the knob follows instantaneously, and the knob moves predictably.
Animating Changes to the Control’s Value
Currently, setting the animated parameter to true has no effect on your control. To enable this bit of functionality, add the following to setPointerAngle(_:animated:) just below the CATransform3DMakeRotation call and before the commit:
if animated {
  let midAngleValue = (max(newPointerAngle, pointerAngle) - min(newPointerAngle, pointerAngle)) / 2
    + min(newPointerAngle, pointerAngle)
  let animation = CAKeyframeAnimation(keyPath: "transform.rotation.z")
  animation.values = [pointerAngle, midAngleValue, newPointerAngle]
  animation.keyTimes = [0.0, 0.5, 1.0]
  animation.timingFunctions = [CAMediaTimingFunction(name: kCAMediaTimingFunctionEaseInEaseOut)]
  pointerLayer.add(animation, forKey: nil)
}
Now when animated is true, you create an explicit animation that rotates the pointer in the correct direction. In order to specify the rotation direction, you use a keyframe animation. That’s simply an animation where you specify some in-between points in addition to the usual start and end points.
You create a CAKeyFrameAnimation and specify that the property to animate is the rotation around the z-axis with transform.rotation.z as its keypath.
Next, in animation.values, you specify three angles through which the layer should rotate: the start point, mid-point and end point. Along with that, there’s the array animation.keyTimes specifying the normalized times (as percentages) at which to reach those values. Adding the animation to the layer ensures that once the transaction is committed the animation will start.
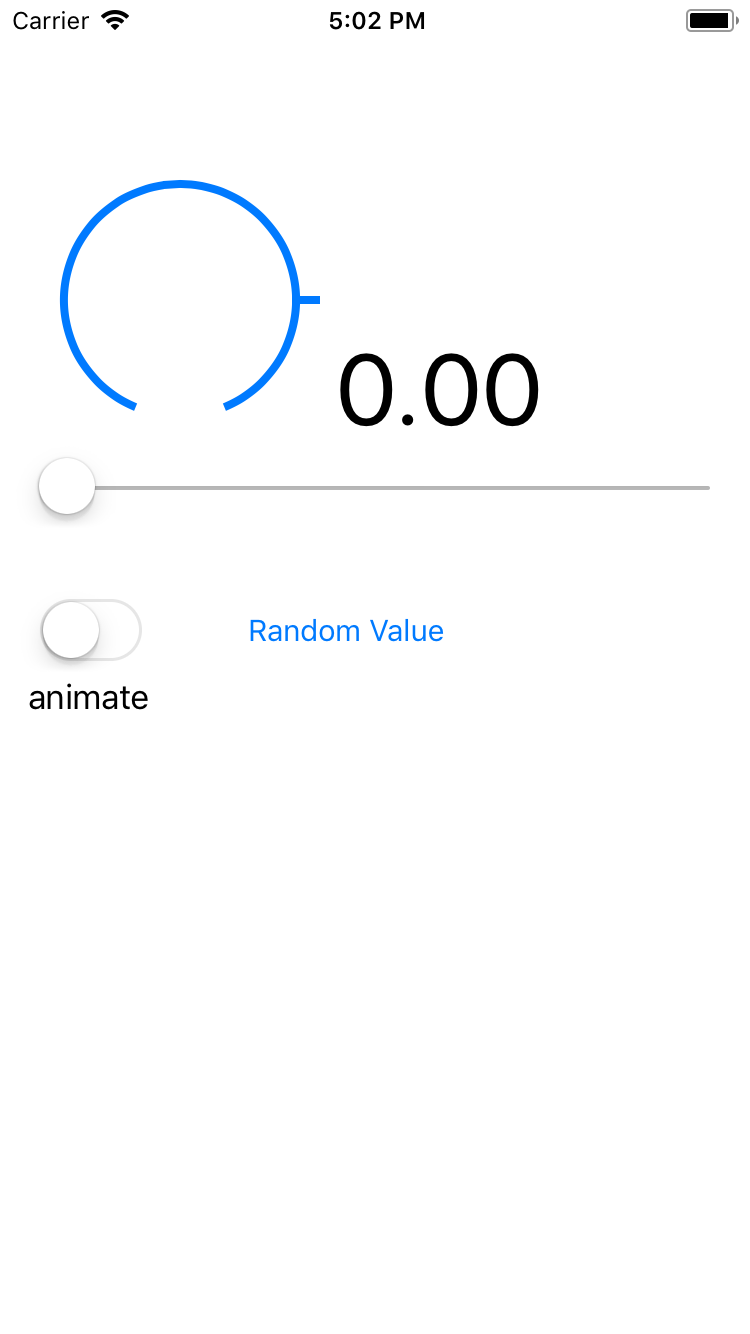
To see this new functionality in action, you’ll need the knob to jump to a value. To do this, you’ll implement the method wired up to the Random Value button to cause the slider and knob controls to move to a random value.
Open ViewController.swift and add the following to handleRandomButtonPressed(_:):
let randomValue = Float(arc4random_uniform(101)) / 100.0
knob.setValue(randomValue, animated: animateSwitch.isOn)
valueSlider.setValue(Float(randomValue), animated: animateSwitch.isOn)
The above generates a random value between 0.00 and 1.00 and sets the value on both controls. It then inspects the isOn property of animateSwitch to determine whether or not to animate the transition to the new value.
Build and run. Now tap the Random Value button a few times with the animate switch toggled on, then tap the Random Value button a few times with the animate switch toggled off to see the difference the animated parameter makes.