React Native Tutorial: Building iOS Apps with JavaScript
In this React Native tutorial you’ll learn how to build native iOS and Android apps based on the hugely popular React JavaScript library. By Christine Abernathy.
Performing an API Request
Still within SearchPage.js, update the initial state in the class constructor to add a message variable to the end of the list:
message: '',
Within render, add the following to the bottom of your UI, right after the spinner:
<Text style={styles.description}>{this.state.message}</Text>
You’ll use this to display a range of messages to the user.
Add the following code to the end of _executeQuery:
fetch(query)
  .then(response => response.json())
  .then(json => this._handleResponse(json.response))
  .catch(error =>
     this.setState({
      isLoading: false,
      message: 'Something bad happened ' + error
   }));
This makes use of the fetch function, which is part of the Fetch API. The asynchronous response is returned as a Promise. The success path calls _handleResponse which you’ll define next, to parse the JSON response.
Add the following function to SearchPage:
_handleResponse = (response) => {
  this.setState({ isLoading: false , message: '' });
  if (response.application_response_code.substr(0, 1) === '1') {
    console.log('Properties found: ' + response.listings.length);
  } else {
    this.setState({ message: 'Location not recognized; please try again.'});
  }
};
This clears isLoading and logs the number of properties found if the query was successful.
Note: Nestoria has a number of non-1** response codes that are potentially useful. For example, 202 and 200 return a list of best-guess locations.
Save your changes, head back to the simulator and press Go. You should see an Xcode console log message saying that 20 properties (the default result size) were found:
2017-11-26 23:22:18.478 [info][tid:com.facebook.react.JavaScript] Properties found: 20
Also note that when this message is logged, the spinner goes away.
It’s time to see what those 20 properties actually look like!
Displaying the Results
Create a new file SearchResults.js, and add the following:
'use strict';

import React, { Component } from 'react'
import {
  StyleSheet,
  Image,
  View,
  TouchableHighlight,
  FlatList,
  Text,
} from 'react-native';
This imports the relevant modules you’ll use.
Next, add the component:
export default class SearchResults extends Component<{}> {
  _keyExtractor = (item, index) => index;

  _renderItem = ({item}) => {
    return (
      <TouchableHighlight
        underlayColor='#dddddd'>
        <View>
          <Text>{item.title}</Text>
        </View>
      </TouchableHighlight>
    );

  };

  render() {
    return (
      <FlatList
        data={this.props.listings}
        keyExtractor={this._keyExtractor}
        renderItem={this._renderItem}
      />
    );
  }
}
The above code makes use of a more specialized component — FlatList — which displays rows of data within a scrolling container, similar to UITableView. Here’s a look at the FlatList properties:
-
dataprovides the data to display -
keyExtractorprovides a unique key that React uses for efficient list item management -
renderItemspecifies how the UI is rendered for each row
Save your new file.
Add the following to SearchPage.js just beneath the import statements:
import SearchResults from './SearchResults';
This brings in the newly added SearchResults class.
In _handleResponse, replace the console.log statement with the following:
this.props.navigator.push({
  title: 'Results',
  component: SearchResults,
  passProps: {listings: response.listings}
});
This navigates to your newly added SearchResults component and passes in the listings from the API request. Using the push method ensures the search results are pushed onto the navigation stack, which means you’ll get a Back button to return to the root.
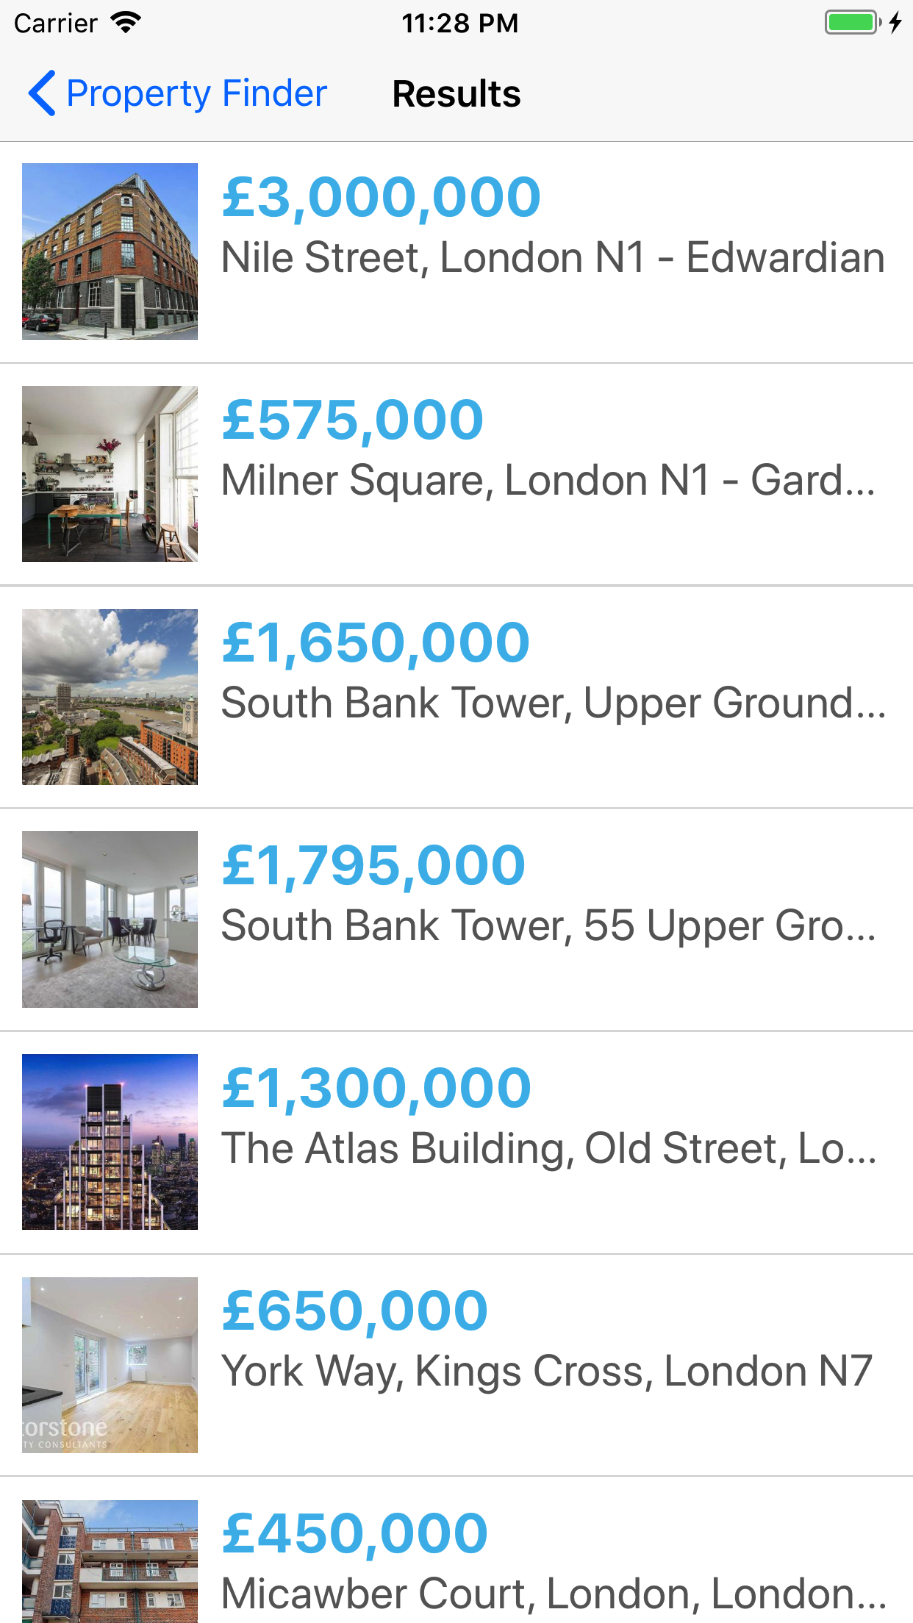
Save your changes, head back to the simulator and press Go. You’ll be greeted by a list of properties:

It’s great to see the property listings, but that list is a little drab. Time to liven things up a bit.
A Touch of Style
Add the following style definition at the end of SearchResults.js:
const styles = StyleSheet.create({
  thumb: {
    width: 80,
    height: 80,
    marginRight: 10
  },
  textContainer: {
    flex: 1
  },
  separator: {
    height: 1,
    backgroundColor: '#dddddd'
  },
  price: {
    fontSize: 25,
    fontWeight: 'bold',
    color: '#48BBEC'
  },
  title: {
    fontSize: 20,
    color: '#656565'
  },
  rowContainer: {
    flexDirection: 'row',
    padding: 10
  },
});
This defines all the styles that you are going to use to render each row.
Add a new component representing a row by adding the following just under the import statements:
class ListItem extends React.PureComponent {
  _onPress = () => {
    this.props.onPressItem(this.props.index);
  }

  render() {
    const item = this.props.item;
    const price = item.price_formatted.split(' ')[0];
    return (
      <TouchableHighlight
        onPress={this._onPress}
        underlayColor='#dddddd'>
        <View>
          <View style={styles.rowContainer}>
            <Image style={styles.thumb} source={{ uri: item.img_url }} />
            <View style={styles.textContainer}>
              <Text style={styles.price}>{price}</Text>
              <Text style={styles.title}
                numberOfLines={1}>{item.title}</Text>
            </View>
          </View>
          <View style={styles.separator}/>
        </View>
      </TouchableHighlight>
    );
  }
}
This manipulates the returned price, which is in the format 300,000 GBP, to remove the GBP suffix. Then it renders the row UI using techniques that you are by now quite familiar with. Of note, an Image is added to the row and is loaded from a returned URL (item.img_url) which React Native decodes off the main thread.
React.PureComponent. React re-renders a Component if its props or state changes. React only re-renders a PureComponent if a shallow compare of the state and props shows changes. Used under the right conditions, this can give your app a performance boost.Now replace _renderItem with the following:
_renderItem = ({item, index}) => (
  <ListItem
    item={item}
    index={index}
    onPressItem={this._onPressItem}
  />
);

_onPressItem = (index) => {
  console.log("Pressed row: "+index);
};
_onPressItem is passed into ListItem to handle a row selection. This design pattern is equivalent to a callback. In this callback, the index for the selected row is logged.
Save your work, head back to the simulator, press Go, and check out your results:
That looks a lot better — although it’s a wonder anyone can afford to live in London!
Tap the first row and check that the Xcode console reflects the selection:
2017-11-26 23:29:19.943 [info][tid:com.facebook.react.JavaScript] Pressed row: 0
Try tapping other listings or searching other locations in the UK.
Where To Go From Here?
Congratulations on completing this React Native tutorial! You can find the complete project here if you want to compare notes. :]
As a challenge, try showing a property’s details when the user selects one from the search list. You can check out the challenge solution if you get stuck.
npm install via the Terminal in the root folder of the project.Check out the React Native’s source code if you’re curious. I suggest taking a look at this ES6 resource to continue brushing up on modern JavaScript.
If you’re a web developer, you’ve seen how to use JavaScript to easily create a native app. If you’re a native app developer, you’ve gained some appreciation for React Native’s fast iteration cycle. Whether you decide to use React Native in a future app or simply stick with Swift, I hope you’ve learned some interesting principles to apply to your next project.
If you have any questions or comments on this React Native tutorial, feel free to join the discussion in the forums below!