React Native Tutorial: Building iOS Apps with JavaScript
In this React Native tutorial you’ll learn how to build native iOS and Android apps based on the hugely popular React JavaScript library. By Christine Abernathy.
Using JSX
Your current application uses React.createElement to construct the simple UI for your application, which React turns into the native equivalent. While your JavaScript code is perfectly readable in its present form, a more complex UI with nested elements would rapidly become quite a mess.
Make sure the app is still running, then return to your text editor to edit App.js. Modify the body of render to be the following:
return <Text style={styles.description}>Search for houses to buy! (Again)</Text>;
This is JSX, or JavaScript syntax extension, which mixes HTML-like syntax directly in your JavaScript code; if you’re already a web developer, this should feel rather familiar. You’ll use JSX throughout this article.
Save your changes to App.js and return to the simulator. Press Cmd+R, and you’ll see your application refresh to display the updated message:

Re-running a React Native application is really as simple as refreshing a web browser! :] Note that this will only reflect changes made to your JavaScript files – native code or resource changes will require a rebuild in Xcode.
You can even skip having to refresh the app by enabling live reload. Press Cmd+D in the simulator then select Enable Live Reload:

In App.js, modify the render method’s body to the following:
return <Text style={styles.description}>Search for houses to buy!</Text>;
Save your changes. Note that the simulator automatically refreshes to reflect your changes:

Adding Navigation
PropertyFinder uses the standard stack-based navigation experience provided by UIKit’s navigation controller. It’s time to add this behavior.
In App.js, find the import statements near the top and add a comma following the View destructuring assignment. Then add the following below it:
NavigatorIOS,
This brings in NavigatorIOS that you’ll use for navigation.
Next, replace the App class definition with the following:
class SearchPage extends Component<{}> {
Add the following class below the SearchPage component:
export default class App extends Component<{}> {
  render() {
    return (
      <NavigatorIOS
        style={styles.container}
        initialRoute={{
          title: 'Property Finder',
          component: SearchPage,
        }}/>
    );
  }
}
This constructs a navigation controller, applies a style and sets the initial route to the SearchPage component. In web development, routing is a technique for defining the navigation structure of an application, where pages — or routes — are mapped to URLs.
Within the same file, add the following to the styles list under the closing brace of the description style:
container: {
  flex: 1,
},
This tells the component using this style to fill all available space. This ensures that the component’s children are visible.
Save your changes and check the simulator to see the updated UI:

There’s the navigation controller with its root view, which is currently the search description text. Excellent — you now have the basic navigation structure in place.
Building out the Search Page
Add a new file named SearchPage.js and place it in the same folder as App.js. Add the following code to this file:
'use strict';

import React, { Component } from 'react';
import {
  StyleSheet,
  Text,
  TextInput,
  View,
  Button,
  ActivityIndicator,
  Image,
} from 'react-native';
This imports the modules you’ll need to build the UI.
Add the following Component subclass after the import statements:
export default class SearchPage extends Component<{}> {
  render() {
    return (
      <View style={styles.container}>
        <Text style={styles.description}>
          Search for houses to buy!
        </Text>
        <Text style={styles.description}>
          Search by place-name or postcode.
        </Text>
      </View>
    );
  }
}
render is a great demonstration of JSX and the structure it provides. Along with the style, you can very easily visualize the UI constructed by this component: a container with two text labels.
Now, add the following style code at the bottom of the file:
const styles = StyleSheet.create({
  description: {
    marginBottom: 20,
    fontSize: 18,
    textAlign: 'center',
    color: '#656565'
  },
  container: {
    padding: 30,
    marginTop: 65,
    alignItems: 'center'
  },
});
Again, these are standard CSS properties. Setting up styles like this is less visual than using Interface Builder, but it’s better than setting view properties one by one in your viewDidLoad() methods! :]
Save your changes.
Open App.js and add the following just after the current import statements near the top of the file:
import SearchPage from './SearchPage';
This imports SearchPage from the file you just created.
Remove the SearchPage class and its associated description style from App.js. You won’t be needing that code any longer. This may also be a good time to get rid of the all unused imports: Platform, Text and View.
Save your changes and return to the simulator to check out the new UI:

Styling with Flexbox
So far, you’ve seen basic CSS properties that deal with margins, paddings and color. However, you might not be familiar with Flexbox, a more recent addition to the CSS specification that’s useful for handling complex layout across different screen sizes.
React Native uses the Yoga library under the hood to drive layout. Yoga is a C implementation of Flexbox and it includes bindings for Swift, Objective-C, Java (for Android), and C# (for .NET).
Generally you use a combination of flexDirection, alignItems, and justifyContent Yoga properties to manage your layout.
So far, your layout has a container with two children arranged vertically:

This is due to the default flexDirection value of column being active. flexDirection helps define the main axis and cross axis. Your container’s main axis is vertical. Its cross axis is, therefore, horizontal.
alignItems determines the placement of children in the cross axis. Your app has set this value to center. This means the children are center-aligned.
You’re going to see some other layout options at play.
Open SearchPage.js and insert the following just after the closing tag of the second Text element:
<View style={styles.flowRight}>
  <TextInput
    style={styles.searchInput}
    placeholder='Search via name or postcode'/>
  <Button
    onPress={() => {}}
    color='#48BBEC'
    title='Go'
  />
</View>
You’ve added a view that holds a text input and a button.
In your styles definition, add the following new styles below the container style:
flowRight: {
  flexDirection: 'row',
  alignItems: 'center',
  alignSelf: 'stretch',
},
searchInput: {
  height: 36,
  padding: 4,
  marginRight: 5,
  flexGrow: 1,
  fontSize: 18,
  borderWidth: 1,
  borderColor: '#48BBEC',
  borderRadius: 8,
  color: '#48BBEC',
},
These set the placement of the text input and button.
Save your changes and check the simulator to see your updates:
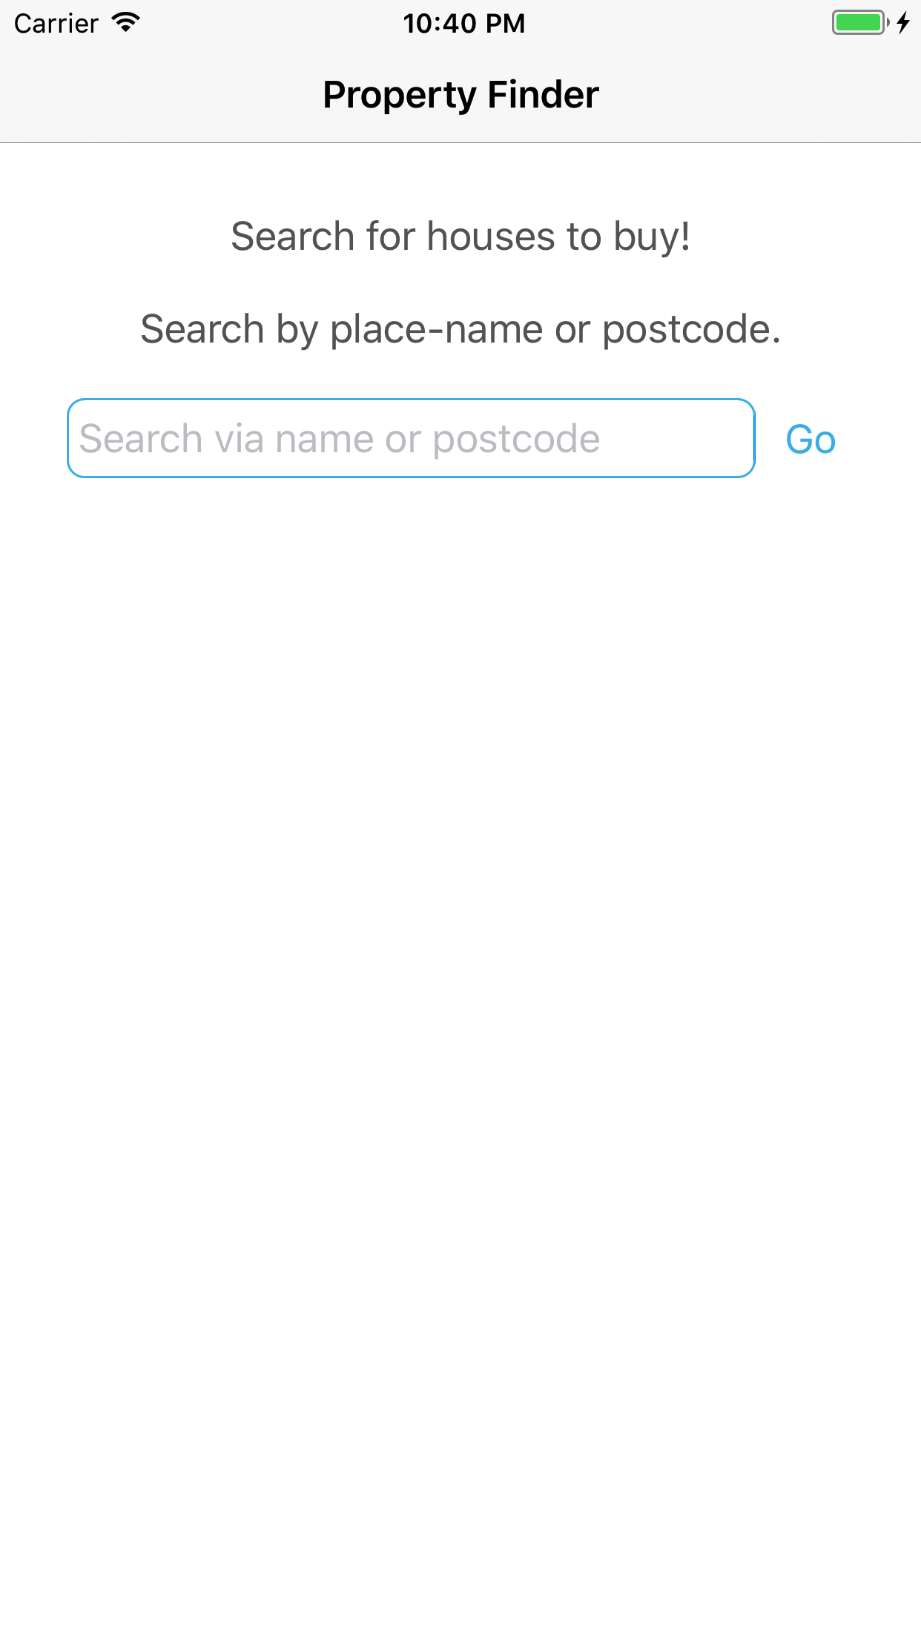
The text field and Go button are on the same row, so you’ve wrapped them in a container view using the flowRight style which uses flexDirection: 'row' to horizontally place the items in a row.
You’ve also added a flexGrow: 1 style to the text input. Yoga first lays out the text input and button according to their sizes. It then distributes the remaining space according to the flexGrow values. The text input therefore takes over the remaining space.
Button doesn’t provide much UI customization. You could build and customize your own buttons using TouchableOpacity or TouchableHighlight.