React Native Tutorial: Building iOS Apps with JavaScript
In this React Native tutorial you’ll learn how to build native iOS and Android apps based on the hugely popular React JavaScript library. By Christine Abernathy.
Handling Assets
The final step to complete the search screen of the application is to add the house graphic. Download and unzip the images zip file.
Next, create a directory in your root project folder and call it Resources. Place the three images of the house in this directory.
Asset Catalogs: Apple recommends placing images in Asset Catalogs where possible. In React Native, however, it’s recommended not to. Placing your assets alongside your components helps to keep your components self contained, doesn’t require the app to be relaunched if you add new images. It also provides a single place for adding images if you are building for both iOS and Android.
Back in SearchPage.js, add the following beneath the closing tag of the View component that wraps the text input and button:
<Image source={require('./Resources/house.png')} style={styles.image}/>
Now, add the image’s corresponding style to the end of the style list:
image: {
  width: 217,
  height: 138,
},
Save your changes and check out your new UI:

react-native start command you have in the terminal).Your current app looks good, but it’s somewhat lacking in functionality. Your task now is to add some state to your app and perform some actions.
Adding Component State
A React component can manage its internal state through an object called, you guessed it, state. Whenever a component’s state changes, render() is called.
Within SearchPage.js, add the following code just before render():
constructor(props) {
  super(props);
  this.state = {
    searchString: 'london'
  };
}
Your component now has a state variable, with searchString set to an initial value of london.
Within render(), change TextInput to the following:
<TextInput
  style={styles.searchInput}
  value={this.state.searchString}
  placeholder='Search via name or postcode'/>
This sets the TextInput value property — that is, the text displayed to the user — to the current value of the searchString state variable. This takes care of setting the initial state, but what happens when the user edits this text?
The first step is to create a method that acts as an event handler. Within the SearchPage class add the following method below the constructor:
_onSearchTextChanged = (event) => {
  console.log('_onSearchTextChanged');
  this.setState({ searchString: event.nativeEvent.text });
  console.log('Current: '+this.state.searchString+', Next: '+event.nativeEvent.text);
};
This defines a function using the => syntax. This is an arrow function, another recent addition to the JavaScript language that provides a succinct syntax for creating anonymous functions.
The function takes the value from the native browser event’s text property and uses it to update the component’s state. It also adds some logging code that will make sense shortly.
Note: JavaScript classes do not have access modifiers, so they have no concept of private. As a result you often see developers prefixing methods with an underscore to indicate that they should be considered private.
To wire up this method so it gets called when the text changes, return to the TextInput field within the render method and add an onChange property so the tag looks like the following:
<TextInput
  style={styles.searchInput}
  value={this.state.searchString}
  onChange={this._onSearchTextChanged}
  placeholder='Search via name or postcode'/>
Whenever the user changes the text, you invoke the function supplied to onChange; in this case, it’s _onSearchTextChanged.
There’s one final step before you refresh your app again: add the following logging statement to the top of render(), just before return:
console.log('SearchPage.render');
Save your changes and return to your simulator.

You should see the text input’s initial value set to london. You should also see Xcode console logs when editing the text:
2017-11-26 23:00:31.847 [info][tid:com.facebook.react.JavaScript] SearchPage.render
2017-11-26 23:00:38.134 [info][tid:com.facebook.react.JavaScript] _onSearchTextChanged
2017-11-26 23:00:38.134 [info][tid:com.facebook.react.JavaScript] Current: london, Next: londona
2017-11-26 23:00:38.135 [info][tid:com.facebook.react.JavaScript] SearchPage.render
Looking at the console logs, the order of the logging statement seems a little odd:
- This is the initial call to
render()to set up the view. - You invoke
_onSearchTextChanged()when the text changes. - You call
this.setState()to schedule an update to the component state to reflect the new input text. This triggers another render. - You log the current and the next search text values.
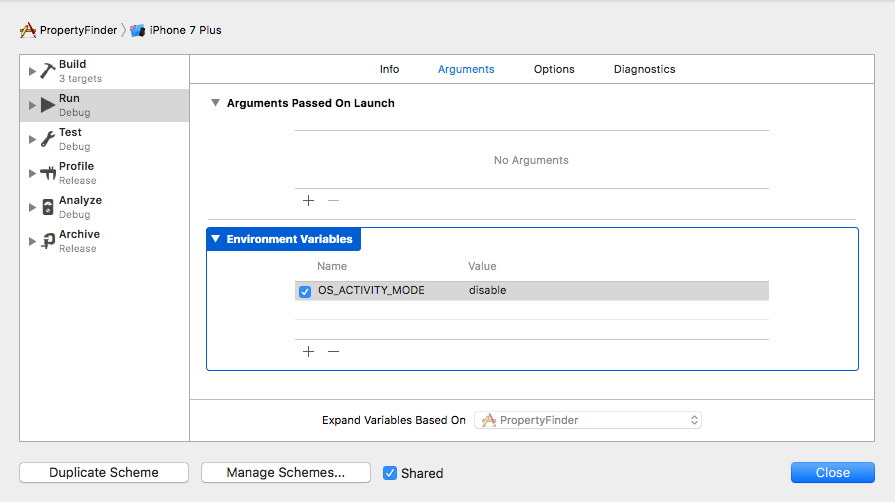
Note: You may see frequent log messages related to nw_connection_get_connected_socket or finished with error - code : -1001. These are due to attempted connections to the React debugging tools. Silence these temporarily by going to Product \ Scheme \ Edit Scheme and finding the Arguments tab of the Run config. Add a new environment variable called OS_ACTIVITY_MODE with the value disable.
Build and run the project for the settings to take effect.
A React component state change triggers a UI update. This de-couples the rendering logic from state changes affecting the UI. Most other UI frameworks put the onus on you to update the UI based on state changes. Alternatively, the updates are done through an implicit link between the state and UI. For an example of the latter, see this article on implementing the MVVM pattern with ReactiveCocoa.
At this point you’ve probably spotted a fundamental flaw in this concept. Yes, that’s right — performance!
Surely you can’t just throw away your entire UI and re-build it every time something changes? This is where React gets really smart.
Each time the UI renders itself, it takes the view tree returned by your render methods, and reconciles — or diffs — it with the current UIKit view. The output of this reconciliation process is a simple list of updates that React needs to apply to the current view. That means only the things that have actually changed will re-render!
You can wrap your head around all that later; you still have some work to do in the app.
Initiating a Search
First, remove the logging code you just added above, since it’s no longer necessary.
In order to implement the search functionality you need to handle the Go button press, create a suitable API request, and provide a visual indication that a query is in progress.
Within SearchPage.js, update the initial state within the constructor:
this.state = {
  searchString: 'london',
  isLoading: false,
};
The new isLoading property will keep track of whether a query is in progress.
Add the following logic to the start of render:
const spinner = this.state.isLoading ?
  <ActivityIndicator size='large'/> : null;
This is a ternary if statement that optionally adds an activity indicator, depending on the component’s isLoading state. Because the entire component is rendered each time, you are free to mix JSX and JavaScript logic.
Within the JSX that defines the search UI in return, add the following line below the Image to place the spinner:
{spinner}
Next, add the following methods to the SearchPage class:
_executeQuery = (query) => {
  console.log(query);
  this.setState({ isLoading: true });
};

_onSearchPressed = () => {
  const query = urlForQueryAndPage('place_name', this.state.searchString, 1);
  this._executeQuery(query);
};
_executeQuery() will eventually run the query, but for now it simply logs a message to the console and sets isLoading appropriately so the UI can show the new state.
_onSearchPressed() configures and initiates the search query. This should kick off when the Go button is pressed.
To accomplish that, go back to the render method and replace the onPress prop for the Go Button as follows:
onPress={this._onSearchPressed}
Finally, add the following utility function just above the SearchPage class declaration:
function urlForQueryAndPage(key, value, pageNumber) {
  const data = {
      country: 'uk',
      pretty: '1',
      encoding: 'json',
      listing_type: 'buy',
      action: 'search_listings',
      page: pageNumber,
  };
  data[key] = value;

  const querystring = Object.keys(data)
    .map(key => key + '=' + encodeURIComponent(data[key]))
    .join('&');

  return 'https://api.nestoria.co.uk/api?' + querystring;
}
urlForQueryAndPage doesn’t depend on SearchPage, so it’s implemented as a free function rather than a method. It first creates the query string based on the parameters in data. Then it transforms the data into name=value pairs separated by ampersands. Finally, it calls the Nestoria API to return the property listings.
Save your changes, head back to the simulator and press Go. You’ll see the activity indicator spin:

Your Xcode console should show something like this:
2017-11-26 23:19:21.950 [info][tid:com.facebook.react.JavaScript] https://api.nestoria.co.uk/api?country=uk&pretty=1&encoding=json&listing_type=buy&action=search_listings&page=1&place_name=london
Copy and paste that URL into your browser to see the result. You’ll see a massive JSON object. Don’t worry — you don’t need to understand that! You’ll add code to parse that now.