Unity 4.3 2D Tutorial: Animations
Learn how to use Unity’s powerful built-in animation system in this Unity 4.3 2D Tutorial! By Chris LaPollo.
Adding Curves Manually
It’s perfectly fine to let Unity add any necessary curves for you based on changes you make while recording a clip, but sometimes you’ll want to add a curve explicitly from within the Animation view.
Select cat in the Hierarchy, and then choose CatWiggle from the clip drop-down menu in the Animation view’s control bar.
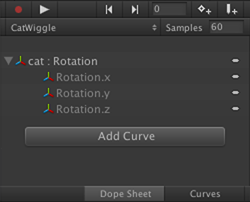
Click Add Curve to reveal the following menu:

This menu lists each Component on the associated GameObject. Click the triangle next to Transform to reveal the properties available for animating, and click the + icon on the right side of Rotation to add a Rotation curve, as demonstrated below:

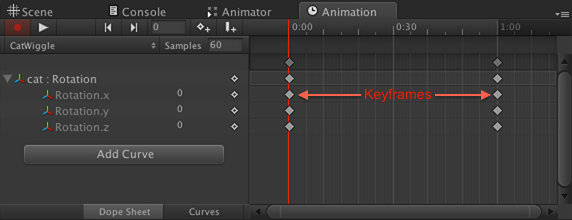
Inside the Animation view, click the triangle to the left of cat : Rotation to expose curves for the x, y and z rotation properties. Unity gives you three curves so you can manipulate each component of the rotation individually, and as you can see in the following image, Unity automatically added keyframes at frames 0 and 60 of each curve it created:
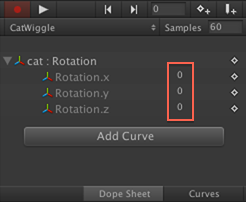
Each of the keyframes Unity added has the same values – whatever ones existed on the GameObject when you added the curve. In this case, the rotations are all zero, as shown below:
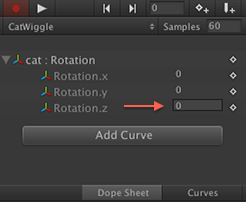
Inside the Animation view, make sure the scrubber is at frame zero. Move your cursor over the 0 next to Rotation.z, and notice that it highlights to indicate that it’s actually a text field, as shown below:
Click in the Rotation.z field and change the value to 22.5, as shown below:
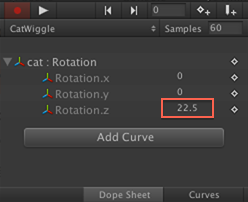
Now move the scrubber to frame 30 and set the Rotation.z value to -22.5. Unity automatically creates a new keyframe here to store this new value, as shown below:

Finally, move the scrubber to frame 60 and set the Rotation.z value to 22.5.
Press the Play button in the Animation view to preview the rotation. Be honest, that cat’s soothing oscillation makes you want to tape a cat to a fan, doesn’t it?

To make the cat look more like it’s hopping around rather than just swiveling from side to side, you’ll add a bit of scaling to the animation. Basically, you want the cat to be its normal size at the extremes of its rotation, and a bit larger right in the middle.
With what you’ve practiced already, you should have no problem adding a Scale curve to CatWiggle. Do so now.
[spoiler title=”Don’t remember how to add a curve?”]You can add a Scale curve in either of the following two ways:
Bonus: Animation View Extras
Where to Go From Here?
Curves Mode
Editing in Preview Mode
[/spoiler]
The rotation is at its most extreme values at the keyframes you placed at 0, 30 and 60, so it’s at its midpoint at frames 15 and 45. That means you’ll want to increase the scale at these two frames.
Set the X and Y Scale values to 1.2 at frames 15 and 45, and set them to 1 at frames 0, 30 and 60.
You’ve learned two different ways to set values, so give it a try yourself.
[spoiler title=”Need a refresher on setting values for keyframes?”]You can set these values in either of the two ways you’ve learned:
No matter which method you choose, be sure to move to the appropriate frame before setting each value.
[/spoiler]
When you’re done, you should have keyframes that look like this:
Preview the animation by clicking the Play button in the Animation view. Your cat should now look quite enticing to a hungry zombie:

Now run your scene. Hmm, the cat still just pops in and then stays perfectly still, like it just saw a ghost or something else equally terrifying.

The problem is that you have more than one Animation Clip associated with the cat, so now you need to make sure the cat plays the correct animation at the correct time. To do that, you need to configure the cat’s Animator Controller, which you’ll learn how to do in the next part of this tutorial!
Here are a couple extra bits of information about the Animation view that you may find useful.
While this tutorial didn’t cover the Animation view’s Curves mode, you’ll probably find you need to use it at some point to fine-tune your animations.
In Curves mode, the timeline displays a graph of the selected curves. The following image shows the Animation view in Curves mode with both the Rotation.z and the Scale.x curves selected:

You can use this mode to add, delete and move keyframes, as well as set values for keyframes like you did in Dope Sheet mode. However, the real power of Curves mode comes from its ability to adjust the values between the keyframes.
If you select any keyframe, you can access a menu of options by either right-clicking on it, which is often tricky to accomplish, or by clicking the diamond for that curve in the curves list, as shown below:

The options in the menu allow you to control the curve between the keyframes. By selecting an option like Free Smooth, Flat, or Broken, you can then click on a keyframe in the timeline and access handles to control how the curve enters/exits that keyframe, as shown below:

Working directly with the curves can be tricky and error prone; it’s certainly not an exact science. But if you aren’t happy with the timing of one of your animations, playing around with these options can sometimes help.
You probably already know that if you make any changes to your GameObjects while playing a scene in the editor, these changes are lost when you stop the scene. However, this is not the case when previewing Animation Clips using the Animation view’s Play button.
That means that you can tweak the values of a clip while it loops in preview mode until you get them just right. This can come in handy sometimes, such as when adjusting curves in Curves mode or when adjusting a clip’s timing by moving keyframes.
In this part of the tutorial you learned about using Unity’s Animation view to create Animation Clips for your 2D games. You can find a copy of the project with everything you did here.
While you can get started making animations with just this information, there are still more details to cover. You’ll get more practice making Animation Clips in the next part of this tutorial, and you’ll learn about using Animator Controllers to transition between different clips. In the final part of this tutorial series, you’ll finish Zombie Conga with an introduction to Unity’s 2D physics engine and a bit more scripting.
Also, don’t forget that Unity has great documentation. For more information on the Animation view (along with some stuff that will be covered in the next part of this tutorial), take a look here.
I hope you enjoyed this tutorial and found it useful. As always, please ask questions or leave remarks in the Comments section.
- Click Add Curve in the Animation view, expand Transform in the menu that appears and click the + button to the right of Scale.
- Simply press the Record button in the Animation view to enter recording mode and let Unity add the Scale curve automatically once you start changing values.
- Edit the values in the fields located in the curves list in the Animation view.
- Press the Record button in the Animation view to enter recording mode and then set the values in the Inspector while recording.
- Edit the values in the fields located in the curves list in the Animation view.
- Press the Record button in the Animation view to enter recording mode and then set the values in the Inspector while recording.