Unity 4.3 2D Tutorial: Animations
Learn how to use Unity’s powerful built-in animation system in this Unity 4.3 2D Tutorial! By Chris LaPollo.
Animating Other Properties
Unity can animate things other than Sprites. Specifically, Unity can animate values for any of the following types:
- Bool
- Float
- Color
- Vector2
- Vector3
- Vector4
- Quaternion
- Object Reference
For the zombie, you won’t modify anything other than the Sprite, but over the lifetime of a cat, it will move through the following sequence of animations:

There are actually five different Animation Clips at work here:
- Rather than have cats just appear on the beach, you’ll animate them in from nothingness.

- The cats will wiggle back and forth to attract the zombie’s attention.

- When the zombie touches a cat, the cat will turn into a zombie itself. You’ll transition it from white to green to give it a nice, undead look.

- By combining this simple scaling animation with forward motion, it will give the impression that the cats are happily hopping along in their conga line…of dooooooooom!

- When the old lady hits your player’s zombie, you’ll remove some cats from the scene. Rather than just make them disappear, you’ll spin them into nothingness, signifying their mad descent into wherever kitties go after they die after having already died once. Poor little twice-dead kitties.

You’ll produce each of those animations without any additional artwork. Instead, you’ll animate the cat’s scale, rotation and color properties.
Create the Cat’s Animation Clips
Select cat in the Hierarchy. Remember, Unity decides where to attach new Animation Clips based on the most recent Hierarchy selection.
In the Animation view, choose [Create New Clip] from the clip drop-down menu in the control bar, shown below:

In the dialog that appears, name the new clip CatSpawn, select the Animations directory, and click Save.
Unity automatically adds an Animator component to the cat when you create the first Animation Clip. As you make each of the following clips, Unity will automatically associate them with this Animator.
Repeat the above process to create four more clips, one for each of the other animations you’re going to make. Name them CatWiggle, CatZombify, CatConga and CatDisappear.
The Animation view’s clip drop-down menu now contains all five clips, as shown below:

Of course, if you created the clips before you read this note for some silly reason, like because those instructions came before this note, well then one of us made a serious mistake in our order of operations, didn’t one of us?
Adding Curves Automatically
This tutorial will show a few different techniques for setting up Animation Clips. For the zombie’s walk cycle, you dragged Sprites into the Animation view and Unity created all the necessary components automatically. This time, you’ll start with an empty clip to edit and let Unity add the curves for you.
Select cat in the Hierarchy, then select CatSpawn from the Animation view’s clip drop-down menu to begin working on this clip, as shown below:

To enter recording mode, press the Record button in the Animation view, shown below:
Record button before pressing it.

Once again, Unity indicates that you are now in recording mode by tinting red the Animation view’s Record button, the scene controls, and the checkbox next to the cat’s Animator component. The Record button while recording is shown below:
Record button after pressing it.

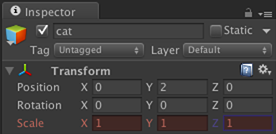
For the cat’s spawning animation, you simply want to scale the cat from zero to one. In the Inspector, set the Scale values for X and Y to 0. A 2D object’s scale along its z-axis has no effect, so you can ignore the Scale’s Z value.
Your Transform component in the Inspector now looks like this:

As soon as you adjusted one of the Scale fields, they all turned red in the Inspector to indicate that you are currently recording an animation for the cat that contains a Scale curve. Unity automatically added a curve to your Animation Clip named cat : Scale, shown below:

Look in either your Scene or Game views and you will see that your cat just disappeared!

Technically, the cat is still located right where it was, but without a width and height, you can’t see it. That’s because while recording an animation, your Scene and Game views display the GameObject as it appears in the frame currently selected in the Animation view. But what frame is selected in the Animation view?
Take a look at the Animation view’s timeline, which now includes a single keyframe at 0:00 on the cat : Scale curve, as shown below:
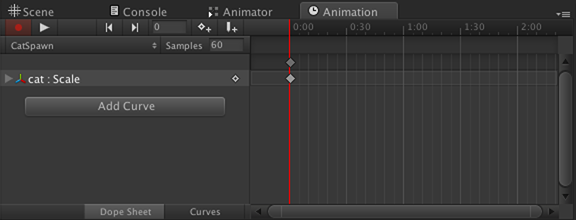
The vertical red line you see in the above image is the scrubber. Its position indicates your current frame in the animation. Any changes you make will be recorded at this frame, creating a new keyframe there if necessary. Also, as was previously mentioned, the Scene and Game views will display your GameObject as it will appear during this frame of animation.
The scrubber appears whenever you are in recording mode, as well as while previewing your animation with the Animation view’s Play button.
The Animation view’s control bar includes a current frame field that indicates the frame at which the scrubber is located. As you can see below, it is currently at frame zero:

Type 15 in the frame field to move the scrubber to frame 15. Because this clip is set to run at 60 frames per second, the scrubber is now at 0:15, as the following image shows:

In the Inspector, set the cat’s X and Y values for Scale to 1, as shown below:
Press the Play button in the Animation view to preview your animation. Inside the Game or Scene views, watch your cat scale up to full size and then disappear, over and over again.

Click the Record button in the Animation view to exit recording mode.
Play your scene and notice that the cat still flashes continuously in and out of existence. Hmm, that wasn’t just a feature of the Animation view’s Preview mode?

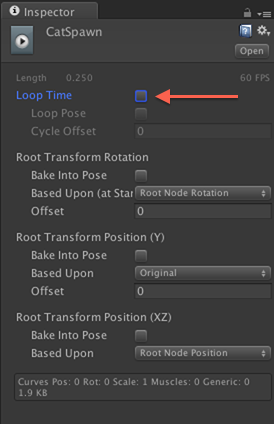
Everyone loves a pulsating cat, but that’s not really what you were going for. The problem is that Animation Clips in Unity loop by default, but this should really be a one shot deal.
Select CatSpawn in the Project browser to view the Animation Clip’s properties in the Inspector. Uncheck the box labeled Loop Time to disable looping, as shown here:
Play the scene again and the cat pops in before remaining very, very still.
Note: If it’s too hard to see the animation, you can temporarily decrease the samples to 10 like you did earlier to slow down the animation. Just be sure to set it back when you’re done!

You’d think it would want to draw a little more attention to itself to attract the zombie, right? Well, nothing attracts zombies like a wiggling cat, so it’s time to make it wiggle.