Testing With Hilt Tutorial: UI and Instrumentation Tests
Learn how to get started with testing with Hilt by writing UI and instrumentation tests. By Massimo Carli.
Adding the Assertions for the UI Test
Now, you’re finally ready to implement RoboMainActivityTest with the actual test. Open RoboMainActivityTest.kt and replace the test function whenMainActivityLaunchedNavigationHelperIsInvokedForFragment inside the RoboMainActivityTest class with the following new function definition:
import com.google.common.truth.Truth.assertThat
import com.raywenderlich.rwnews.ui.list.NewsListFragment
import com.raywenderlich.rwnews.R

// Annotations
class RoboMainActivityTest {
  // ...
  @Test
  fun whenMainActivityLaunchedNavigationHelperIsInvokedForFragment() {
    activityScenarioRule.scenario // 1
    val fakeHelper = navigator as FakeNavigationHelper // 2
    with(fakeHelper.replaceRequests[0]) { // 3
      assertThat(anchorId)
          .isEqualTo(R.id.anchor)
      assertThat(fragment)
          .isInstanceOf(NewsListFragment::class.java)
      assertThat(backStack)
          .isNull()
    }
  }
  // ...
}
In this code, you:
- Launch
MainActivity, accessing thescenarioproperty ofactivityScenarioRule. - Access
navigatorafter a cast toFakeNavigationHelper. - Use the Truth library to verify that
FakeNavigationHelperhas been invoked with the expected parameter values.Note: You can also use any other assertion library that you prefer.
Now, you can finally run the test and check if it’s successful.
Congratulations! You’ve created your first UI test using Hilt and Robolectric. Along the way, you learned how to use @UninstallModules and @BindValue to adapt the dependency graph of the app to the specific test.
Implementing Instrumentation Tests With Hilt and Espresso
In the previous part of the tutorial, you created a UI test using Robolectric. Now, you’ll use Hilt and Espresso to implement a test that’s a bit more challenging. In particular, you’ll create an Espresso UI test for NewsListFragment. In this case, you have some more work to do, because you need to:
- Add the Hilt dependencies for the instrumentation test.
- Create an
@AndroidEntryPointactivity to use as the container for theFragmentunder test. - Implement a utility class to launch the
Fragmentunder test into the Hilt-enabledActivity. - Create a custom
AndroidJUnitRunnerthat usesHiltTestApplicationinstead of the one Android provides by default, then configure it in build.gradle. - Implement and run the instrumentation test.
Code along and everything will be fine. :]
Adding Instrumentation Test Dependencies
To run UI test with Espresso and Hilt, you need to add the following dependencies to the build.gradle for the app:
// ...
dependencies {
  // Hilt for instrumented tests.
  androidTestImplementation "com.google.dagger:hilt-android-testing:$hilt_android_version" // 1
  kaptAndroidTest "com.google.dagger:hilt-android-compiler:$hilt_android_version" // 2
  // ...
}
Only two things to note here:
- You add the dependency to the Hilt library for the instrumentation test in the androidTest build type.
- For the same reason, you use kaptAndroidTest to install the annotation processor that’s responsible for generating the testing code from the Hilt definition in instrumented tests.
Now, Sync Project with Gradle files and you’re ready to start writing your Espresso test. Its dependencies are already in the project.
Creating an Activity Container for the Fragment to Test
Usually, before you test a Fragment, you first launch an Activity as its container. With Hilt, there’s a problem — if the Fragment is an @AndroidEntryPoint, the same must be true for the container Activity. If you just use ActivityScenario, this doesn’t happen automatically. That’s why you need to create an activity container.
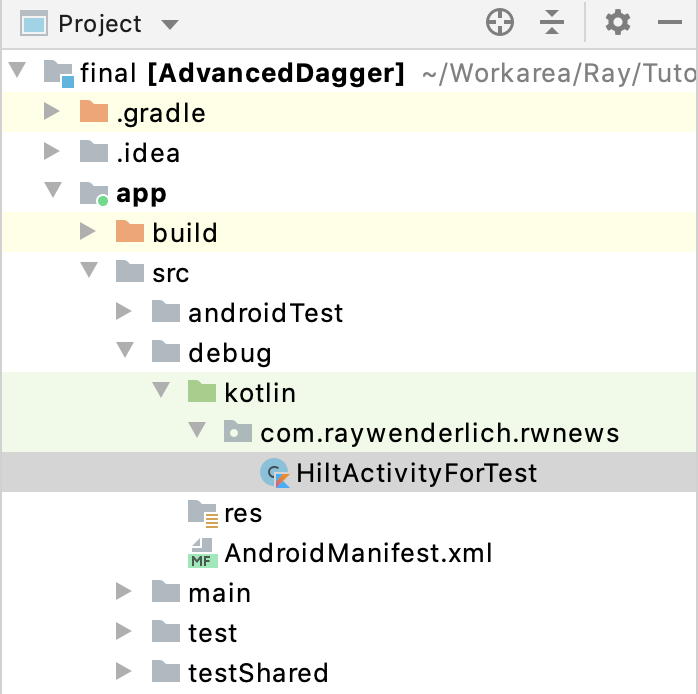
Start by creating a new folder named kotlin in debug, then create a package named com.raywenderlich.rwnews inside. For your next step, create a new class in it named HiltActivityForTest.kt and add the following code:
import androidx.appcompat.app.AppCompatActivity
import dagger.hilt.android.AndroidEntryPoint

@AndroidEntryPoint // HERE
class HiltActivityForTest : AppCompatActivity()
Here, you create HiltActivityForTest, only to be able to mark it with @AndroidEntryPoint as explained earlier.
Next, you need to tell the instrumentation environment to use HiltActivityForTest during the test. Create AndroidManifest.xml for debug, like this:
<manifest xmlns:android="http://schemas.android.com/apk/res/android"
  package="com.raywenderlich.rwnews">

  <application>
    <activity
      android:name=".HiltActivityForTest"
      android:exported="false" />
  </application>
</manifest>
At this point, your structure will look like the image below and the FragmentTestUtil.kt will build successfully. Yeah! :]
Debug Build Type.
But what exactly is in FragmentTestUtil? You’ll explore that next.
Launching the Fragment Under Test
The starter project for RW News already contains FragmentTestUtil.kt. Open it and take a look at its code, specifically at the following signature:
inline fun <reified T : Fragment> launchFragmentInHiltContainer(
    fragmentArgs: Bundle? = null,
    @StyleRes themeResId: Int = R.style.FragmentScenarioEmptyFragmentActivityTheme,
    crossinline action: Fragment.() -> Unit = {}
) {
  // ...
}
You’ll use launchFragmentInHiltContainer() to launch a Fragment in the context of HiltActivityForTest. Both are Hilt @AndroidEntryPoints.
Creating the Custom AndroidJUnitRunner
To run the UI test you implemented using Roboletric, you had to specify which TestRunner implementation to use. You did that by either using @Config in the test itself or application in robolectric.properties.
Now, you have to do the same for the instrumentation test — with the important difference that you also need to create a runner.
Create a new runner package under androidTest/java/com.raywenderlich.rwnews. After that, create HiltTestRunner.kt inside it and add the following code:
import android.app.Application
import android.content.Context
import androidx.test.runner.AndroidJUnitRunner
import dagger.hilt.android.testing.HiltTestApplication

class HiltTestRunner : AndroidJUnitRunner() {

    override fun newApplication(
        cl: ClassLoader?,
        className: String?,
        context: Context?
    ): Application {
        return super.newApplication(
            cl,
            HiltTestApplication::class.java.name, // HERE
            context
        )
    }
}
Here, you override newApplication and force Hilt to use HiltTestApplication as the Application implementation for the tests. This code tells Hilt to use a different dependency graph for your instrumentation tests.
For your next step, you need to tell Gradle to use this implementation in place of the existing one. Open build.gradle for the app and apply the following change:
// ...
android {
  ...
  defaultConfig {
    ...
    testInstrumentationRunner "com.raywenderlich.rwnews.runner.HiltTestRunner" // HERE
  }
  // ...
}
// ...
Here, you replaced the existing value for testInstrumentationRunner with HiltTestRunner‘s fully qualified name.
Next, Sync Project with Gradle files. Once that successfully completes, it’s finally time to write the instrumentation test for NewsListFragment.
Implementing NewsListFragmentTest
To implement NewsListFragment‘s test, create a new file named NewsListFragmentTest.kt inside androidTest/java/com.raywenderlich.rwnews and add the following code (adding the missing imports using IDE):
@HiltAndroidTest
@UninstallModules(AppModule::class) // HERE
class NewsListFragmentTest {

    @get:Rule
    var hiltAndroidRule = HiltAndroidRule(this)

    @Before
    fun setUp() {
        hiltAndroidRule.inject()
    }
}
Here in this code block, @UninstallModules annotation is used to remove bindings defined via the AppModule class which contains bindings for NewsRepository and RwNewsLogger.
Next, in the same class file add the following code (adding the missing imports using IDE):
class NewsListFragmentTest {

    // Rule definition
    // Before tests setup

    @Module
    @InstallIn(SingletonComponent::class) // 1
    object TestAppModule {

        @Provides
        fun provideNewsRepository(): NewsRepository { // 2
            return FakeNewsRepository().apply {
                insert(News(1, "First Title", "First Body"))
                insert(News(2, "Second Title", "Second Body"))
                insert(News(3, "Third Title", "Third Body"))
            }
        }

        @Provides
        fun provideNewsLogger(): RwNewsLogger = FakeNewsLogger() // 2
    }
}
Here in this code block:
- Install
TestAppModuleto replace the previous bindings for the test. - You install a local
@Modulefor the test. It provides an instance ofFakeNewsRepository, which you populate with some dummy data. You do the same withFakeNewsLogger.
Finally, in the same class file add the test code (adding the missing imports using IDE):
class NewsListFragmentTest {

  // Rule definition
  // Before tests setup
  // Module setup

    @Test
    fun whenDisplayed_newsListFromRepoIsDisplayed() { // 1
        launchFragmentInHiltContainer<NewsListFragment>() // 2
        scrollAtAndCheckTestVisible(0, "First Title")
        scrollAtAndCheckTestVisible(1, "Second Title")
        scrollAtAndCheckTestVisible(2, "Third Title")
    }

    fun scrollAtAndCheckTestVisible(position: Int, text: String) {
        onView(ViewMatchers.withId(R.id.recycler_view))
            .perform(RecyclerViewActions
                .scrollToPosition<NewsListItemViewHolder>(position))
        onView(withText(text)).check(matches(isDisplayed()))
    }
}
This test should be quite straightforward now, but here are a few things to note:
- Implement the test, asserting that the data from
NewsRepositoryactually display in theRecyclerViewinNewsListFragment. - Use
launchFragmentInHiltContainer()to launchNewsListFragmentin theHiltActivityForTestyou prepared earlier.
Now, you can simply run the test as usual. With a successful test, you’ll get something like this:
Successful Espresso test
