Testing With Hilt Tutorial: UI and Instrumentation Tests
Learn how to get started with testing with Hilt by writing UI and instrumentation tests. By Massimo Carli.
Dagger is one of the most popular libraries for dependency injection for Java and Kotlin. It allows you to define dependency relationships between different components declaratively, by decorating your code with annotations such as @Inject and @Component.
As valuable as it is, Dagger is not simple. Google is addressing this by working hard to make it more accessible. Hilt is here for that reason — to provide a simpler way to define dependency injection in Android.
You already learned how to migrate your app to Hilt in the Migrating From Dagger to Hilt tutorial. Now, you’ll learn about how testing with Hilt can make your life easier.
In this tutorial, you’ll learn:
- The role of Dagger and Hilt in test implementation.
- How to implement and run UI tests with Robolectric and Hilt.
- How to simplify the implementation of instrumentation tests.
- What
@UninstallModulesand@BindValueare and how to use them in your tests.
You learn these things by implementing tests for the RW News app.
- Dagger 2 Tutorial For Android: Advanced
- Dagger 2 Tutorial for Android: Advanced — Part 2
- Migrating from Dagger to Hilt
- Dagger by Tutorials
Now, it’s time to dive in!
Getting Started
Download and unzip the materials for this tutorial using the Download Materials button at the top or bottom of this page. Open the starter project, then build and run. You’ll see the following:
RW News app

This is RW News, a new version of the app you already met in the Migrating From Dagger to Hilt tutorial. The app currently doesn’t have any tests, so it’s time to add some.
Open the RW News project and look at the initial structure for the code:
RWNews’s Initial Code Structure.
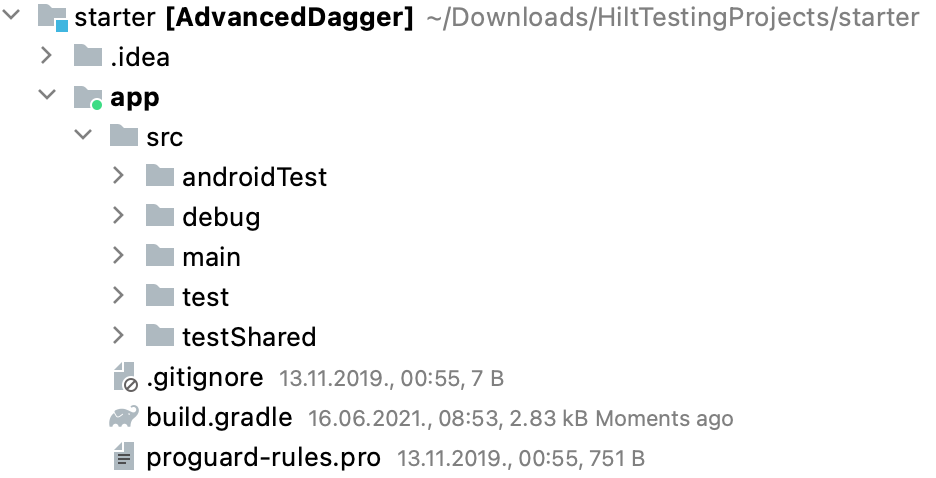
These are the important folders in the project, along with what they contain:
- androidTest: Instrumentation tests.
- debug: Code and tests available in debug mode.
- main: The main app code.
- test: Unit and Robolectric tests.
- testShared: Code you share between different types of tests. It currently contains the fakes you’ll use in this tutorial.
Implementing UI Tests With Hilt and Robolectric
Now, it’s time to to work on the interesting stuff! Your goal is to implement:
- UI tests with Robolectric.
- Instrumentation tests.
Robolectric is a testing framework that lets you implement and run tests that depend on the Android environment without an actual implementation of the Android platform. This allows you to run UI tests on the JVM without creating instances of the Android emulator. Tests run more quickly and require fewer resources when you use Robolectric.
In this tutorial, you’ll create a test for MainActivity. Before doing that, it’s important to understand the role of Dagger and Hilt, which already help you create the dependency tree of the objects for your app.
When you run tests, you need to replace some of the objects with a fake implementation — and for that, you need a different dependency tree. As you’ll see soon, Hilt lets you replace objects you use for the app with different objects that you only use when running tests.
Setting up Robolectric
Before you can write a UI test, you need to configure Robolectric. Your first step is to add the dependencies for Robolectric’s Hilt testing library.
Open build.gradle from app and add the following definition:
// ...
dependencies {
  // ...
  // Hilt for Robolectric tests.
  testImplementation "com.google.dagger:hilt-android-testing:$hilt_android_version" // 1
  testImplementation "org.robolectric:robolectric:$robolectric_version" // 2
  kaptTest "com.google.dagger:hilt-android-compiler:$hilt_android_version" // 3
}
Here, you:
- Add the dependency to use Hilt testing. This is a definition for the test build type.
- For the same test build type, you add the dependency to Robolectric.
- Use kaptTest to install the annotation processor responsible for generating the testing code from the Hilt definition.
The version you use in the code above is the same as that of the main Hilt library. Also, note that you must install an annotation processor when testing with Hilt. That’s because you need that annotation processor to generate some code.
Creating the RoboMainActivityTest File
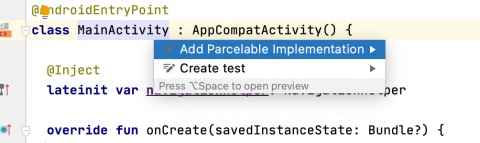
For an example of a UI test with Hilt and Roboletric, you’ll test MainActivity. Open MainActivity.kt in the ui package and look at its code:
@AndroidEntryPoint // 1
class MainActivity : AppCompatActivity() {

  @Inject
  lateinit var navigationHelper: NavigationHelper // 2

  override fun onCreate(savedInstanceState: Bundle?) {
    super.onCreate(savedInstanceState)
    val binding = ActivityMainBinding.inflate(LayoutInflater.from(this))
    setContentView(binding.root)
    if (savedInstanceState == null) {
      navigationHelper.replace(R.id.anchor, NewsListFragment()) // 3
    }
  }
}
This is a very simple Activity where you:
- Use
@AndroidEntryPointto tag the class as an Hilt entry point. - Define a property of type
NavigationHelper, which you initialize using@Inject. - Use
navigationHelperto displayNewsListFragment.
To test MainActivity‘s UI, you need to use NavigationHelper to display NewsListFragment when you launch MainActivity. This requires you to create a test class, which you’ll do next.
Implementing RoboMainActivityTest
Now you will create the test class and name it RoboMainActivityTest.
Open ui/MainActivity.kt. Now, put the cursor on the class name and press Option-Enter. You’ll see the following result:
Creating a Unit Test.
Select Create test and press Enter to get the following dialog:
Configuring the Test.
Select JUnit4 as your testing library. It’s important to note that you need to select test as the destination build type:
Robolectric UI Tests Folder.

Initially, you’ll get an empty class:
class RoboMainActivityTest
It’s important to check that this file is among the source files for the test build type:
RoboMainActivityTest Location.

Next, you’ll add some code to implement the test.