Firebase Tutorial: iOS A/B Testing
iOS A/B Testing is an effective way to test user experiences in iOS apps. Learn how Firebase makes it easy to run experiments and review results. By Ron Kliffer.
Adding Events
Firebase Analytics, like most other mobile analytics solutions, uses an event-based model. As users perform actions in your app, Firebase Analytics sends events to its servers. Sometime later, these servers process those events and turn them into meaningful graphs for you to analyze.
Open ContainerViewController.swift. Add the following to the top of the file:
import Firebase
Next, add the following to the end of viewDidLoad():
Analytics.logEvent("mainPageLoaded", parameters: nil)
This will send an event named mainPageLoaded when your user first starts the app and makes it to your main screen. The parameters argument is an optional dictionary of key/value pairs associated with this event. You don’t need any here, so leave this as nil.
Next, open GetNewsletterViewController.swift. Add the following to the top of the file:
import Firebase
Add the following to the end of viewDidLoad():
Analytics.logEvent("newsletterPageLoaded", parameters: nil)
Finally, add the following to the end of submitButtonWasPressed(_:):
Analytics.logEvent("newsletterSubscribed", parameters: nil)
Your app will now trigger different analytics events when users first visit the main page or the newsletter page and when they click the Submit button to sign up for the newsletter.
Enabling Debug View
Before you build and run, you’ll want to turn on Firebase Analytics debug mode, which lets you see the results of all these analytics calls in the console.
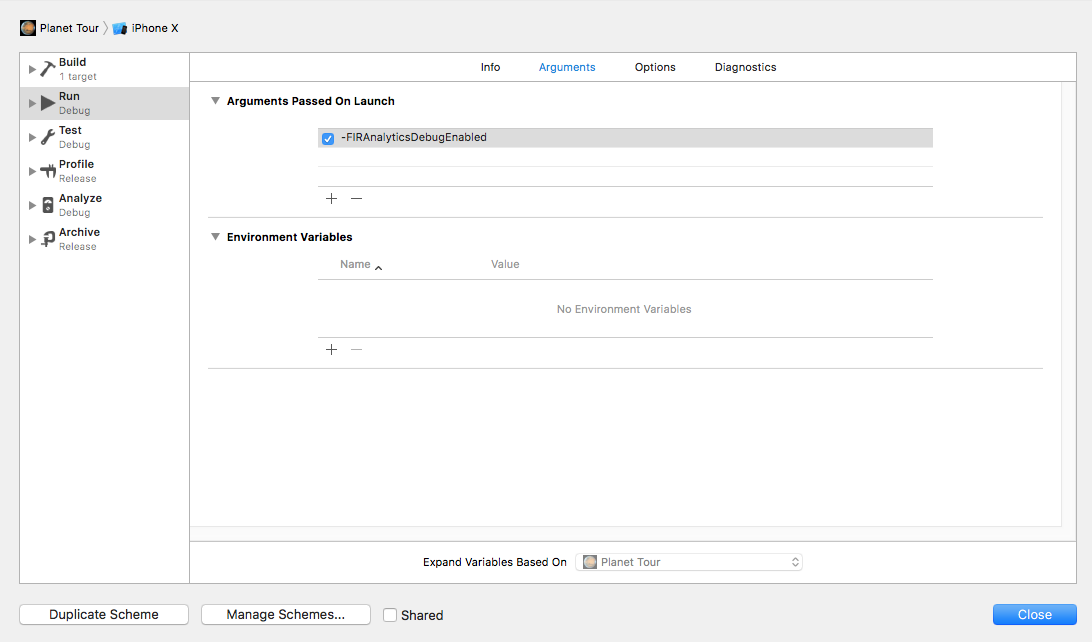
To do this, select Product ▸ Scheme ▸ Edit Scheme. In the Run scheme, select Arguments. In Arguments Passed On Launch, click the + symbol and enter the argument -FIRAnalyticsDebugEnabled. Make sure you include the dash at the beginning.
When you’re done, you should have something like the following:
Close the dialog, and build and run. Now, you’ll see much more output in the console. There will be text like the following:
[Firebase/Analytics][I-ACS023051] Logging event: origin, name, params: app, mainPageLoaded, {
    firebase_event_origin (_o) = app;
    firebase_screen_class (_sc) = WaitingViewController;
    firebase_screen_id (_si) = 5917351895999520221;
}
You can click into the console and press Command-F and then enter mainPageLoaded in the search box to find this if you can’t find it manually.
When you tap Get our newsletter! (or Get more facts!), the app will also log this to your console:
[Firebase/Analytics][I-ACS023051] Logging event: origin, name, params: app, newsletterPageLoaded, {
    firebase_event_origin (_o) = app;
    firebase_screen_class (_sc) = ContainerViewController;
    firebase_screen_id (_si) = 5917351895999520222;
}
It will log a similar event when you tap Subscribe.
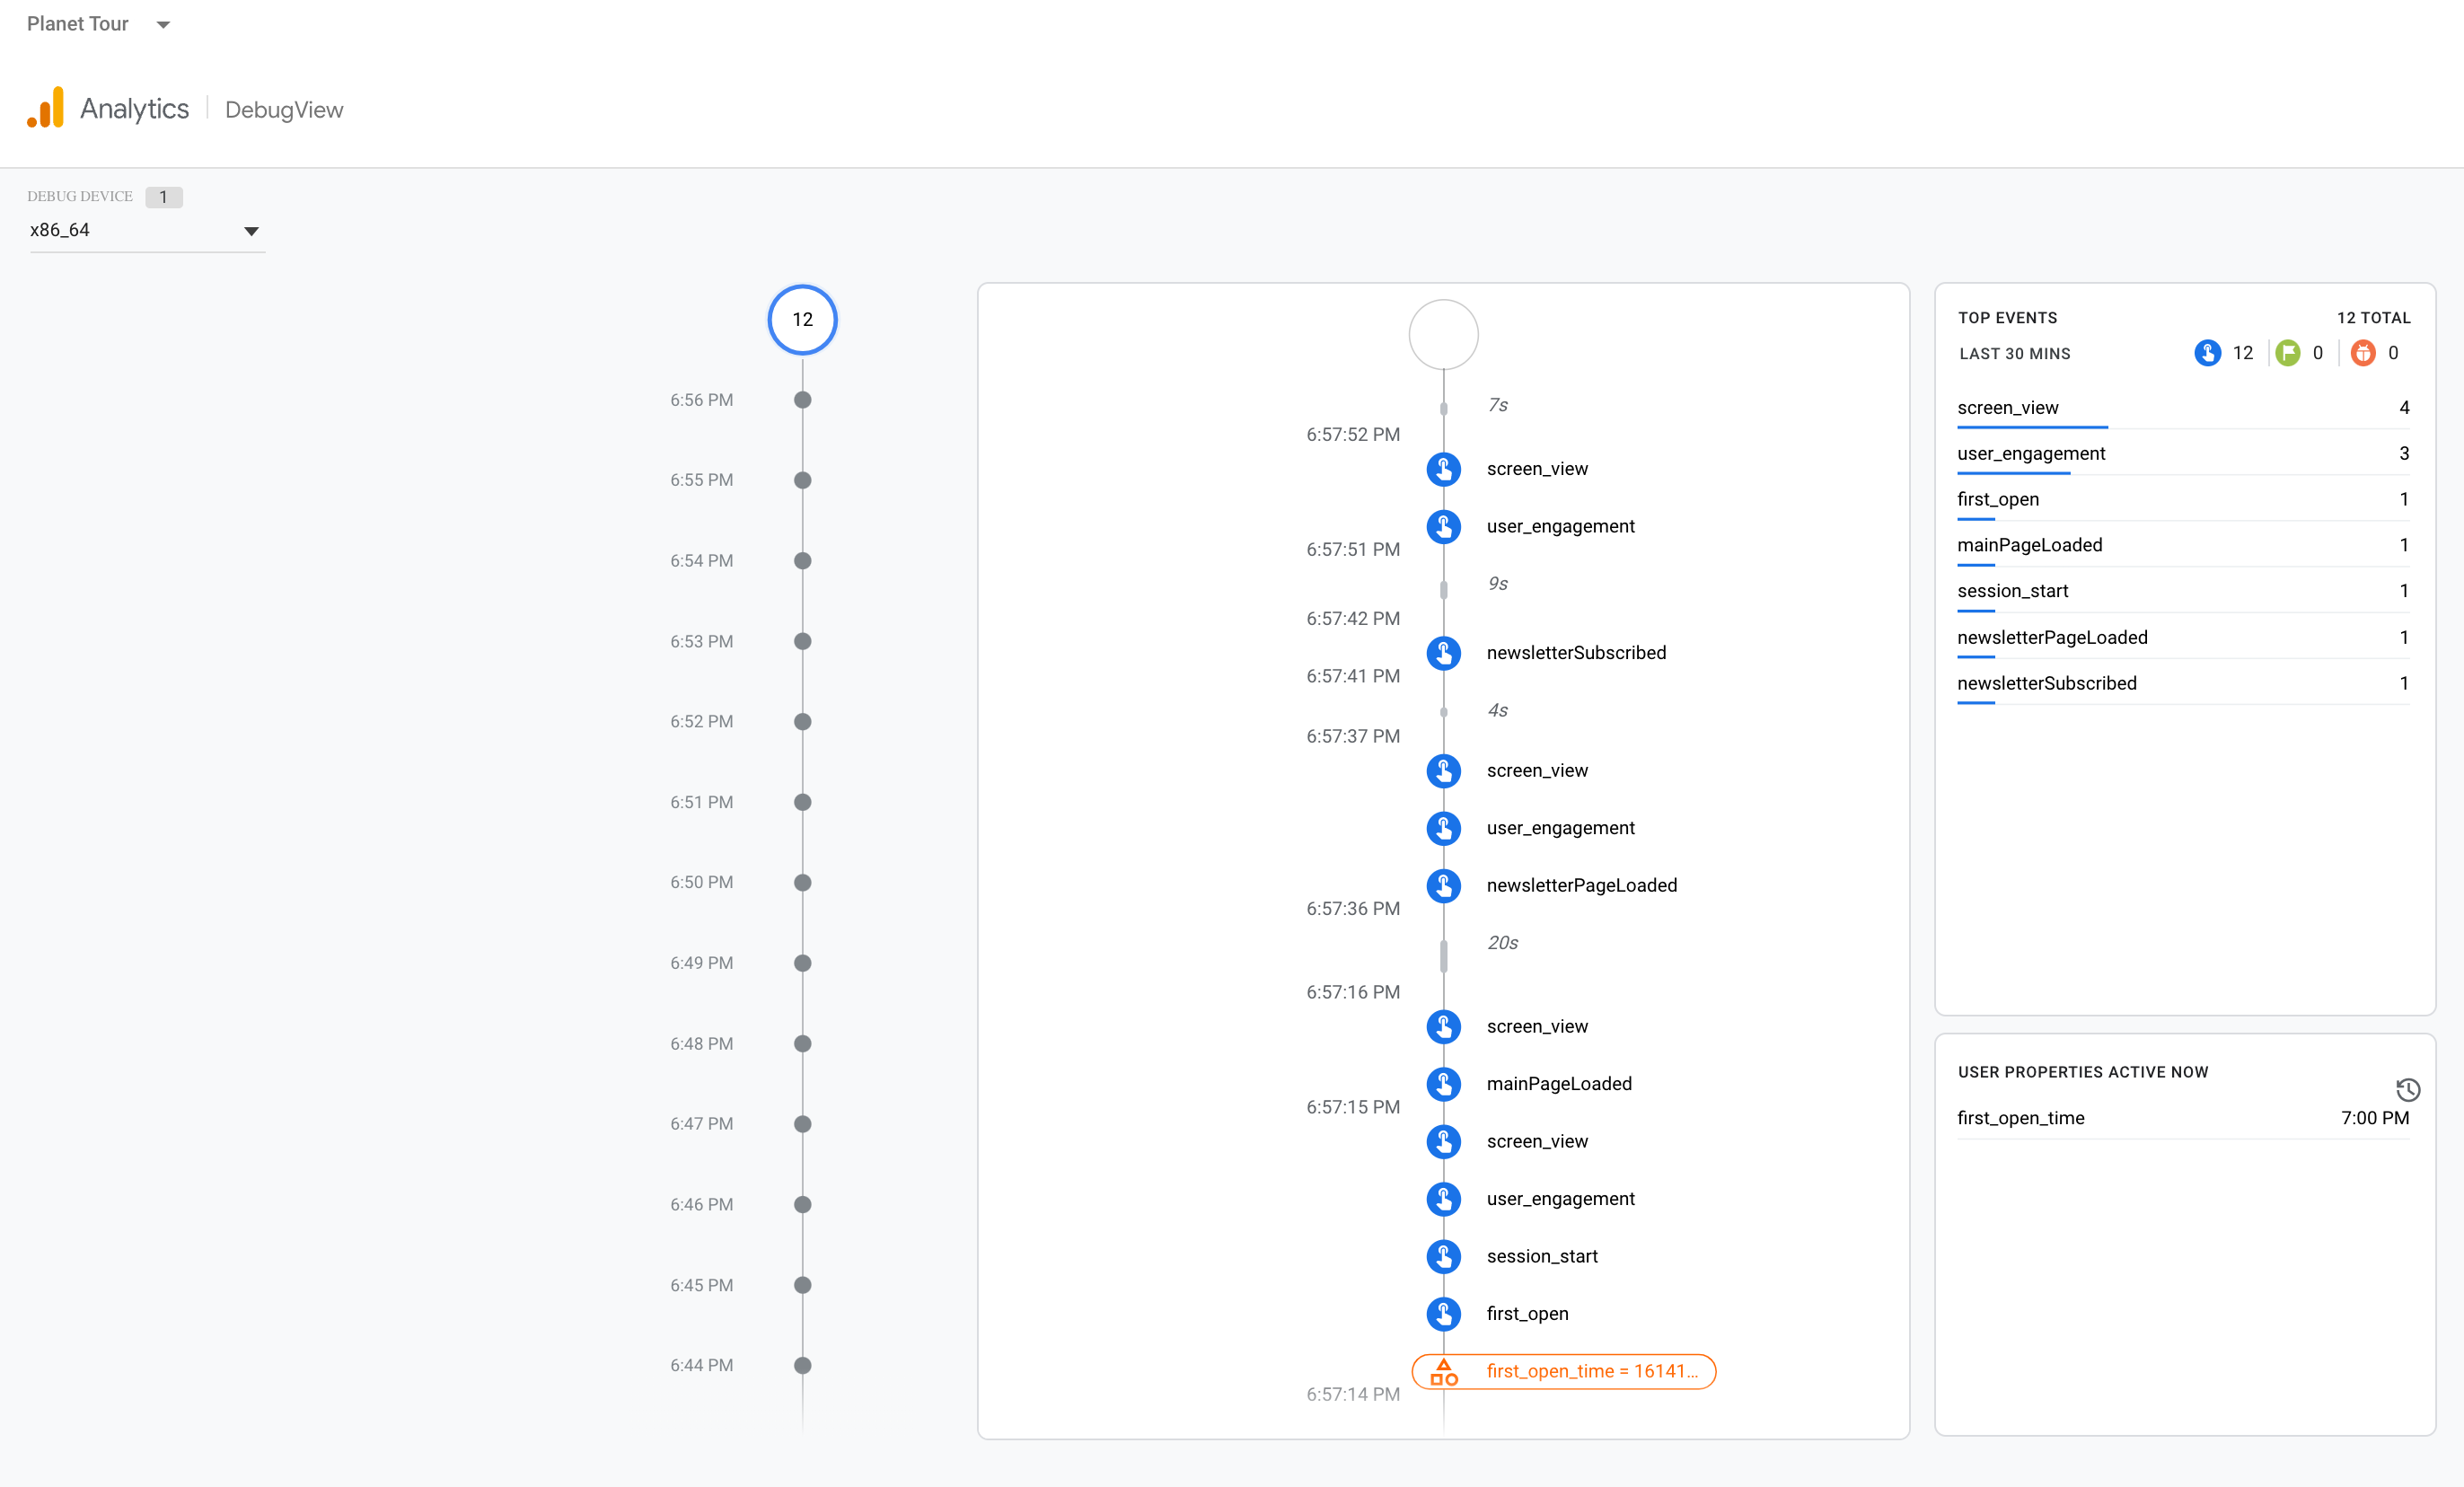
You should also be able to see these results trickle in almost-real time by going to the Debug View section of the Firebase console. This will let you know about any events Firebase receives from devices that have debug mode enabled. These include not only the events you added but also other events Firebase measures for you, like screen_view and user_engagement.
Debug Mode Considerations
Because you’ve turned on debug mode, Firebase Analytics is aggressive about sending data to its servers. It sends a batch either when it has data that’s more than 10 seconds old or when your app moves into the background. In a production app, this behavior would probably kill your phone’s battery life. Therefore, when you don’t have debug mode turned on, Firebase Analytics sends data either when it has data that’s more than an hour old or when your app goes into the background.
Incidentally, this debug setting does persist. So if you want to turn off Analytics debug mode (because, say, you want to stress-test your app’s battery performance), you either disable the flag and then delete and reinstall the app, or explicitly turn off debug mode by changing the flag to -noFIRAnalyticsDebugEnabled.
minimumFetchInterval = 0 set so Firebase doesn’t throttle updates. However sometimes, particularly with a new project, you’ll still be throttled. If this happens, either wait for an hour or reset the simulator and try again.Creating Your First A/B Test
Head to the A/B Testing section of the Firebase console. If you’re prompted to select a project, pick the Planet Tour project you created. Click Create experiment:

Select Remote Config to create an experiment with app behavior using remote config server-side configuration parameters:

You’ll see a form to create a new experiment. The first few fields should be pretty easy to fill out. Give your experiment a name like Newsletter sign-ups and whatever description you want, then click Next.
Defining Targeting
For Targeting, make sure you select your iOS app from the drop-down list (see below for the completed panel). You don’t have an Android app, but even if you did, it makes sense to experiment on different platforms separately because your app — or your users — might behave quite differently on different platforms.
Because you’re experimenting with text labels, it makes sense to limit your experiment to English-speaking users. Click the and button, select Languages and then select English from the second drop-down list.
Finally, you can decide what percentage of users to put into this experiment. The more users who participate in your experiment, the more confident you’ll be in your results. But if you’re trying something risky that could anger your community or throw your in-app economy into chaos, it might make sense to keep this population small.
Because your changes seem pretty safe, you could probably afford to make this percentage larger. 30 seems like a good percentage to start with.
When you’re all done, the first part of your experiment panel should look like this:

Defining Goals
Click Next to move to the Goals section. This is the thing you’re looking to maximize in your app. In your case, you’re looking to increase the occurrence of the newsletterSubscribed event that you created earlier.
Assuming enough time has passed that the events you created in the previous section have made it into the A/B testing system, you should see newsletterSubscribed listed as one of your goals in the drop-down list. If it’s there, select it. If it’s not there yet, create it:
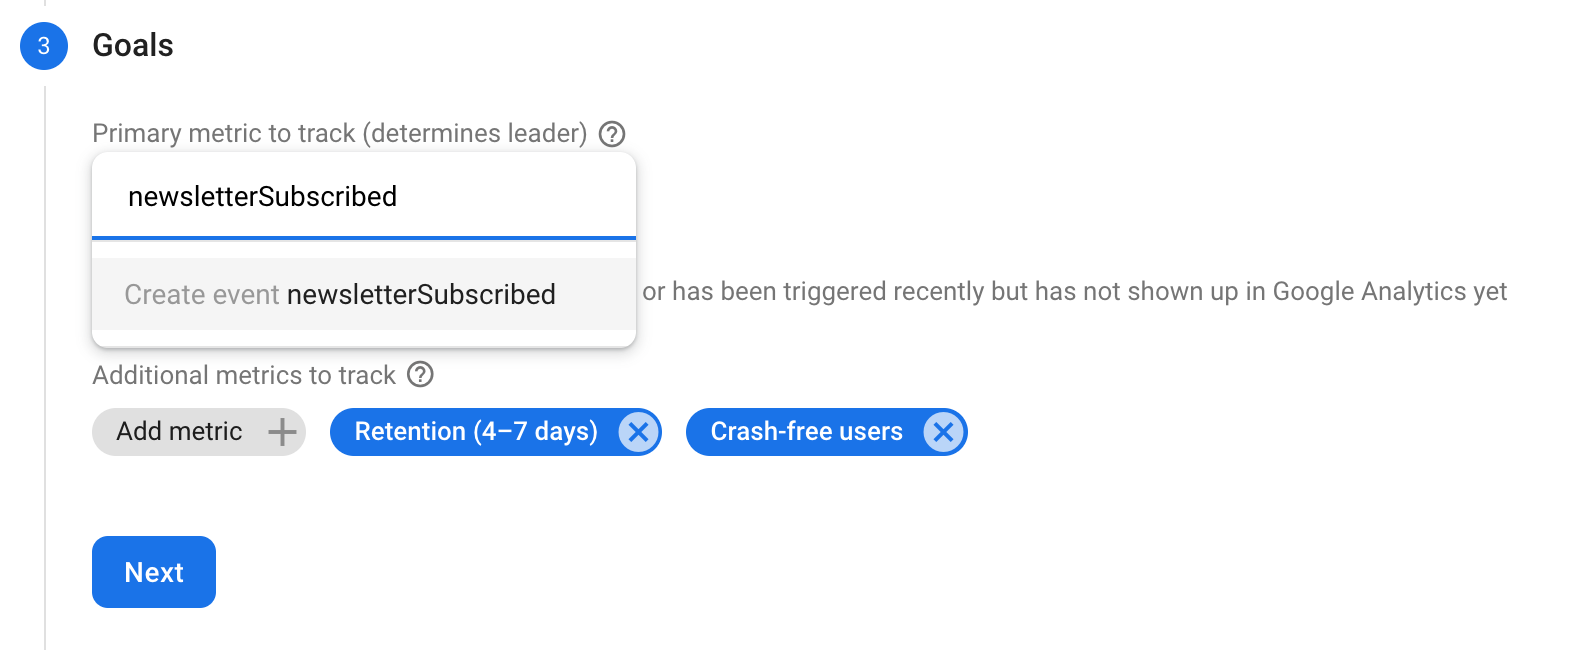
Firebase has already included some other secondary goals to measure along with your main goal. These extra goals are useful in getting the “big picture” view of your experiment. They help make sure that you don’t accidentally hurt your retention because you’re too focused on improving your newsletter subscriptions.