Unity Tutorial Part 1: Getting Started
In this Unity tutorial series, newly updated for Unity 2018.1, you’ll learn how to make your first game in Unity with C# from scratch: a twin-stick shooter called Bobblehead Wars! By Brian Moakley.
 This is an excerpt taken from Chapter 1, “Hello Unity” of our book Unity Games by Tutorials, newly updated for Unity 2018.1, which walks you through creating four Unity games from scratch — and even shows you how to develop for VR in Unity. Enjoy!
To say game development is a challenge would be the understatement of the year.
Until recently, making 3D games required low-level programming skills and advanced math knowledge. It was akin to a black art reserved only for super developers who never saw the sunlight.
That all changed with Unity. Unity has made game programming into a craft that’s now accessible to mere mortals. Yet, Unity still contains those complicated AAA features so, as you grow as a developer, you can begin to leverage them in your games.
Every game has a beginning and so does your learning journey — and this one will be hands-on. Sure, you could pore over pages and pages of brain-numbing documentation until a lightbulb appears above your head, or you can learn by creating a game.
You obviously would prefer the latter, so in this tutorial, you’ll build a game named Bobblehead Wars.
In this game, you take the role of a kickass space marine, who just finished obliterating an alien ship. You may have seen him before; he also starred in our book 2D iOS & tvOS Games in a game called Drop Charge.
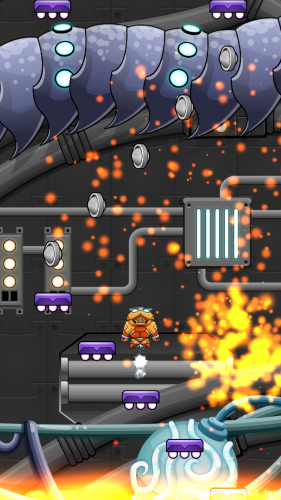
After destroying the enemy ship, our space marine decides to vacation on a desolate alien planet. However, the aliens manage to interrupt his sun tan — and they are out for blood. After all, space marines are delicacies in this part of the galaxy!
This game is a twin-stick shooter, wherein you blast hordes of hungry aliens that relentlessly attack:
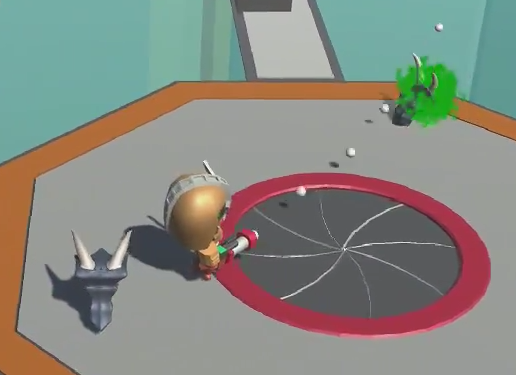
You’ll toss in some random powerups to keep gameplay interesting, but success lies in fast footwork and a happy trigger finger.
Installing and Running Unity
Before you can take on aliens, you need to download the Unity engine itself. Head over to the following URL: http://unity3d.com/get-unity. You’ll see a page with many options from which to choose:
You can go Pro if you’d like, but it’s excessive at this stage of your journey. For this tutorial, you only need the free version. In fact, you can even release a complete game and sell it on Steam with the free version.
Before Unity 5, certain engine features were disabled in the free version. Now, all those closed-off features are now available to everybody who uses the personal version.
In case you are curious, here are what the three options mean:
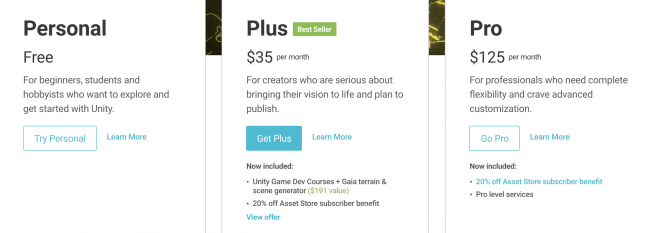
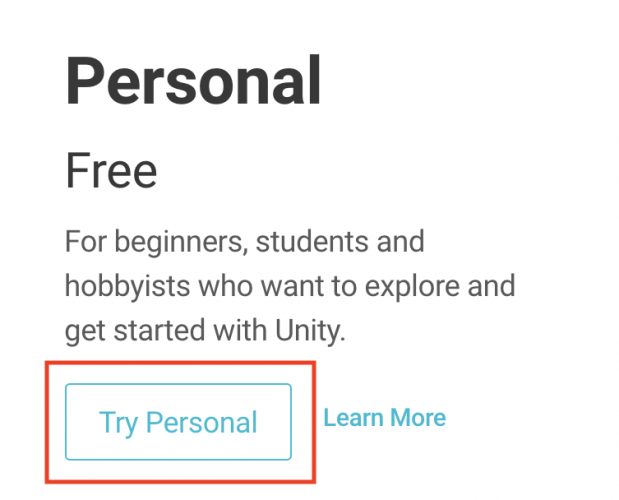
- Unity Personal: This edition allows you to create a complete game and distribute it without paying Unity anything. However, your company must make less than $100,000 per fiscal year. The other catch is that each game will present a “Made by Unity” splash screen that you can’t remove.
- Unity Plus: This edition costs $35 per month. It comes with performance-reporting tools, the Unity Pro skin and some additional features. This version requires your company to make less than $200,000 per year, and it allows you to either disable or customize the “Made by Unity” splash screen.
- Unity Pro: This is the highest tier available. It costs $125 per month and comes with useful Unity services, professional iOS and Android add-ons, and has no splash screen. There is no revenue cap either.
There’s also an enterprise edition for large organizations that want access to the source code and enterprise support.
Under Personal, click Try Personal and download the software from the following page.
Give it a moment to download then double-click it to start the installation.
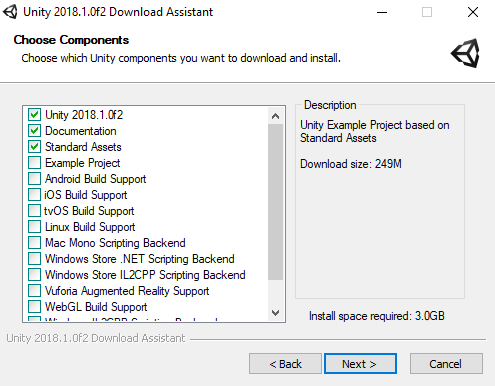
Click through the installer until you reach the following screen where you select components:
The screenshots in this tutorial are made on Windows, because that is what the majority of Unity developers use (mainly because Windows is a more popular gaming platform).
By default, you should select the Unity Engine, Documentation and Standard Assets. Here’s why they are significant:
Don’t worry if your version number is slightly different than what we’ve shown — Unity is constantly updating.
- Unity Engine: This is the powerhouse that will drive all of your games. When you update the engine, keep this — and only this — selected to avoid downloading unnecessary files.
- Documentation: This is your lifeline when you run into issues you don’t understand. Downloading the documentation frees you from reliance on the internet. Having it on hand is particularly helpful when traveling or dealing with unstable networks.
- Standard Assets: These are additional objects that help you build games such as first-person and third-person character controllers, anti-aliasing and other useful items.
In that case, you just run the installer again, uncheck everything and then check the required platforms. Follow the installer to completion to install those components.
Run the program once installation completes. The first thing you’ll see is a dialog asking for your Unity credentials.
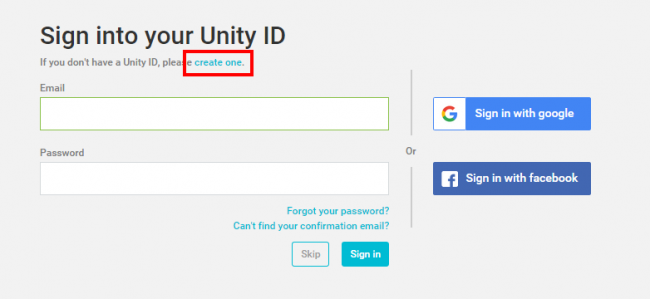
If you don’t have an account, click create one and follow the steps. Unity accounts are free. You’ll have to log in every time you fire it up, but the engine does have an offline mode for those times when you have no network.
Once you’re logged in, you’ll be presented with a project list that provides an easy place to access all of your projects.
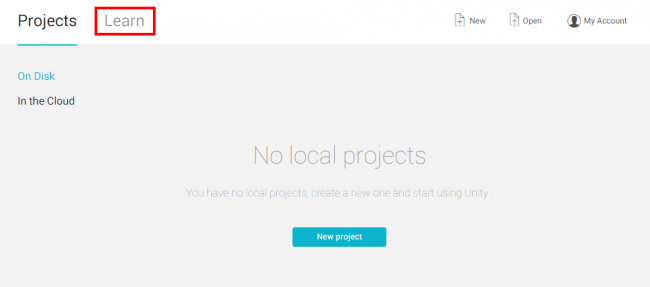
With Unity 2018, you now have a Learn tab. This tab provides a bunch of different Unity tutorials to get you up to speed with the editor.
Definitely check them out when you are done with this tutorial. To get started, click the New button.
You should see the project creation dialog. You’ll notice that you have a few options, so fill them in as follows:
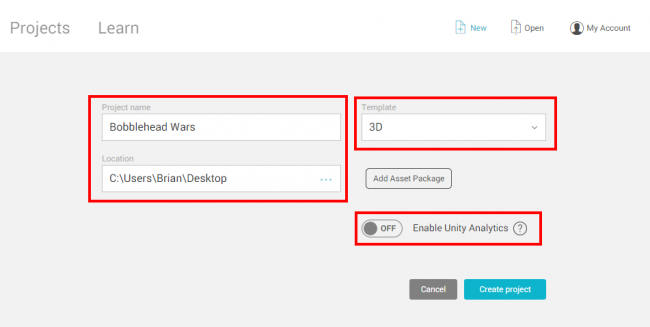
Here’s what everything on this screen means:
- The Project name represents the internal name of the game. It’s not published with your final game, so you can name your projects whatever you like. Give this one the name Bobblehead Wars.
- The Location field is where you’ll save the project and related items. Click the three dots in the Location field to choose a location on your computer.
- Unity 2018 comes with a new feature known as Templates. Unity used to only switch between 3D and 2D. It required the end user to turn on a bunch of settings to make simple games look good. Now, Unity provides different templates configured with the optimal settings. For instance, if you are developing a game for mobile devices, you would choose the Lightweight RP template. Templates don’t limit you in any way. They just save you time when configuring the editor and engine. For now, make sure 3D is selected.
- The Add Asset Package button allows you to include additional assets in your game or any others you download from the Unity Asset Store. You don’t need to do anything with this for now.
- Finally, you have the option to Enable Unity Analytics, which give you insight into your players’ experiences. By reading the data, you can determine areas wherein players struggle and make changes based on the feedback. This tutorial will not delve into analytics, so set the switch to off.
Once you’re ready, click the Create project button. Welcome to the world of Unity!