ResearchKit Tutorial with Swift: Getting Started
Learn how to make a medical research app with this ResearchKit tutorial for iOS. By Matt Luedke.
Collecting a Consent Signature
Signature collection comes built-in with ResearchKit — how easy is that? :]
Replace the //TODO: signature line in ConsentDocument.swift with the following:
consentDocument.addSignature(ORKConsentSignature(forPersonWithTitle: nil, dateFormatString: nil, identifier: "ConsentDocumentParticipantSignature"))
Yup — that’s all the code you need! The only parameter required to create an ORKConsentSignature is identifier, which is a unique String that will distinguish this signature from any other potential signatures that could be present in the document.
ORKConsentSignature can also be pre-populated with a name, image and date. This is useful when you need to include a copy of the principal investigator’s signature in the consent document.The Consent Task
Now that you have the consent document defined, you have to add it to a task in order to present it to the user. Tasks are broken down into two categories: Visual Consent, which are the screens defined by your ORKConsentSections; and Consent Review which involve collection of the signature.
To start, create a new Swift file named ConsentTask.swift, and add to it the following code:
import ResearchKit

public var ConsentTask: ORKOrderedTask {

  var steps = [ORKStep]()

  //TODO: Add VisualConsentStep

  //TODO: Add ConsentReviewStep

  return ORKOrderedTask(identifier: "ConsentTask", steps: steps)
}
This is the first direct appearance of an ORKTask: a protocol which is one of the core organizational units of ResearchKit. Tasks in ResearchKit act as a collection of steps, and an ORKOrderedTask is a common class that implements the ORKTask protocol by presenting its steps in a fixed order.
"ConsentTask" identifier serves to distinguish this task for the purposes of handling its results. The results are outside the scope of this tutorial, but I encourage you to take note of the task identifiers in the sample code and try to retrieve the results yourself.Now you need to add your Visual Consent Step.
Still in ConsentTask.swift, replace //TODO: Add VisualConsentStep with the following code:
var consentDocument = ConsentDocument
let visualConsentStep = ORKVisualConsentStep(identifier: "VisualConsentStep", document: consentDocument)
steps += [visualConsentStep]
Here, you make use of the ConsentDocument from above and use it to create an ORKVisualConsentStep. In other words, you’re telling ResearchKit to create a visual representation of the consent document sections.
Next up is the Consent Review Step.
Replace //TODO: Add ConsentReviewStep with the following code:
let signature = consentDocument.signatures!.first as! ORKConsentSignature

let reviewConsentStep = ORKConsentReviewStep(identifier: "ConsentReviewStep", signature: signature, inDocument: consentDocument)

reviewConsentStep.text = "Review Consent!"
reviewConsentStep.reasonForConsent = "Consent to join study"

steps += [reviewConsentStep]
The ORKConsentReviewStep sets up screens to summarize the consent document, to determine if the user agrees or disagrees to the terms, and to obtain the user’s signature. Just like the ORKConsentSections you defined earlier, the consent review section requires you to set text for the page.
You’ve added both steps to the consent task — all that’s left for the consent portion of your app is to show this task to your user and handle the results.
Presenting the Consent Task
This is a job for your view controller, so open ViewController.swift and add the following:
extension ViewController : ORKTaskViewControllerDelegate {

  func taskViewController(taskViewController: ORKTaskViewController, didFinishWithReason reason: ORKTaskViewControllerFinishReason, error: NSError?) {
    //Handle results with taskViewController.result
    taskViewController.dismissViewControllerAnimated(true, completion: nil)
  }

}
Your view controller now implements ORKTaskViewControllerDelegate by handling task results in taskViewController:didFinishWithReason:error:. These results could be in the form of a signed consent document, survey responses, or sensor data. For now, you are simply dismissing the task’s view controller when the task finishes.
How, then, can you present the task? Add the following method to the ViewController class:
@IBAction func consentTapped(sender : AnyObject) {
  let taskViewController = ORKTaskViewController(task: ConsentTask, taskRunUUID: nil)
  taskViewController.delegate = self
  presentViewController(taskViewController, animated: true, completion: nil)
}
This is a simple method in which you create an ORKTaskViewController with your consent task. ResearchKit will create the UI all on its own from the information contained in the task you pass in.
Once you’ve set the view controller as the task view controller’s delegate, you present the view controller. Now all that remains is to trigger consentTapped!
Open Main.storyboard and add a UIButton to the lone view.
Then, set the button’s title to Consent and connect the button to consentTapped: in your view controller as shown below:

It’s the moment you’ve been waiting for!
Build and run your app; first, page through the cool-looking consent flow:

Take note of all the nice UI presentation and animations that you get for free with ResearchKit; in particular, check out the study detail modal screens. Note how ResearchKit displays your sample text, and how it orders the pages as you defined them.
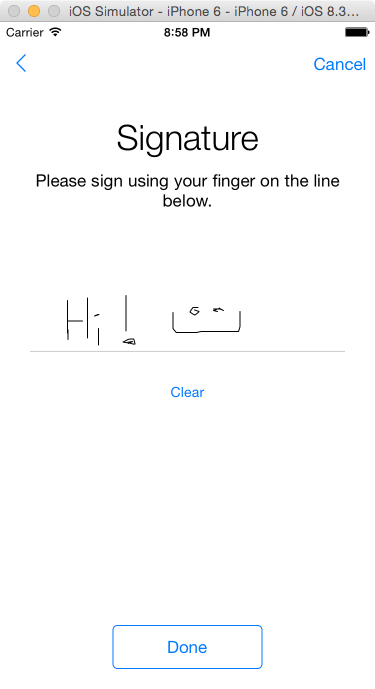
Once you’ve run through the consent pages, test out the signature screen:
Drawing on the simulator with a trackpad was harder than I had anticipated.
ORK_Log_Debug in ORKHelpers.h within ResearchKit.The Survey Module
Now that you’ve set up the consent portion of your app, you can move on to the meat of your app: the survey. In this section, you’ll create a survey task and present it the same way you did with your consent task.
Create a new Swift file in your project named SurveyTask.swift and populate it with the following code:
import ResearchKit

public var SurveyTask: ORKOrderedTask {

  var steps = [ORKStep]()

  //TODO: add instructions step

  //TODO: add name question

  //TODO: add 'what is your quest' question

  //TODO: add color question step

  //TODO: add summary step

  return ORKOrderedTask(identifier: "SurveyTask", steps: steps)
}
You might have already guessed that your survey would be an ORKOrderedTask, just like your ConsentTask. The difference lies in the steps that you’ll be adding.
Instructions Step
The first step simply displays your survey’s instructions to the user. Replace //TODO: add instructions step with the following:
let instructionStep = ORKInstructionStep(identifier: "IntroStep")
instructionStep.title = "The Questions Three"
instructionStep.text = "Who would cross the Bridge of Death must answer me these questions three, ere the other side they see."
steps += [instructionStep]
This creates and adds an ORKInstructionStep, which is a simple yet highly useful screen you can use any time you need to present instructions to your user. You can optionally include an image via the image property, but that’s not necessary here.