ResearchKit Tutorial with Swift: Getting Started
Learn how to make a medical research app with this ResearchKit tutorial for iOS. By Matt Luedke.
Text Input Question
Next up is your first question, which is an open-ended question that permits user input. Replace //TODO: add name question with the following:
let nameAnswerFormat = ORKTextAnswerFormat(maximumLength: 20)
nameAnswerFormat.multipleLines = false
let nameQuestionStepTitle = "What is your name?"
let nameQuestionStep = ORKQuestionStep(identifier: "QuestionStep", title: nameQuestionStepTitle, answer: nameAnswerFormat)
steps += [nameQuestionStep]
An ORKQuestionStep, like the one you created in the previous section, presents the user with a single question. The answer: parameter, which is of type ORKAnswerFormat, determines the UI for the user input. You’ve used ORKTextAnswerFormat, which lets the user type in their name using the keyboard.
Text Choice Question
Next up is a question where the user must choose among several predefined options. Replace //TODO: add 'what is your quest' question with the following:
let questQuestionStepTitle = "What is your quest?"
let textChoices = [
  ORKTextChoice(text: "Create a ResearchKit App", value: 0),
  ORKTextChoice(text: "Seek the Holy Grail", value: 1),
  ORKTextChoice(text: "Find a shrubbery", value: 2)
]
let questAnswerFormat: ORKTextChoiceAnswerFormat = ORKAnswerFormat.choiceAnswerFormatWithStyle(.SingleChoice, textChoices: textChoices)
let questQuestionStep = ORKQuestionStep(identifier: "TextChoiceQuestionStep", title: questQuestionStepTitle, answer: questAnswerFormat)
steps += [questQuestionStep]
This time, the answer format is ORKTextChoiceAnswerFormat. You define the possible choices for the user, create the question step and then add it to the task.
ORKTextChoiceAnswerFormat format is flexible, and allows for either single-choice or multiple-choice. In this example, you’ve specified .SingleChoice
Image Choice Question
The last question of your survey is similar to the text choice format, in that it requires the user to choose among several predefined options, but with one key difference: the choices are represented by images, not just text.
Download and unzip this pack of six PNG images. Then, add them to your Xcode project in Images.xcassets:

Once you’ve added the images to your project, return to SurveyTask.swift and replace //TODO: add color question step with the following:
let colorQuestionStepTitle = "What is your favorite color?"
let colorTuples = [
  (UIImage(named: "red")!, "Red"),
  (UIImage(named: "orange")!, "Orange"),
  (UIImage(named: "yellow")!, "Yellow"),
  (UIImage(named: "green")!, "Green"),
  (UIImage(named: "blue")!, "Blue"),
  (UIImage(named: "purple")!, "Purple")
]
let imageChoices : [ORKImageChoice] = colorTuples.map {
  return ORKImageChoice(normalImage: $0.0, selectedImage: nil, text: $0.1, value: $0.1)
}
let colorAnswerFormat: ORKImageChoiceAnswerFormat = ORKAnswerFormat.choiceAnswerFormatWithImageChoices(imageChoices)
let colorQuestionStep = ORKQuestionStep(identifier: "ImageChoiceQuestionStep", title: colorQuestionStepTitle, answer: colorAnswerFormat)
steps += [colorQuestionStep]
The key to this question is, again, the answer’s format. Here, you’ve used ORKImageChoiceAnswerFormat, which you initialized with an array of image choices of type ORKImageChoice.
Each ORKImageChoice instructs the step to display an image; when the user selects an image, the step displays the image’s text from the name property and passes the image’s value to the results. ResearchKit takes it from here, and constructs your screen using these images to display a series of buttons.
Summary Step
It’s a good practice to notify your user when the survey is complete; therefore, you’ll need to add a summary step.
Replace //TODO: add summary step with the following:
let summaryStep = ORKCompletionStep(identifier: "SummaryStep")
summaryStep.title = "Right. Off you go!"
summaryStep.text = "That was easy!"
steps += [summaryStep]
Here you create and add an ORKCompletionStep, which is essentially the same as an ORKInstructionStep, except with a nice animated checkmark in the center to thank your user for completing the survey.
Presenting the Survey
Presenting the the survey task is identical to the way you present the consent task. Open ViewController.swift and add the following method:
@IBAction func surveyTapped(sender : AnyObject) {
  let taskViewController = ORKTaskViewController(task: SurveyTask, taskRunUUID: nil)
  taskViewController.delegate = self
  presentViewController(taskViewController, animated: true, completion: nil)
}
Again, you create an ORKTaskViewController, set the current view controller as its delegate, and finally present it.
Open Main.storyboard, add a UIButton with the title Survey, and connect it to surveyTapped: as shown below

Build and run your app; work through your survey and you will see the instruction and summary steps, followed by your three survey questions:
Uses ORKTextAnswerFormat

Uses ORKTextChoiceAnswerFormat

Uses ORKImageChoiceAnswerFormat

Active Tasks
Active Tasks use on-device sensors, such as the accelerometer, gyroscope, microphone and even the touchscreen, to record data for analysis purposes. In this example, you’ll use the iPhone’s microphone to record audio samples for your study.
Create a new Swift file in your project and name it MicrophoneTask.swift. Populate it with the following code:
import ResearchKit
public var MicrophoneTask: ORKOrderedTask {
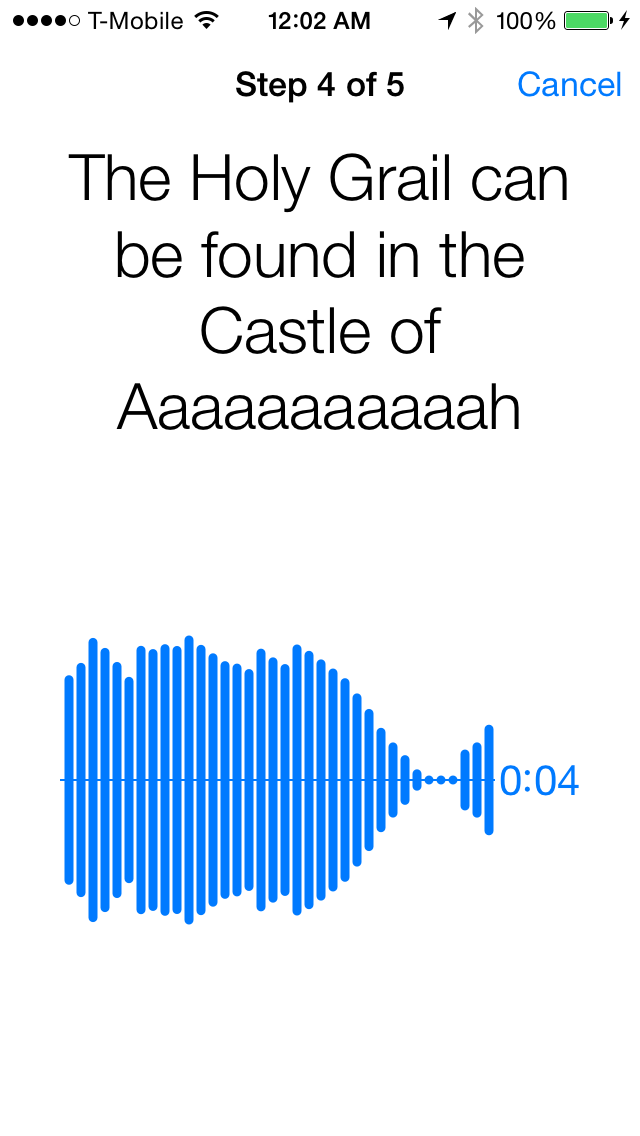
return ORKOrderedTask.audioTaskWithIdentifier("AudioTask", intendedUseDescription: "A sentence prompt will be given to you to read.", speechInstruction: "These are the last dying words of Joseph of Aramathea", shortSpeechInstruction: "The Holy Grail can be found in the Castle of Aaaaaaaaaaah", duration: 10, recordingSettings: nil, options: nil)
}
Here you’re using an ORKOrderedTask with a custom initializer which produces an audio task that displays your instructions and records the user’s voice for a length of time.
Yup, it’s that simple — you simply specify the instructions and the duration of your task, and ResearchKit provides the rest of the UI for free! :]
The final step is to connect this task to your UI. Add the following method to ViewController.swift:
@IBAction func microphoneTapped(sender : AnyObject) {
  let taskViewController = ORKTaskViewController(task: MicrophoneTask, taskRunUUID: nil)
  taskViewController.delegate = self
  taskViewController.outputDirectory = NSURL(fileURLWithPath: NSSearchPathForDirectoriesInDomains(.DocumentDirectory, .UserDomainMask, true)[0] as! String, isDirectory: true)
  presentViewController(taskViewController, animated: true, completion: nil)
}
This should look familiar by now, except for one new line where you specify a valid NSURL to taskViewController.outputDirectory. The ResearchKit documentation states the following: “If no output directory is specified, active steps that require writing data to disk, such as those with recorders, will typically fail at runtime.”
Finally, open Main.storyboard, add a third UIButton titled Microphone, and connect it to microphoneTapped: as shown below:

Build and run your app; tap the Microphone button to try out your new task. In the simulator, the task will simply count down, but if you run your app on a real device you can watch the waveform react to your voice:
Where to Go From Here?
You can download or clone the fully finished sample project here.
In this tutorial you covered all three ResearchKit modules: surveys, informed consent, and active tasks. These all have the end goal of obtaining data from the user, which is what ResearchKit is all about! :]
There are, of course, additional steps in a real-world study. You’d likely need to schedule these tasks to run on a recurring basis, and you’d need to get this data to a server where it could be aggregated and studied. Neither of these are built into ResearchKit at the time of this writing, but Apple and/or the ResearchKit community could certainly add this in the future.
ResearchKit is capable of far more than the topics covered in this tutorial. Try out the ORKCatalog project included with ResearchKit to see additional possibilities for your research apps, such as result analysis, other types of sensor data, and more.
ResearchKit is already being used in the following active research studies:
- Asthma Health
- mPower (Parkinson’s disease)
- GlucoSuccess (Diabetes)
- Share the Journey (Breast Cancer)
- MyHeart Counts (Cardiovascular Disease)
You may want to join one of these studies, if you’re eligible to participate, and form a stronger concept of the desired user experience in ResearchKit apps. Of course, your participation may also help advance some important research!
ResearchKit is an open source framework, so if you want to request a feature or even contribute, simply open an issue or submit a pull request on GitHub. You can learn more about how to contribute here.
Remember that ResearchKit does not replace approval from an institutional review board or ethics committee, and compliance with HIPAA guidelines and international regulations is something you’ll have to handle on your own, if your study requires it.
Thank you for working through this ResearchKit tutorial — and I’m excited to see all the contributions you’ll make to future research studies. If you have any questions about this tutorial, feel free to join the discussion below!