Swinject Tutorial for iOS: Getting Started
In this tutorial, you will explore Dependency Injection (DI) through Swinject, a Dependency Injection framework written in Swift. Dependency Injection is an approach to organizing code so that its dependencies are provided by a different object, instead of by itself. By Gemma Barlow.
Writing Your First Swinject Test
To write your first Swinject test, replace the XCTFail() statement in testPriceResponseData() with the following:
let response = container.resolve(PriceResponse.self)!
XCTAssertEqual(response.data.amount, "999456")
This checks that the PriceResponse object is correctly created (i.e., resolved) by inspecting the amount on one of its corresponding sub-objects, Price. Build and run the tests again using Command-U:

Congratulations, you have successfully performed Dependency Injection using Swinject! One down, four to go.

Improving Tests with Autoregister
In the previous example, you required a lot of setup code before writing a single unit test. Swinject has a less verbose method for this called autoregister, which is provided by a separate library in the Swinject organization named SwinjectAutoregistration. In this section of the tutorial, you’ll use it to write a second set of tests for the PriceResponse object.
autoregister in the official Swinject autoregistration documentation.Press Command-Shift-O within Xcode and search for AutoregisterTests.swift. Hit Return to open it.
At the top of the file there are two extensions:
extension PriceResponse {
  init(data: Price) {
    self.init(data: data, warnings: nil)
  }
}

extension Price {
  init(amount: String) {
    self.init(base: .BTC, amount: amount, currency: .USD)
  }
}
These extensions provide an initializer for each of the Price and PriceResponse objects. Although Swinject works nicely in most cases, autoregister does not currently work if a property uses a failable initializer. These extensions avoid this by always returning a non-optional result.
Prior to Writing the Tests
To use autoregister on the Price and PriceResponseData objects, completely replace setUp() with:
override func setUp() {
  super.setUp()
  container.autoregister(Price.self,
                         argument: String.self,
                         initializer: Price.init(amount:))

  container.autoregister(PriceResponse.self,
                         argument: Price.self,
                         initializer: PriceResponse.init(data:))
}
This code autoregisters the dependencies to use the provided initializer to create the correct dependency whenever you ask the container to resolve it.
Note that, unlike the previous example, you haven’t yet specified any property values. Soon, you’ll add them as part of the tests, which is much better than relying on ‘magic numbers’ in the registration code.
Autoregistered Tests
Add the following logic to testPriceResponseData(), in place of the XCTFail call:
let price = container ~> (Price.self, argument: "789654")
let response = container ~> (PriceResponse.self, argument: price)
XCTAssertEqual(response.data.amount, "789654")
Note the use of the ~> operator here; this is part of the SwinjectAutoregistration library and further simplifies your code.
let price = container ~> (Price.self, argument: "789654")
is equivalent to
let price = container.resolve(Price.self, argument: "789654")!
However, the former produces much tidier code and has the nice effect of removing the need for force-unwrapping.
Finish up your test suite by replacing the contents of testPrice() with the following:
let price = container ~> (Price.self, argument: "999456")
XCTAssertEqual(price.amount, "999456")
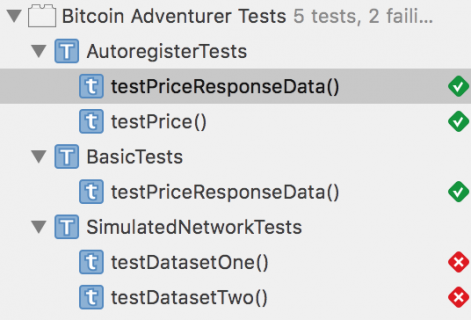
Once more, build and run the tests using Command-U. Make sure the Autoregister tests pass.
Almost there… :]
In this section, you saw how using autoregister(_:argument:initializer:) and the ~> operator can produce simpler and more readable code when using Swinject to resolve your dependencies. Use this approach wherever possible to improve the readability and maintainability of your code.
Clean and readable code will be a nice surprise to future-you :]
Simulating Networking in Tests
Next, you’ll write tests for a more complex test scenario where HTTP response mocking is required.
Press Command-Shift-O within Xcode and search for SimulatedNetworkTests.swift. Hit Return to open it.
Notice the DataSet enum at the top of the file. This enum represents two different JSON files that contain valid data returned by the Coinbase API: dataset-one.json and dataset-two.json. Open each and familiarize yourself with their contents.
Prior to Writing the Tests
Return to SimulatedNetworkTests.swift. To use the JSON files as simulated or mocked HTTP responses, you’ll need to use a new struct implementing the Networking protocol you defined earlier in this tutorial. Add the following code above the DataSet enumeration:
struct SimulatedNetworking: Networking {
  let filename: String

  func request(from: Endpoint, completion: @escaping CompletionHandler) {
    let data = readJSON(name: filename)
    completion(data, nil)
  }

  private func readJSON(name: String) -> Data? {
    let bundle = Bundle(for: SimulatedNetworkTests.self)
    guard let url = bundle.url(forResource: name, withExtension: "json") else { return nil }

    do {
      return try Data(contentsOf: url, options: .mappedIfSafe)
    }
    catch {
      XCTFail("Error occurred parsing test data")
      return nil
    }
  }
}
All this does is create a specific implementation of Networking that returns a response from disk instead of using an HTTP request.
Now, it’s time to register the mocked networking struct so its used by BitcoinPriceFetcher. Add the following to setUp(), after the call to super.setUp():
container.autoregister(Networking.self,
                       argument: String.self,
                       initializer: SimulatedNetworking.init)

DataSet.all.forEach { dataSet in
  container.register(BitcoinPriceFetcher.self, name: dataSet.name) { resolver in
    let networking = resolver ~> (Networking.self, argument: dataSet.filename)
    return BitcoinPriceFetcher(networking: networking)
  }
}
This code registers two instances of BitcoinPriceFetcher, one for each of the available data sets. Inside the registration closure, the Networking dependency for each BitcoinPriceFetcher is provided using the provided resolver and resolved using the ~> operator introduced earlier. The different instances are named so they can be retrieved independently. Each instance gets its mocked results from its relevant JSON file included in the project.
Writing Your First Complex Test
Finally, it’s time to write some tests for BitcoinPriceFetcher!
While still in SimulatedNetworkTests.swift, replace the contents of testDatasetOne() with the following:
let fetcher = container ~> (BitcoinPriceFetcher.self, name: DataSet.one.name)
let expectation = XCTestExpectation(description: "Fetch Bitcoin price from dataset one")

fetcher.fetch { response in
  XCTAssertEqual("100000.01", response!.data.amount)
  expectation.fulfill()
}

wait(for: [expectation], timeout: 1.0)
In this code, you resolve an instance of BitcoinPriceFetcher that uses the first JSON dataset; this works because you previously registered a named container. You then use its fetch method, and assert the results to ensure that the value of data.amount matches the data in the dataset-one.json file.
Because fetch is asynchronous, you use XCTestExpectation to wait for the response before ending the test.
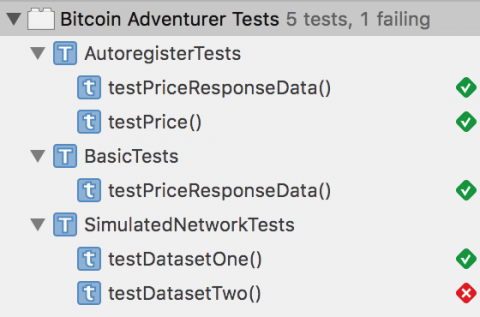
Press Command-U to build and run the Unit Tests. Confirm testDatasetOne() succeeds:
Only one more to go!
The Final Test
You’re finally at your final test for this tutorial that confirms you can retrieve and use the BitcoinPriceFetcher associated with the second JSON dataset.
Replace the contents of testDatasetTwo() with:
let fetcher = container ~> (BitcoinPriceFetcher.self, name: DataSet.two.name)
let expectation = XCTestExpectation(description: "Fetch Bitcoin price from dataset two")

fetcher.fetch { response in
  XCTAssertEqual("9999999.76", response!.data.amount)
  expectation.fulfill()
}

wait(for: [expectation], timeout: 1.0)
Getting a sense of déjà vu? Except for the name used to resolve the BitcoinPriceFetcher, and the different amount value you’re checking for, this code is practically identical to the code provided for testDatasetOne().
For the last time, press Command-U to build and run the Unit Tests. Confirm they all pass by waiting for the “Test Succeeded” message to appear.

Congratulations, you now have unit tests correctly using Dependency Injection, where the tests are getting their dependencies resolved by a DI Container while keeping concerns separated and modularized. Excellent work, kudos to you! :]