SceneKit Tutorial With Swift Part 4: Render Loop
In the fourth installment of our SceneKit With Swift tutorial, you’ll learn to use the Scene Kit render loop in your Geometry Fighter game to make your geometry spawn over time. By Chris Language.
Welcome back to our Scene Kit Tutorial With Swift series, where you’ll learn how to make your first 3D iOS game: a game like Fruit Ninja called Geometry Fighter!
This tutorial series will show you how to create your first game with Scene Kit, Apple’s built-in 3D game framework.
In the first part of the series, you learned how to make an empty Scene Kit project as a good starting point.
In the second part of the series, you started making your game, learning about Scene Kit nodes along the way.
In the third part of the series, you learned how to make your geometry move through the power of Scene Kit physics.
In this fourth part of the series, you’ll learn how to make your geometry spawn over time through the Scene Kit render loop.
Let’s dive back in!
Getting Started
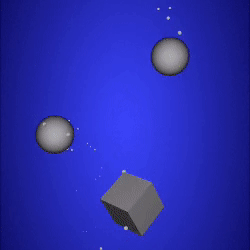
In the previous tutorial, you enabled basic physics for your spawned object and applied an impulse to kick it up into the air. Eventually, the object fell back down and vanished into the abyss due to the simulated effect of gravity.
Although the effect is neat, it would be so much cooler to spawn multiple objects that collide with each other. This will certainly push the excitement factor up a notch!
Right now, your game calls spawnShape() just once. To spawn multiple objects you’ll need to call spawnShape() repeatedly. Introducing… the render loop!
As you learned in previous tutorials, SceneKit renders the contents of your scene using an SCNView object. SCNView has a delegate property that you can set to an object that conforms to the SCNSceneRendererDelegate protocol; SCNView will then call methods on that delegate when certain events occur within the animation and rendering process of each frame.
In this way, you can tap into the steps SceneKit takes as it renders each frame of a scene. These rendering steps are what make up the render loop.
So — what exactly are these steps? Well, here’s a quick breakdown of the render loop:

Is this Wheel of Fortune? :] No, it’s simply a depiction of the nine steps of the render loop. In a game that runs at 60 fps, all these steps run — you guessed it — 60 times per second, in sequence.
The steps always execute in the following order, which lets you inject your game logic exactly where it’s needed:
-
Update: The view calls
renderer(_: updateAtTime:)on its delegate. This is a good spot to put basic scene update logic. - Execute Actions & Animations: SceneKit executes all actions and performs all attached animations to the nodes in the scene graph.
-
Did Apply Animations: The view calls its delegate’s
renderer(_: didApplyAnimationsAtTime:). At this point, all the nodes in the scene have completed one single frame’s worth of animation, based on the applied actions and animations. - Simulates Physics: SceneKit applies a single step of physics simulation to all the physics bodies in the scene.
-
Did Simulate Physics: The view calls
renderer(_: didSimulatePhysicsAtTime:)on its delegate. At this point, the physics simulation step has completed, and you can add in any logic dependent on the physics applied above. - Evaluates Constraints: SceneKit evaluates and applies constraints, which are rules you can configure to make SceneKit automatically adjust the transformation of a node.
-
Will Render Scene: The view calls
renderer(_: willRenderScene: atTime:)on its delegate. At this point, the view is about to render the scene, so any last minute changes should be performed here. - Renders Scene In View: SceneKit renders the scene in the view.
-
Did Render Scene: The final step is for the view to call its delegate’s
renderer(_: didRenderScene: atTime:). This marks the end of one cycle of the render loop; you can put any game logic in here that needs to execute before the process starts anew.
Because the render loop is, well, a loop, it’s the perfect place to call spawnShape(). Your job is to decide where to inject the spawn logic.
The Renderer Delegate
It’s time to put this cool feature to use in your game.
First, make the GameViewController class conform to the SCNSceneRendererDelegate protocol by adding the following to the bottom of GameViewController.swift:
// 1
extension GameViewController: SCNSceneRendererDelegate {
  // 2
  func renderer(_ renderer: SCNSceneRenderer,
    updateAtTime time: TimeInterval) {
    // 3
    spawnShape()
  }
}
Taking a closer look at the code above:
-
This adds an extension to
GameViewControllerfor protocol conformance and lets you maintain protocol methods in separate blocks of code. -
This adds an implementation of the
renderer(_: updateAtTime:)protocol method. -
Finally, you call
spawnShape()to create a new shape inside the delegate method.
This give you your first hook into SceneKit’s render loop. Before the view can call this delegate method, it first needs to know that GameViewController will act as the delegate for the view.
Do this by adding the following line to the bottom of setupView():
scnView.delegate = self
This sets the delegate of the SceneKit view to self. Now the view can call the delegate methods you implement in GameViewController when the render loop runs.
Finally, clean up your code a little by removing the single call to spawnShape() inside viewDidLoad(); it’s no longer needed since you’re calling the method inside the render loop now.
Build and run; unleash the spawning fury of your render loop! :]

The game starts and spawns an insane amount of objects, resulting in a mosh pit of colliding objects — awesome! :]
So what’s happening here? Since you’re calling spawnShape() in every update step of the render loop, you’ll spawn 60 objects per second — if the device you’re running on can support your game at 60 fps. But less-powerful devices, which includes the simulator, can’t support that frame rate.
As the game runs, you’ll notice a rapid decrease in the frame rate. Not only does the graphics processor have to deal with increasing amounts of geometry, the physics engine has to deal with an increasing number of collisions, which also negatively affects your frame rate.
Things are a bit out of control at the moment, as your game won’t perform terribly well on all devices.