SceneKit Tutorial With Swift Part 2: Nodes
In the second installment of our SceneKit With Swift tutorial, you’ll dive into coding your first 3D iOS game, Geometry Fighter, by learning about nodes. By Chris Language.
Welcome back to our Scene Kit Tutorial With Swift series, where you’ll learn how to make your first 3D iOS game: a game like Fruit Ninja called Geometry Fighter!
This tutorial series will show you how to create your first game with Scene Kit, Apple’s built-in 3D game framework.
In the first part of the series, you learned how to make an empty Scene Kit project as a good starting point.
In this second part of the series, you’ll get started making your game, learning about Scene Kit nodes along the way.
Let’s dive back in!
Getting Started
In the previous tutorial, you learned that SceneKit organizes the components of your game into a hierarchy known as the scene graph.
Each element of your game — such as lights, cameras, geometry and particle emitters — are called nodes, and nodes are stored in this tree-like structure.
To illustrate how this works, think back to a childhood nursery rhyme you might have heard…
🎵 The hip bone’s connected to the back bone 🎵 The back bone’s connected to the shoulder bone… 🎵
You’re right! It’s the classic song Dem Dry Bones. Bonus points if you know a classic video game that makes particularly good use of this concept. ;]
With those lyrics in mind, take a look at the following anatomically-correct structure of a rare four-fingered skeleton:

To help illustrate how you can construct a node-based hierarchy from this skeleton, think of each bone in the skeleton as a node.
As the song points out, the shoulder bone’s connected to the back bone. So consider the back bone as the parent node of the shoulder bone, and the shoulder bone as the child node of the back bone.
To add the shoulder bone to the scene, you add it as a child of the back bone. You can continue to construct the whole arm in this way, adding child bones to parent bones, right up to the little pinky.
To position a bone, you position it relative to its parent. For example, to wave the skeleton’s left arm, you simply rotate the shoulder node back and forth as indicated by the little blue arrow. All child nodes of the shoulder node will rotate along with their parent.
Congratulations! You just passed skeleton anatomy 101! :]
From a technical perspective, a single node is represented by the SCNNode class and represents a position in 3D space relative to its parent node. A node on its own has no visible content, therefore, it’s invisible when rendered as part of a scene. To create visible content, you have to add other components such as lights, cameras or geometries (like bones) to the node.
The scene graph contains a special node which forms the foundation of your node-based hierarchy: the root node. To construct your scene, you add your nodes either as child nodes of the root node or as a child of one of the root node’s descendants.
In this tutorial, you’ll start to work with a few simple nodes in SceneKit, such as camera and geometry nodes. By the end of the tutorial, you’ll have rendered a simple 3D cube to the screen!
Asset Catalogs
Once you’re a successful and rich 3D game designer, you’ll have enough money to hire your very own graphics artist and sound engineer, which will free you up to focus on the game code alone. :] The SceneKit asset catalog has been designed specifically to help you manage your game assets separately from the code.
An asset catalog lets you manage your game assets in a single folder. To use it, simply add a folder with the .scnassets extension to your project and save all your game assets in that folder. Xcode will copy everything in your catalog to your app bundle at build time. Xcode preserves your assets folder hierarchy; this gives you full control over the folder structure.
By sharing your assets folder with your artists, they can quickly fix any issues, such as a not-quite-so-scary cross-eyed monster and have it ready for the next build, without having to copy the changed assets back into the project.
Adding an Asset Catalog
Now that you understand what the asset catalog is all about, you’ll add one to Geometry Fighter.
Drag and drop the GeometryFighter.scnassets folder from the resources folder into your game project in Xcode. In the popup that appears, make sure that Copy items if needed, Create Groups and your GeometryFighter target are all checked, then click Finish.

Select the GeometryFighter.scnassets folder in the project navigator. Notice the additional settings unique to the asset catalog in the right hand panel. Expand the GeometryFighter.scnassets folder and sub-folders to see more detail about your assets:
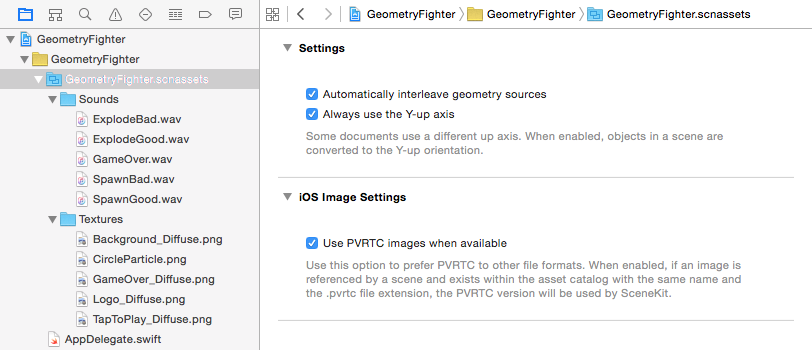
There are two folders inside the asset catalog:
- Sounds: Contains all of the sound assets you’ll need for your game.
- Textures: Contains all of the images you’ll need.
Feel free to take a sneak peek at what’s inside each folder.
Adding a Launch Screen
Now that you’ve imported the asset catalog, you’ll take care of some basic housekeeping steps, including adding a proper image to the launch screen.
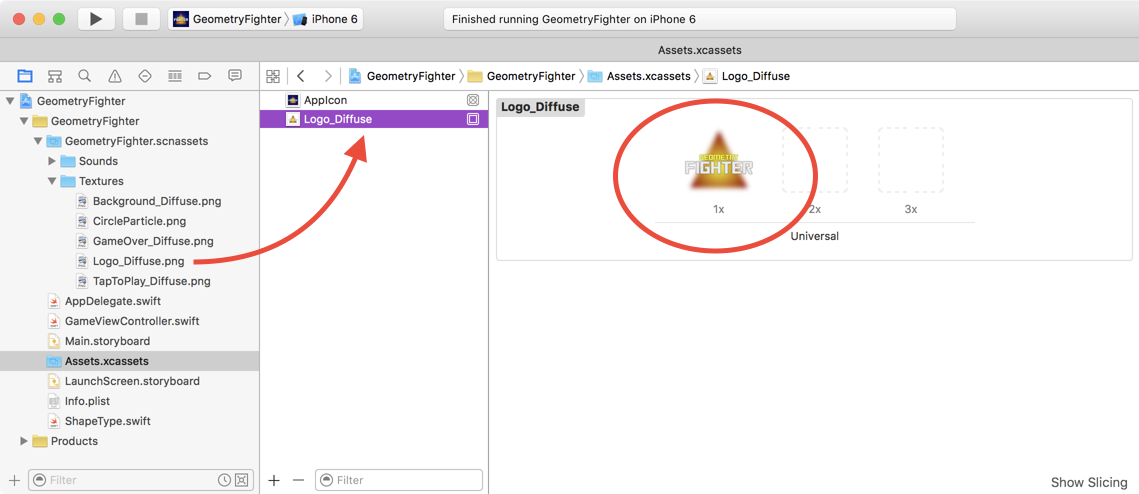
First, click Assets.xcassets in the project navigator. Drag and drop GeometryFighter.scnassets/Textures/Logo_Diffuse.png into the assets, below the AppIcon.
Next, click LaunchScreen.storyboard in the project navigator. Select the main view and set the Background property to a dark blue:

Next, drag the Logo_Diffuse image from the Media Library into the center of the view. Set the Content Mode property of your new image to Aspect Fit:

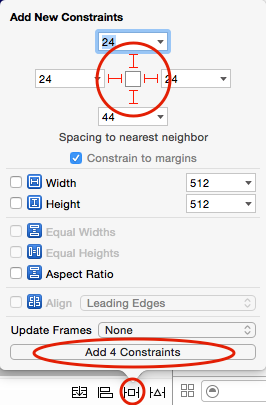
You’re almost done with your launch screen. All you need to do is add some constraints so the splash image works on all devices. Click the Pin button at the bottom, toggle the constraints on for all four edges and click Add 4 Constraints as shown below:
You’re done setting up your launch screen! Build and run your app; you’ll see your shiny new launch screen appear:
