Collection Views in OS X Tutorial
In this collection views in OS X tutorial, you’ll discover the joy of arranging things in beautiful, flowing interfaces for the desktop. By Gabriel Miro.
Implement the Data Source and Delegate Methods
Your header view is in place and ready to go, and you need to pass the header views to the collection view to implement the collectionView(_:viewForSupplementaryElementOfKind:atIndexPath:) method.
Open ViewController.swift and add the following method to the NSCollectionViewDataSource extension:
func collectionView(collectionView: NSCollectionView, viewForSupplementaryElementOfKind kind: String, atIndexPath indexPath: NSIndexPath) -> NSView {
  // 1
  let view = collectionView.makeSupplementaryViewOfKind(NSCollectionElementKindSectionHeader, withIdentifier: "HeaderView", forIndexPath: indexPath) as! HeaderView
  // 2
  view.sectionTitle.stringValue = "Section \(indexPath.section)"
  let numberOfItemsInSection = imageDirectoryLoader.numberOfItemsInSection(indexPath.section)
  view.imageCount.stringValue = "\(numberOfItemsInSection) image files"
  return view
}
The collection view calls this method when it needs the data source to provide a header for a section. The method:
- Calls
makeSupplementaryViewOfKind(_:withIdentifier:forIndexPath:)to instantiate aHeaderViewobject using the nib with a name equal towithIdentifier. - Sets the values for the labels.
At the end of ViewController.swift, add this NSCollectionViewDelegateFlowLayout extension.
extension ViewController : NSCollectionViewDelegateFlowLayout {
  func collectionView(collectionView: NSCollectionView, layout collectionViewLayout: NSCollectionViewLayout, referenceSizeForHeaderInSection section: Int) -> NSSize {
    return imageDirectoryLoader.singleSectionMode ? NSZeroSize : NSSize(width: 1000, height: 40)
  }
}
The above method, although technically optional, is a must when you use headers because the flow layout delegate needs to provide the size of the header for every section.
When not implemented, the header won’t show because zero size is assumed. Additionally, it ignores the specified width, effectively setting it to the collection view’s width.
In this case, the method returns a size of zero when the collection view is in single section mode, and it returns 40 when in multiple sections mode.
For the collection view to use NSCollectionViewDelegateFlowLayout, you must connect ViewController to the delegate outlet of NSCollectionView.
Open Main.storyboard and select the collection view. Open the Connections Inspector, and locate the delegate in the Outlets section. Drag from the button next to it to the view controller in the Document Outline.

Build and run.
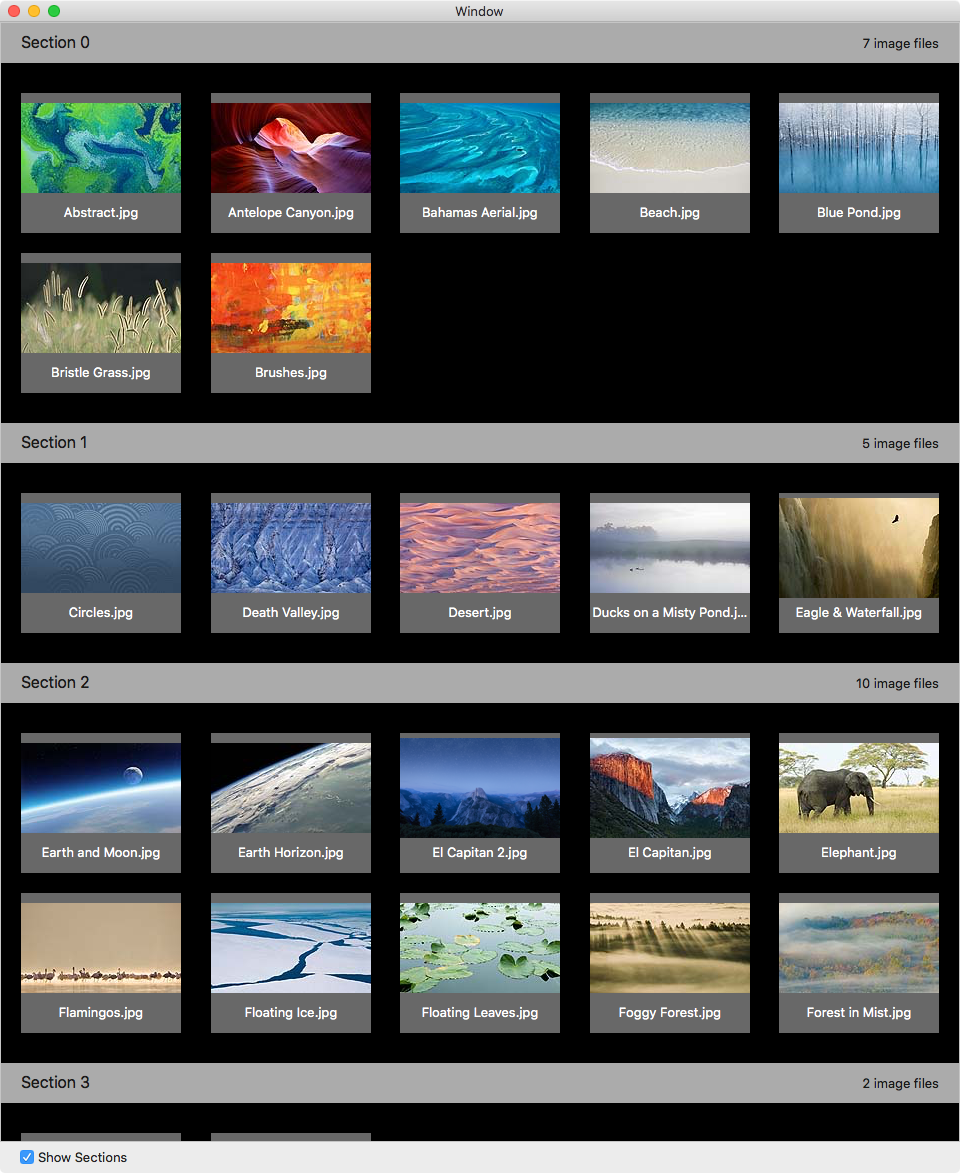
Check Show Sections and watch your header neatly define sections.
Selection in Collection Views
Collection views support both single and multiple selections. To show an item as selected, you must highlight it.
Before you can do that, you need to make the collection view selectable. Open the Main.storyboard. Then, select the Collection View and in the Attributes Inspector, check Selectable.

Checking Selectable enables single selection, meaning you can click an item to select it. And when you choose a different item, it deselects the previous item and selects item you just picked.
To show an item as selected, you’ll set a white border with borderWith set to 5.0. Non-selected items will get no special treatment.
Open CollectionViewItem.swift. Add the following at the end of viewDidLoad():
// 1
view.layer?.borderWidth = 0.0
// 2
view.layer?.borderColor = NSColor.whiteColor().CGColor
- Setting
borderWidthto0.0initializes the item to show not selected - Sets white for the color when selected
Add the following method at the end of CollectionViewItem class:
func setHighlight(selected: Bool) {
  view.layer?.borderWidth = selected ? 5.0 : 0.0
}
This method is called to add or remove highlighting.
When the user selects an item in the collection view, you find out via delegate methods. You’ll need to implement those methods, so open ViewController.swift and add this extension at the end of the file:
extension ViewController : NSCollectionViewDelegate {
  // 1
  func collectionView(collectionView: NSCollectionView, didSelectItemsAtIndexPaths indexPaths: Set<NSIndexPath>) {
    // 2
    guard let indexPath = indexPaths.first else {
      return
    }
    // 3
    guard let item = collectionView.itemAtIndexPath(indexPath) else {
      return
    }
    (item as! CollectionViewItem).setHighlight(true)
  }

  // 4
  func collectionView(collectionView: NSCollectionView, didDeselectItemsAtIndexPaths indexPaths: Set<NSIndexPath>) {
    guard let indexPath = indexPaths.first else {
      return
    }
    guard let item = collectionView.itemAtIndexPath(indexPath) else {
      return
    }
    (item as! CollectionViewItem).setHighlight(false)
  }
}
This implements the necessary NSCollectionViewDelegate methods. Further detail:
- When you select an item,
NSCollectionViewcalls this method. - Here you get the selected item — since multiple selection is disabled, it is always the first.
- This retrieves an item by its index and highlights it.
- The same as the previous method, but it’s called when an item is deselected.
What Happens During Selection Stays in Selection
When selected, an item is set in:
- The
selectionIndexPathsproperty ofNSCollectionView. - The
selectedproperty ofNSCollectionViewItem.
It’s critical to understand that when an NSCollectionViewItem instance is recycled, the data set must be refreshed with the data from the new object. Your selected property of NSCollectionViewItem is where you ensure this happens.
Accordingly, in the NSCollectionViewDataSource extension you need to add the following inside collectionView(_:itemForRepresentedObjectAtIndexPath:) method, just before the return statement:
if let selectedIndexPath = collectionView.selectionIndexPaths.first where selectedIndexPath == indexPath {
  collectionViewItem.setHighlight(true)
} else {
  collectionViewItem.setHighlight(false)
}
This guarantees that selection and highlighting are in sync.
Build and run.

Click an item and you’ll see highlighting. Choose a different image and you’ll see fully functional highlighting. Poof! Magic!
Where to go From Here
Download the final version of SlidesMagic here.
In this collection views in OS X tutorial you went all the way from creating your first ever collection view, through discovering the intricacies of the data source API with sections, to handling selection with the delegate protocol. However, although you covered a lot of ground, you’ve barely explored the capabilities of collection views. For instance, you didn’t look into any of these:
- “Data Source-less” collection views using Cocoa Bindings
- Different kind of items
- Adding and removing items
- Custom layouts
- Drag and drop
- Animations
- Tweaking
NSCollectionViewFlowLayout(sticky headers, for example)
We will be covering some of these topics in upcoming OS X tutorials here on raywenderlich.com, so be sure to check back over the coming months.
Unfortunately, the documentation for collection views from Apple and other sources is limited, but here are my suggestions:
- WWDC 2015 – Session 225 – What’s New in NSCollectionView
- OS X 10.11 El Capitan Release Notes for Cocoa Application Framework
- CocoaSlideCollection – Sample code of WWDC Session 225 above. Written in Objective-C
-
Exhibition – Sample code from Apple, written in Swift using
NSCollectionViewGridLayout
I wish you a pleasant journey with Collection View in your apps. I look forward to hearing your ideas, experiences and any questions you have in the forums below!