Collection Views in OS X Tutorial
In this collection views in OS X tutorial, you’ll discover the joy of arranging things in beautiful, flowing interfaces for the desktop. By Gabriel Miro.
Configure the Collection View Layout
You’ve got options: You can set the initial layout and some of its attributes in Interface Builder, or you can set them programmatically.
For SlidesMagic, you’ll take the programmatic approach.
Open ViewController.swift and add the following method to ViewController:
private func configureCollectionView() {
  // 1
  let flowLayout = NSCollectionViewFlowLayout()
  flowLayout.itemSize = NSSize(width: 160.0, height: 140.0)
  flowLayout.sectionInset = NSEdgeInsets(top: 10.0, left: 20.0, bottom: 10.0, right: 20.0)
  flowLayout.minimumInteritemSpacing = 20.0
  flowLayout.minimumLineSpacing = 20.0
  collectionView.collectionViewLayout = flowLayout
  // 2
  view.wantsLayer = true
  // 3
  collectionView.layer?.backgroundColor = NSColor.blackColor().CGColor
}
Here’s what you’re doing in this method:
- Creating an
NSCollectionViewFlowLayoutand setting its attributes and thecollectionViewLayoutproperty of theNSCollectionView. - For optimal performance,
NSCollectionViewis designed to be layer-backed. So, you’re setting an ancestor’swantsLayerproperty totrue. - Making an addition related to the layer that’s specific to SlidesMagic, setting the collection view’s background color to black.
You need to call this method when the view is created, so add this to the end of viewDidLoad():
configureCollectionView()
Build and run:

At this point, you have a black background and a layout. You’ve set the stage for your magic show!
Loading Items in the Collection View
To load items, you need to call its reloadData() method, which causes the collection view to discard and redisplay any currently visible items.
You’d typically call this method when the model changes.
Open ViewController.swift and add this code at the end of loadDataForNewFolderWithUrl(_:):
collectionView.reloadData()
This makes it so that selecting File \ Open Another Folder… calls this method. it loads a new model then calls reloadData().
Creating a Collection View Item
Just because you removed NSCollectionViewItem from the storyboard doesn’t mean you don’t need it. :] Here’s how to bring it back the right way.
Go to File \ New \ File…, select OS X \ Source \ Cocoa Class and click Next.
Set the Class field to CollectionViewItem, the Subclass of field to NSCollectionViewItem, and check Also create XIB for user interface.
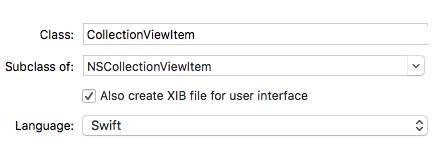
Click Next, and in the save dialog, select Controllers from Group and click Create.
Open CollectionViewItem.swift and replace the whole class with this:
class CollectionViewItem: NSCollectionViewItem {

  // 1
  var imageFile: ImageFile? {
    didSet {
      guard viewLoaded else { return }
      if let imageFile = imageFile {
        imageView?.image = imageFile.thumbnail
        textField?.stringValue = imageFile.fileName
      } else {
        imageView?.image = nil
        textField?.stringValue = ""
      }
    }
  }

  // 2
  override func viewDidLoad() {
    super.viewDidLoad()
    view.wantsLayer = true
    view.layer?.backgroundColor = NSColor.lightGrayColor().CGColor
  }
}
In here, you:
- Define the
imageFileproperty that holds the model object to be presented in this item. When set, itsdidSetproperty observer sets the content of the item’s image and label. - Change the background color to the item’s view.
Add Controls to the View
The View in the nib is the root view for a subtree of controls to be displayed in the item. You’re going to add an image view and a label for the file name.
Open CollectionViewItem.xib.
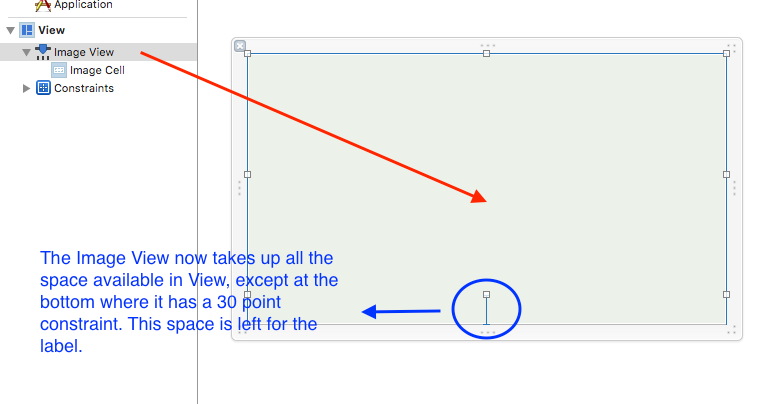
Add an NSImageView:

- From the Object Library, add an Image View to View.
- Select and click Pin from the Auto Layout toolbar to set its constraints.
- Set the top, leading and trailing constraints to 0, the bottom to 30 and click Add 4 Constraints.
- To fix the Auto Layout issues, select Editor \ Resolve Auto Layout Issues \ Update Frames.
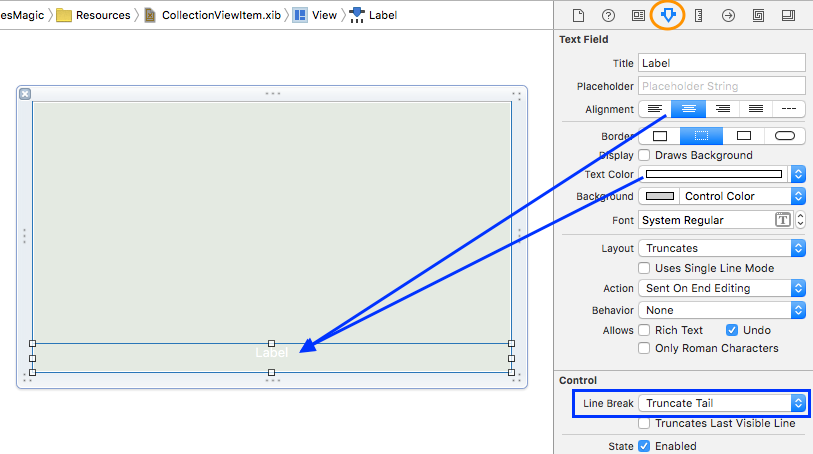
Add a label:


- From the Object Library, add a Label below the Image View.
- Click the Pin button. Set the top, bottom, trailing and leading constraints to 0, and then click Add 4 Constraints.
- Select Editor \ Resolve Auto Layout Issues \ Update Frames to update its position.
Select the Label, and in the Attributes Inspector set the following attributes:
- Alignment to center
- Text Color to white
- Line Break to Truncate Tail
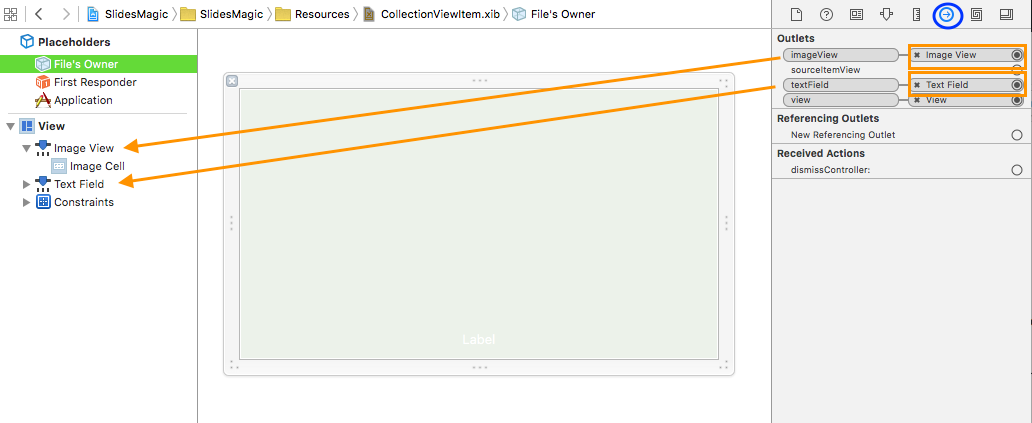
Now you need to connect the controls to the imageView and the textField outlets:
- Select File’s Owner and show the Connections Inspector.
- Next, drag from the button next imageView to the Image View control to connect them.
- In the same way, connect the
textFieldoutlet to Label.
Add a Top Level CollectionViewItem to the Nib
The File’s Owner in the nib — of type CollectionViewItem — is just a placeholder. You still need to instantiate it.
CollectionView's method makeItemWithIdentifier(_:forIndexPath:) instantiates the collection view item, and it requires the nib to contain a single top-level instance of either NSCollectionViewItem or a subclass thereof.
You need to make it appear.
Drag a Collection View Item from the Object Library and drop it into Document Outline. Select it, and in the Identity Inspector, set its Class to CollectionViewItem.

Populate the Collection View
You need to implement the data source methods so the view knows the answers to these questions:
- How many sections are in the collection?
- How many items are in each section?
- Which item is associated with a specified index path?
Meet your data source method: NSCollectionViewDataSource protocol.
Put it into action now — open ViewController.swift and add the following extension at the end of the file:
extension ViewController : NSCollectionViewDataSource {

  // 1
  func numberOfSectionsInCollectionView(collectionView: NSCollectionView) -> Int {
    return imageDirectoryLoader.numberOfSections
  }

  // 2
  func collectionView(collectionView: NSCollectionView, numberOfItemsInSection section: Int) -> Int {
    return imageDirectoryLoader.numberOfItemsInSection(section)
  }

  // 3
  func collectionView(collectionView: NSCollectionView, itemForRepresentedObjectAtIndexPath indexPath: NSIndexPath) -> NSCollectionViewItem {

    // 4
    let item = collectionView.makeItemWithIdentifier("CollectionViewItem", forIndexPath: indexPath)
    guard let collectionViewItem = item as? CollectionViewItem else {return item}

    // 5
    let imageFile = imageDirectoryLoader.imageFileForIndexPath(indexPath)
    collectionViewItem.imageFile = imageFile
    return item
  }

}
- This method provides the number of sections. When your app doesn’t support sections, you can omit this method because a single section will be assumed. When SlidesMagic launches, the model
imageDirectoryLoaderis set to return the value 1. - This is one of two required methods for
NSCollectionViewDataSource. Here you return the number of items in the section specified by thesectionparameter. Upon launch, SlidesMagic has a single section, so you set the model to return the total number of images in the folder. - This is the second required method. It returns a collection view item for a given
indexPath. - The collection view’s method
makeItemWithIdentifier(_:forIndexPath:)instantiates an item from a nib where its name equals the value of theidentifierparameter. In this case, it’s"CollectionViewItem". First, it attempts to reuse an unused item of the requested type, and if nothing is available it creates a new one. - This code gets the model object for the given
NSIndexPathand sets the content of the image and the label.