Collection Views in OS X Tutorial
In this collection views in OS X tutorial, you’ll discover the joy of arranging things in beautiful, flowing interfaces for the desktop. By Gabriel Miro.
Set the Data Source
A collection view without data is like a magic act with no slight of hand — pointless and uninspiring. So, your next step is to define the data source; in this case it’s the view controller.
Open Main.storyboard and select the collection view.
Open the Connections Inspector and locate dataSource in the Outlets section. Drag from the adjacent button to the View Controller in Document Outline View.

Build and run.

Voila! It was worth all that work! Your collection view displays images from the Desktop Pictures folder!
Troubleshooting
If you don’t see images, then something went wrong. You worked through several steps, so you probably just missed something small.
- Are all the connections in the Connections Inspector set as instructed?
- Did you set the
dataSourceoutlet? - Did you use the right type for custom classes in the Identity Inspector.
- Did you add the top level
NSCollectionViewItemobject and change its type toCollectionViewItem? - Is the value for the
identifierparameter inmakeItemWithIdentifieridentical to the nib name?
Going Multi-Section
MagicSlides is doing some serious magic now. But you’re going to improve it by adding sections.
First, you need to add a check box at the bottom of the view so you can toggle between single and multi-section.
Open Main.storyboard, and in the Document Outline view, select the scroll view’s bottom constraint. Open the Size Inspector and change its Constant to 30.
This is how you move the collection view up to make room for the check box.

Now, drag a Check Box Button from the Object Library into the space below the collection view. Select it, and in the Attributes Inspector, set its Title to Show Sections, and its State to Off.

Then, set its Auto Layout constraints by selecting the Editor \ Resolve Auto Layout Issues \ Add Missing Constraints menu.
Build and run. It should look like this at the bottom:

Now for a little UI. When you click the box, the application needs to change the collection view’s appearance.
Open ViewController.swift and add the following method at the end of the ViewController class:
// 1
@IBAction func showHideSections(sender: AnyObject) {
  // 2
  let show = (sender as! NSButton).state
  imageDirectoryLoader.singleSectionMode = (show == NSOffState)
  imageDirectoryLoader.setupDataForUrls(nil)
  // 3
  collectionView.reloadData()
}
Section by section, here’s what you’re doing:
- Calling this method by toggling the state of the checkbox.
- Accordingly, retrieving the state of the checkbox and setting data model mode
singleSelectionMode, and then calling the model’ssetupDataForUrls(_:)method to rearrange the sections structure. Thenilvalue passed means you skip image loading — same images, different layout.
If you’re curious how images are distributed across sections, look up sectionLengthArray in ImageDirectoryLoader. The number of elements in this array sets the max number of sections, and the element values set the number of items in each section.
Now, open Main.storyboard. In the Document Outline, Control-Drag from the Show Sections control over the View Controller. In the black pop-up window click showHideSections: to connect it. You can check if the connection was set properly in the Connections Inspector.

Build and run.

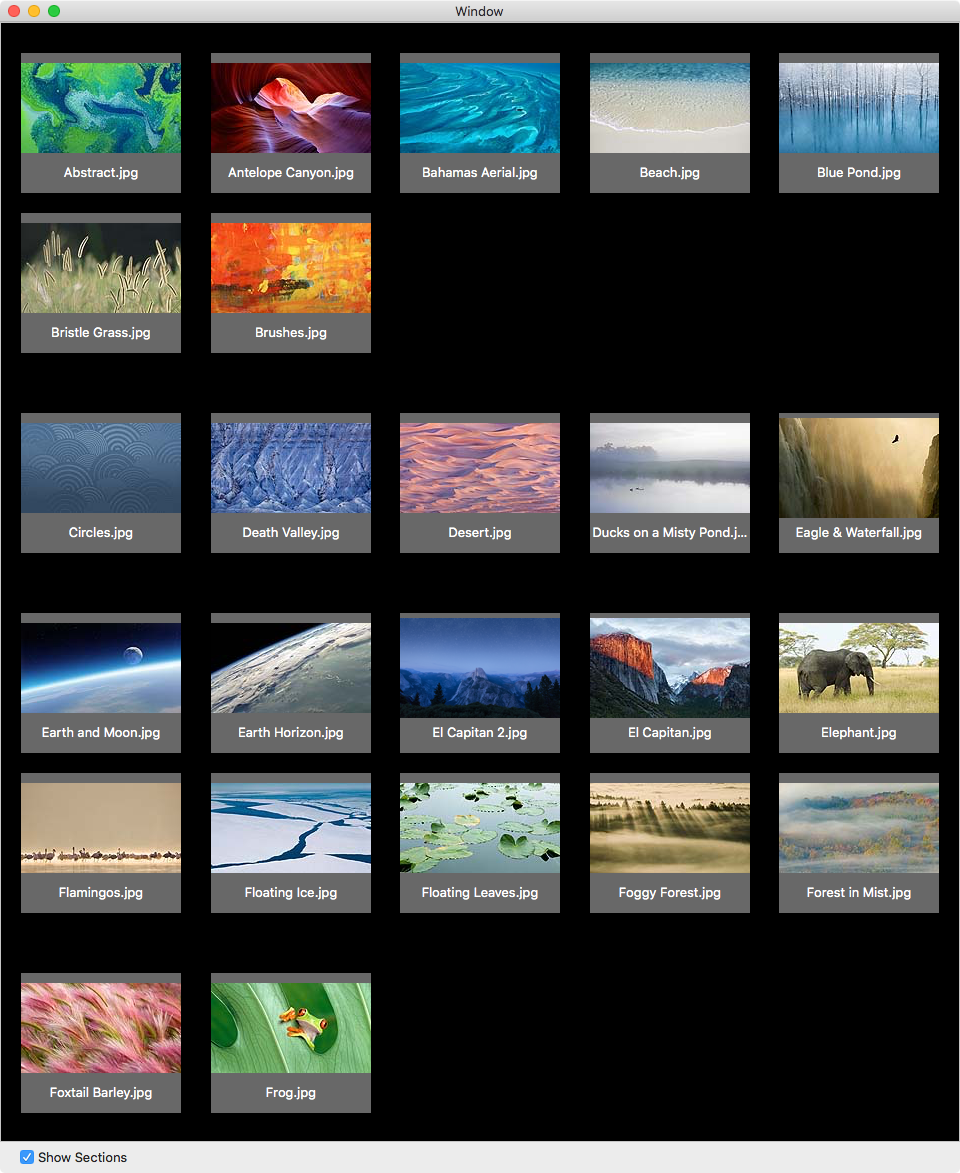
Check Show Sections and watch the layout change.
Because of the “black tail” in the second row, you see section 0 has seven images, but section 1 has five and section 2 has 10 (look at sectionLengthArray). It’s not clear because the sections are rather cozy.
To fix this, open ViewController.swift and modify the layout’s sectionInset property in the configureCollectionView() function.
Replace:
flowLayout.sectionInset = NSEdgeInsets(top: 10.0, left: 20.0, bottom: 10.0, right: 20.0)
With this:
flowLayout.sectionInset = NSEdgeInsets(top: 30.0, left: 20.0, bottom: 30.0, right: 20.0)
Here you set the bottom and top section insets to 30 to provide better visual separation between sections.
Build and run.
Check Show Sections, and note the additional spacing between sections.
Add Section Headers
The app is looking great so far, but more organization will make it even better.
Another way to see section boundaries is adding a header or footer view. To do this, you need a custom NSView class and will need to implement a data source method to provide the header views to the table view.
To create the header view, select File \ New \ File…. Select OS X \ User Interface \ View and click Next.
Enter HeaderView.xib as the file name and for Group select Resources.
Click Create.

Open HeaderView.xib and select the Custom View. Open the Size Inspector and change Width to 500 and Height to 40.
Drag a label from the Object Library to the left-hand side of Custom View. Open the Attributes Inspector and change Title to Section Number and Font Size to 16.
Drag a second label to the right-hand side of Custom View and change Title to Images Count and Text Alignment to Right.
Now, select the Editor \ Resolve Auto Layout Issues \ Add Missing Constraints menu to add its Auto Layout constraints.
The header view should look like this:

With the interface ready for show time, the next task is to create a custom view subclass for the header view.
Select File \ New \ File… to create a new file.
Choose OS X \ Source \ Cocoa Class and name the class HeaderView, and then make it a subclass of NSView. Click next, and for Group select Views. Click Create.
Open HeaderView.swift and replace the contents of the class with the following:
// 1
@IBOutlet weak var sectionTitle: NSTextField!
@IBOutlet weak var imageCount: NSTextField!

// 2
override func drawRect(dirtyRect: NSRect) {
  super.drawRect(dirtyRect)
  NSColor(calibratedWhite: 0.8 , alpha: 0.8).set()
  NSRectFillUsingOperation(dirtyRect, NSCompositingOperation.CompositeSourceOver)
}
In here, you’re:
- Setting up outlets you’ll use to connect to the labels in the nib.
- Drawing a gray background.
With the framework in place, the next task is changing the nib file to use this new class and connecting the outlets to the labels.
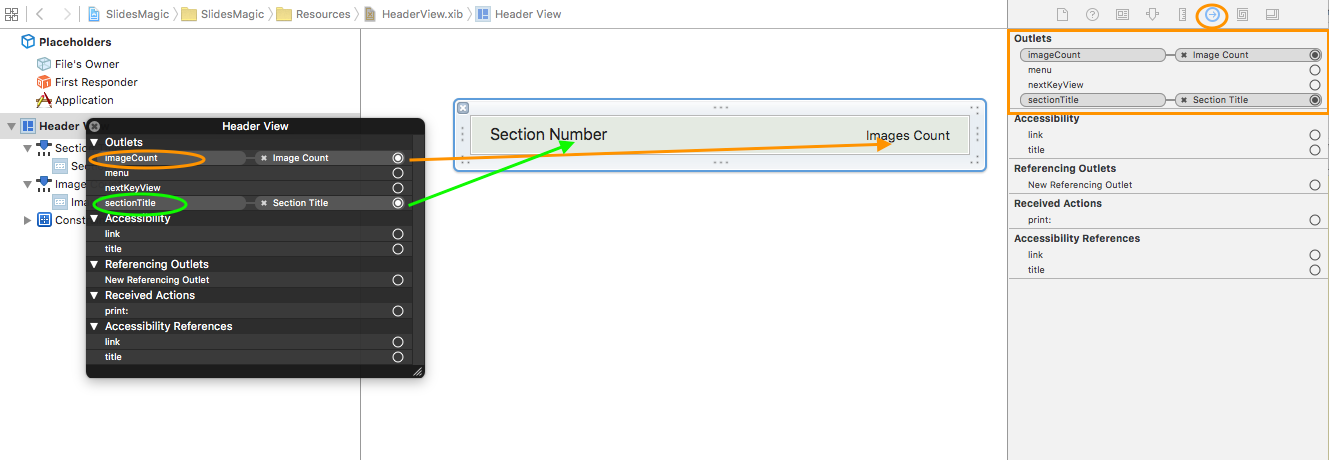
Open HeaderView.xib and select the Custom View. Open the Identity Inspector. Change the Class to HeaderView.

In the Document Outline view, Control-Click on the Header View. In the black pop-up window, drag from imageCount to the Images Count label on the canvas to connect the outlet.
Repeat the operation for the second label, dragging from sectionTitle to the Section Number label in the canvas.