Introduction to Unity: Getting Started – Part 2/2
In this second part of the Introduction to Unity tutorial you’ll learn: “How to use the Project window to import and organize your assets”, “The difference between GameObjects and Prefabs”, “How physics work in Unity”, “How cameras work and which types of projections are available” and “The basics of Materials in Unity”. By Brian Moakley.
Putting it all Together
Where to Go From Here?
As asteroids drift off the screen, they should wrap just like the Spaceship.
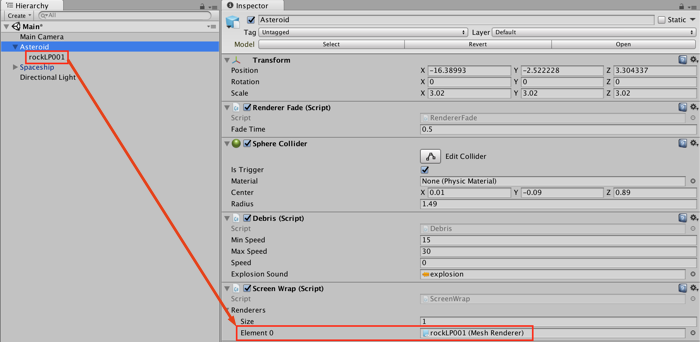
From the Scripts folder in the Project window, drag the ScreenWrap script to the Asteroid. Just as you did with the Spaceship, you’ll need to configure the Screen Wrap with the correct renderer.
The Asteroid has a child GameObject named rockLP001. Drag this child GameObject to the Renderers property of the Screen Wrap component in the Inspector for the Asteroid GameObject.
Finally, drag the Asteroid from the Hierarchy to the Prefab folder in the Project window. Click Original Prefab when prompted to create the Prefab. Now that you’re done creating your Asteroid Prefab, delete the Asteroid instance from the Hierarchy.
The last thing you need is a spawn point for all the asteroids. Click the Create button in the Hierarchy and select Create Empty. Name your spawn point Debris.
You’ll want this spawn point to be on the same plane as the player. Otherwise, the player will either fly over or under the debris. A good GameObject to use as a reference is missile_R_0, since it’s located in the center of the model.
Drag the Debris GameObject and make it a child of missile_R_0. The transform coordinates of Debris will then be relative to its parent GameObject.
To match the coordinates of the parent, set the Debris position to X:0, Y:0, Z:0). With this little trick you can be sure that Spaceship and Debris are on the same plane.
Next, move the Debris to the bottom of the Hierarchy view where it originally was.
Move the Debris GameObject 7.5 points to the right. In case you didn’t manage to get that all exactly the same, its new position should be (X:20.0, Y:1.72, Z:7.06).
Now that you have your ship and an asteroid configured, you need to bring all the elements together and create a simple game.
Click the Create button in the Hierarchy and select Create Empty. In Inspector, click on the name of the new GameObject and name it GameManager.
With the GameManager selected in the Hierarchy, click the Add Component button, select Scripts, then select GameManager.
You’ll see that this action added an Audio Source as well. Also, the GameManager component has several fields that you need to set that it’ll use to spawn asteroids.
Start with the Debris field. Make sure the GameManager is selected in the Hierarchy, and drag the Asteroid Prefab into the Debris field.
So what did you do here? The GameManager is responsible for spawning Asteroids. It uses the Debris field to decide which objects to spawn. You told it to use the Asteroid prefab.
Next, still on GameManager:
The GameManager component should look like the following:

Finally, in the Audio Source component, add background-music to the AudioClip field, and make sure to check the loop checkbox.

Run your game and check out how everything looks.
Congratulations – you’ve built your very first game in Unity!
In later tutorials, you’ll learn about the various subsections of Unity that really let you juice this game up. You’ll also learn how to write your own scripts to take advantage of Unity’s flexible API.
… and you did remember to save your work. Right? ;]
If you like, you can open the final project from the Download Materials link at the top or bottom of this tutorial.
To learn more about Unity, check out our other tutorials. Unity also has a ton of great, free content over on YouTube.
As always, keep checking this site for more Unity tutorials. If you have any questions, feel free to reach out to me in the comments below!
- Set the center of the Sphere Collider to (X:0.01, Y:-0.09, Z:0.89).
- Set the Radius to 1.49.
- Check the Is Trigger checkbox.
- For the Rigidbody, uncheck the Use Gravity checkbox.
- Check the Is Kinematic checkbox.
- For the Debris script, set Min Speed to 15.
- Set the Max Speed to 30.
- Drag the explosion sound file from the Sounds folder to the Explosion Sound field.
- For the transform of the Asteroid GameObject, set the Scale to (X:3.02, Y:3.02, Z:3.02).
- Adding the Debris component also added the required Renderer Fade component. When a bullet collides with an asteroid, the asteroid should fade away instead of simply disappearing from the screen. The component only requires a fade time, so set Fade Time to 0.5.
- Set the Min Time to 2 and the Max Time to 5. This tells the script how quickly it should spawn asteroids.
- Set Total Items on Screen to 5. This limits the number of asteroids to 5 so that the player doesn’t get overwhelmed.
- Drag the Debris GameObject from the Hierarchy to the Screen Debris field. This specifies that the GameManager should spawn asteroids on the Debris GameObject.