Introduction to Unity: Getting Started – Part 2/2
In this second part of the Introduction to Unity tutorial you’ll learn: “How to use the Project window to import and organize your assets”, “The difference between GameObjects and Prefabs”, “How physics work in Unity”, “How cameras work and which types of projections are available” and “The basics of Materials in Unity”. By Brian Moakley.
Introducing Physics
There’s just one major problem. In flying your ship around, you violated one of the laws of physics. No, not Newton’s laws of physics — the laws of Unity physics best-practices.
Unity uses physics for collision detection. If a GameObject doesn’t have a RigidBody component, it’s considered a static collider.
This means Unity assumes that the GameObject will stand still, which allows for huge optimizations when it comes to collision detection. But when you start moving those static objects around anyway, Unity has to recalculate those optimizations. This adds unnecessary CPU time to your game.
To avoid this unnecessary CPU overhead, you’ll need to opt-into the physics engine by adding a Rigidbody component. You’ve already added components directly from the menu bar. This time, with the Spaceship still selected in the Hierarchy, click the Add Component button in the Inspector.

You’ll see a component menu appear. Click Physics, then Rigidbody.

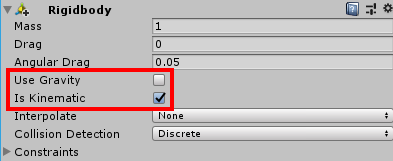
This component has a lot of options. Is Kinematic is the one you’re interested in.
Setting this option means that you want to move a GameObject manually, but still want the object to register for collisions. This is useful when you’re moving items via scripts, like you’re doing here, or via animation.
Tick the Is Kinematic checkbox. Since you aren’t using gravity in this game, uncheck the Use Gravity checkbox like so:
The object of this game is to fly around and shoot various types of debris. Naturally, handling collisions will play a large role in this type of game. You’ll need to know when the player shoots an asteroid or when a player crashes into something.
Colliders let you listen to and respond to collisions. There are many types of colliders to use with basic shapes, such as Sphere Collider and Box Collider.
There’s even a mesh collider that’s based on a 3D model. Colliders are displayed in the Scene view using green lines.
If you’re using a retina display, the green lines are extremely thin. Unity is looking into customizability or making the editor dpi sensitive to improve this.

In this tutorial, you’ll keep things simple and use a Sphere Collider.
Select the Spaceship in the Hierarchy window and click the Add Component button in the Inspector window. Click Physics / Sphere Collider, and you’ll see a green circle behind the Spaceship.

Uh, wait — why is the collider behind the Spaceship? That’s because the actual model of the Spaceship has been offset from the parent when you changed its position earlier.
- With the Spaceship selected in the Hierarchy, find your Sphere Collider in the Inspector.
- Set Center to (X:0, Y:4.09, Z:-0.72)
- Set the Radius to 3.14
- Check the Is Trigger checkbox. Kinematic GameObjects can’t register normal collisions, but they can listen to trigger events from other kinematic objects.
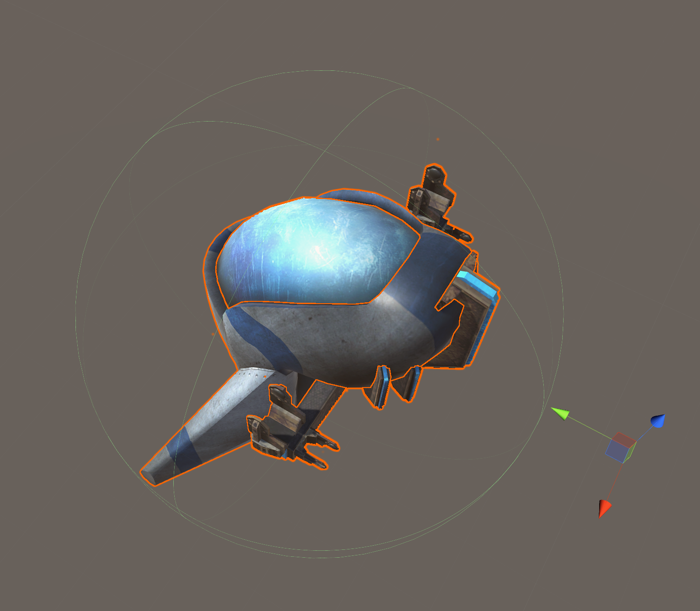
Your Sphere Collider component should look like the following:

The collider should also enclose the Spaceship, like so:
Arming the Cannons
While flying around is fun and all, most players have an overarching desire to fire off a few dozen photon torpedos! :]
A script’s been provided for you to help satisfy that craving.
Select the Spaceship in the Hierarchy and click the Add Component button in the Inspector window. Click Scripts / Ion Cannon.
You’ll notice an Audio Source component was automatically added to the GameObject as well as the script.

Some scripts require components. If the components aren’t found on the GameObject, they’ll be added automatically.
To make your objects play sounds, you need both an Audio Source and an Audio Clip. An Audio Source can be attached to any GameObject, while an Audio Clip is simply an audio file.
Drag the shoot sound from the Sounds folder in the Project window into the Fire Sound field.

You’ll notice that the Ion Cannon script has a Bullet field. Your job is to create a bullet object. Don’t worry if you’re not an artist – a simple sphere will suffice.
Click the Create button in the Hierarchy. From the menu, select 3D Object, then select Sphere.

Select the Sphere in the Hierarchy, then use the Inspector to set Scale to (X:0.47, Y:0.47, Z:0.47). Select the Sphere in the Hierarchy again and name it Bullet.
Since your bullet is going to be moving across the scene, it needs to opt-into the physics engine as well. Do you remember what you need to do? Give it a whirl and if you’re stuck, check the spoiler below.
[spoiler]Select the Bullet from the Hierarchy and click the Add Component button in the Inspector. Select Physics / Rigidbody to add the Rigidbody component.[/spoiler]
The bullet will need velocity to move, so make sure Is Kinematic is unchecked. Also, make sure Use Gravity is unchecked.
The bullet will keep traveling even after it flies offscreen, just like your spaceship did originally. Drag the Bullet script from the Project window onto the Bullet GameObject. Now, when the bullet flies offscreen, it will automatically be destroyed.
Finally, drag your Bullet object into the Prefab folder of your Project window. This creates a Prefab of the bullet, which allows you to create lots of bullets using a script. Pew, pew! :]
Now that you have your bullet created as a Prefab, delete the instance of the bullet from the Hierarchy.
Select your Spaceship again, and use the Inspector to add the Bullet Prefab to the Bullet field. The Inspector should look like so:

Finally, the sky background is somewhat out of place. You’d expect a spaceship to fly in the black void of space, wouldn’t you? :]
Select Main Camera in the Hierarchy and use the Inspector to set Clear Flags to Solid Color and Background Color to black.

Save your work, run your game, and press the space bar to blast away with the Ion cannon!

Putting the Debris in Space Debris
So far you have a ship that can fire, but it would be far more interesting if there was something to shoot at. It’s time for you to add some asteroids to the mix.
Find the rock_d_05.obj file in your downloaded files and drag it into the Models folder in the Project window.
Right-click rock_d_05.obj and rename it Asteroid.
This file only contains information about the model itself. It doesn’t have any animations included.
Drag the Asteroid model into the Scene view to create an instance of it. You’ll see that the asteroid is currently plain white.
A cute couple? I’ll give them a week! It looks like it could be a rocky relationship. :]
![A cute couple? I'll give them a week! It looks like it could be a rocky relationship :]](https://koenig-media.raywenderlich.com/uploads/2016/12/Asteroid.png)
While you could make the argument that it’s a fragment of a snow-white comet, you should learn how to texture your models… unless you want to make a career of creating snow-themed games. :]
Expand the Asteroid GameObject and select its child object named rockLP001. In the Inspector, you’ll see that this child GameObject has a Mesh Renderer component attached to it. The renderer draws the object to the screen, but needs a bit of help to do this – that’s where Materials come into play.
Materials determines the appearance of your objects. For example, a cotton shirt will look much different than a plaster wall would.
Unity achieves this by encapsulating a shader with each material.
What’s a shader, you ask? It’s a simple program written in a C-like language that runs on the GPU. A shader can be simple enough to render a texture on a cube, or it can be complex enough to simulate water.
Unity provides many different shaders out of the box. For example you can use them to render a sky box, or make an object appear translucent.
Open the Materials folder in the Project window, and click the Create button. From the dropdown, select Material and give it the name Asteroid. In the Inspector window you’ll now see the available properties for a material.
Drag the flint_like_rock_4787 image from the Textures folder in the Project window to the Albedo property:


Under the Metallic property, you’ll see two sliders. The first slider determines the metallic appearance of the material, while the other determines how rough the texture is.
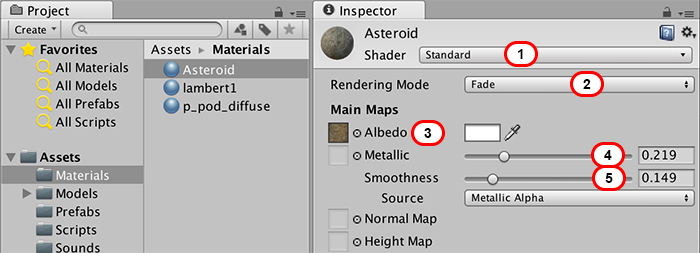
For now, set the Metallic slider to 0.219

- The Shader option lets you choose from one of the many pre-packaged shaders. The default Standard Shader has enormous flexibility, so leave it selected.
- When an asteroid is hit, you’ll want to fade it out, so set the Rendering Mode to Fade.
- The Albedo property holds the actual texture. You can tint it by providing a color.
- Looking at the Asteroid material preview at the bottom of the Inspector window, you’ll notice the material looks a little too smooth, like it’s been polished. (If you don’t see the material preview, try dragging the Asteroid title bar up from the bottom of the Inspector like so):
- Set the Smoothness slider to 0.149. Your Material should now look like this:
With the material all configured, you now need to add it to the asteroid. Drag your Asteroid material from the Project window to the Asteroid GameObject in the Scene view.

Awesome! You have an asteroid ready to cause lots of trouble. But first you need to add some behavior to it.
Drag the Debris script from the Project window in the Scripts folder to the Asteroid.
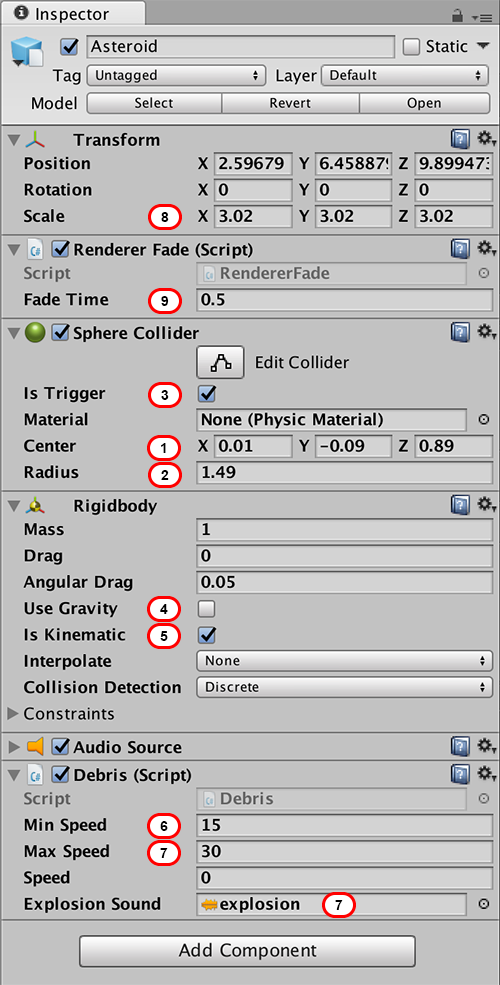
The Debris script automatically added a Sphere Collider, Rigidbody, and Audio Source to the Asteroid. Now set up all the required properties.