macOS Development for Beginners: Part 2
Learn how an app starts, how the UI is constructed, and all the way to handling user interaction in this macOS development tutorial for beginners! By Roberto Machorro.
Preferences Window

The main window for the EggTimer app is looking good now, but it needs a Preferences window so that the user can choose how well they want their egg cooked.
The Preferences will appear in a separate window with its own window controller. This is because the Preferences window will have a different default size and will not be resizable. It is possible to have more than one view controller displayed by the same window controller, but they then would share the properties of that window controller.
Open Main.storyboard, closing the Assistant Editor if it is still open, and search for “window” in the Objects Library. Drag a new Window Controller into the Visual Editor. It will create a View Controller as well to display its content. Arrange them in the window so they are easy to see and so that the new window controller is close to the menu bar.
Open the EggTimer menu and Control-drag from Preferences… to the new window controller. Choose Show from the popup that appears. This creates a segue so that whenever a user selects Preferences… from the EggTimer menu, this window controller will display the new view controller.

The Preferences window controller will display a new view controller, so now you need to make the class for that view controller. In the Project Navigator, select the existing ViewController.swift file; this makes sure your new file will be in a logical place in the Project Navigator. Choose File/New/File…

Choose macOS/Cocoa Class and click Next. Set the class name to PrefsViewController and make it a subclass of NSViewController. Check that the language is set to Swift and uncheck Also create XIB file for user interface. Click Next and Create to save the file.

Back in Main.storyboard, select the new view controller. Make sure you select the view controller itself, not its view; this is easier using the Document Outline. In the Identity Inspector, set its class to PrefsViewController.

Select the window in the preferences window controller and use the Attributes Inspector to set its title to Preferences. Do not set an autosave name, as this window is going to be centered in the screen every time it appears. Uncheck the Minimize and Resize controls so that the window size is fixed.

Go to the Size Inspector and enter a width of 416 and a height of 214 for the Content Size.
Under Initial Position, select Center Horizontally and Center Vertically from the 2 popups.

Select the View in the PrefsViewController and change its width to 416 and height to 214 using the Size Inspector.
The PrefsViewController is going to display a popup for selecting from a preset time and a slider for selecting a custom time. It will have labels for each of these and two buttons: Cancel and OK. There will also be a dynamic label that shows the currently selected time.
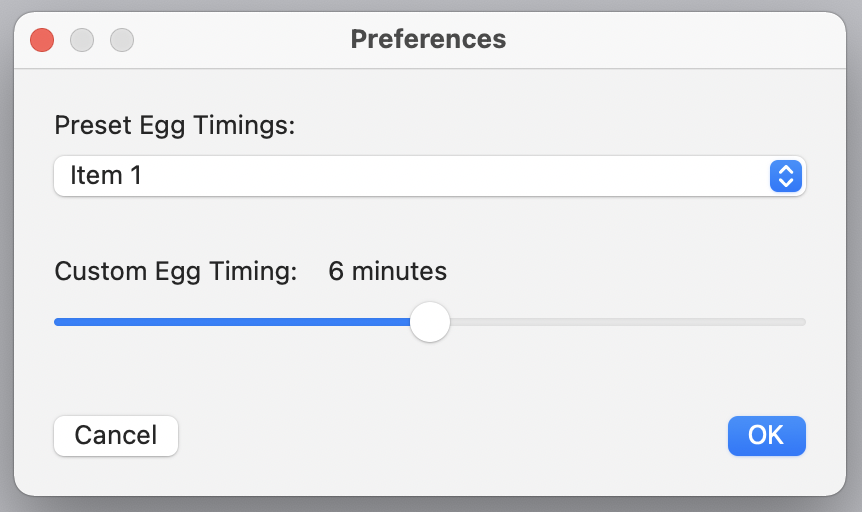
Drag the following controls into the view controller arranging them as shown:
- Label – set title to “Preset Egg Timings:”
- Pop Up Button
- Label – set title to “Custom Egg Timing:”
- Label – set title to “6 minutes”
- Horizontal Slider
- Push Button – set title to “Cancel”
- Push Button – set title to “OK”
Because this window does not resize, there is no need to apply any auto-layout constraints – the objects will always appear as you have arranged them. Drag the objects around to position them, using the blue guidelines to help you. Extend the width of the “6 minutes” label to near the right side of the window as it may contain more text. Double-click the Pop Up Button to see the first three items and set their titles to:
- For runny soft-boiled eggs (barely set whites): 3 minutes
- For slightly runny soft-boiled eggs: 4 minutes
- For custardy yet firm soft-boiled eggs: 6 minutes
Drag in two more Menu Items from the Objects Library, then a Separator Menu Item and finally another Menu Item. If you are having any trouble positioning them, use the Document Outline.
Set the titles for the remaining menu items to:
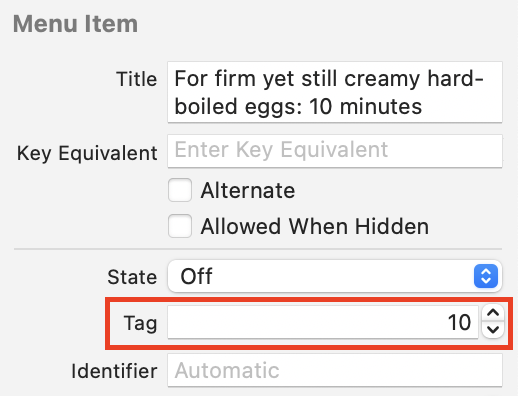
- For firm yet still creamy hard-boiled eggs: 10 minutes
- For very firm hard-boiled eggs: 15 minutes
- Custom

I don’t pretend to have any great knowledge in regard to boiling eggs, so I got these times and descriptions from The Kitchn.
Select the popup itself, not any of the items, and set its Selected Item to the 6 minute option.
Now here is where you are going to do a very neat trick that will allow the app to know exactly how many minutes have been selected. For each of the menu items in the popup, set its tag to the number of minutes: 3, 4, 6, 10, 15 in the Attributes Inspector. Leave the tag for the Custom menu item at 0.
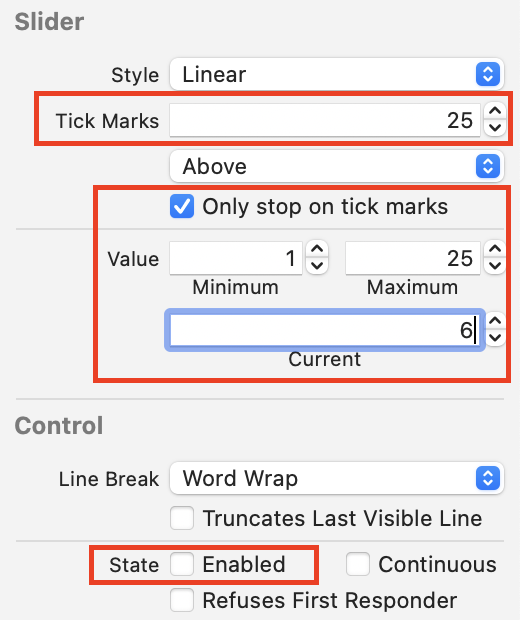
Now select the Slider and in the Attributes Inspector set Tick marks to 25, Minimum Value to 1, Maximum Value to 25, Current Value to 6 and check Only stop on tick marks. Once the tick marks are visible, you may want to move the slider down a few pixels. Disable the slider by unchecking Enabled – it will only be enabled if Custom is selected in the popup.
Connecting up the Preferences Objects
Option-click on PrefsViewController.swift in the Project Navigator and hide the side panels if you need the room. You need @IBOutlets for the popup, the slider and the label showing “6 minutes”. Control-drag from each of these into the PrefsViewController giving them the following outlet names:
- Popup:
presetsPopup - Slider:
customSlider - Label:
customTextField
Next, Control-drag to create the @IBActions, remembering to set the Connection popup to Action each time:
- Popup:
popupValueChanged - Slider:
sliderValueChanged - Cancel button:
cancelButtonClicked - OK button:
okButtonClicked
Your code should now look like this:

The layout of the Preferences window is now complete. Build and run the app and select Preferences from the EggTimer menu. Click the red close blob in the title bar button to close the window when you are done giving it a look.
