macOS View Controllers Tutorial
In this macOS view controllers tutorial you’ll discover the wide range of functionality that is baked into vanilla view controllers, along with learning how you can create your own view controller subclasses to build up your app in an easy-to-understand manner. By Jean-Pierre Distler.
View Controller Life Cycle
Since view controllers are responsible for managing views, they expose methods that allow you to hook into events associated with the views. For example the point at which the views have loaded from the storyboard, or when the views are about to appear on the screen. This collection of event-based methods are known as the view controller life cycle.
The life cycle of a view controller can be divided into three major parts: its creation, its lifetime, and finally its termination. Each part has methods you can override to do additional work.
Creation
-
viewDidLoadis called once the view is fully loaded and can be used to do one-time initializations like the configuration of a number formatter, registering for notifications, or calls to API that only need to be done once. -
viewWillAppearis called every time the view is about to appear on screen. In our application, it is called every time you select the Overview tab. This is a good point to update your UI or to refresh your data model. -
viewDidAppearis called after the view appears on screen. Here you can start some fancy animations.
Lifetime
Once a view controller has been created, it then enters a period during which it it handles user interactions. It has three methods specific to this phase of its life:
-
updateViewConstraintsis called every time the layout changes, like when the window is resized. -
viewWillLayoutis called before thelayoutmethod of a view controller’s view is called. For example, you can use this method to adjust constraints. -
viewDidLayoutis called afterlayoutis called.
Termination
These are the counterpart methods to creation:
-
viewWillDisappearis called before the view disappears. Here you can stop your fancy animations you started inviewDidAppear. -
viewDidDisappearis called after the view is no longer on the screen. Here you can discard everything you no longer need. For example, you could invalidate a timer you used to upate your data model on a periodic time base.
In all these methods, you should call the super implementation at some point.
Life cycle in practice
Now that you know the most important things about a view controller’s life cycle, it’s time for a short test!
Question: Every time OverviewController’s view appears, you want to update the UI to take into account that a user selected a product when the Details tab was selected. Which method would be a good fit?
[spoiler title=””]
There are two possible methods: viewWillAppear and viewDidAppear. The best solution is to use viewWillAppear so that the user sees the updated UI at the moment the view appears. Using viewDidAppear means that a user would see the UI appear first showing old data before updating.
[/spoiler]
Open OverviewController.swift and add this code inside the class implementation:
override func viewWillAppear() {
  super.viewWillAppear()
  updateUI()
}
This overrides the viewWillAppear to update the user interface before the view becomes visible.
The number formatter currently uses default values, which doesn’t fit your needs. You’ll configure it to format numbers as currency values; since you only need to do this once, a good place is the method viewDidLoad.
In OverviewController add this code inside viewDidLoad:
numberFormatter.numberStyle = .currency
For the next step, the main view controller needs to react on product selection and then inform the OverviewController about this change. The best place for this is in the ViewController class, because this controller owns the pop-up button. Open ViewController.swift and add these properties inside the ViewController class implementation:
private var products = [Product]()
var selectedProduct: Product?
The first property, products, is an array used to keep a reference to all the products. The second, selectedProduct, holds the product selected in the pop-up button.
Find viewDidLoad and add the following code inside:
if let filePath = Bundle.main.path(forResource: "Products", ofType: "plist") {
  products = Product.productsList(filePath)
}
This loads the array of products from the plist file using the Product class added at the beginning of the tutorial, and keeps it in the products property. Now you can use this array to populate the pop-up button.
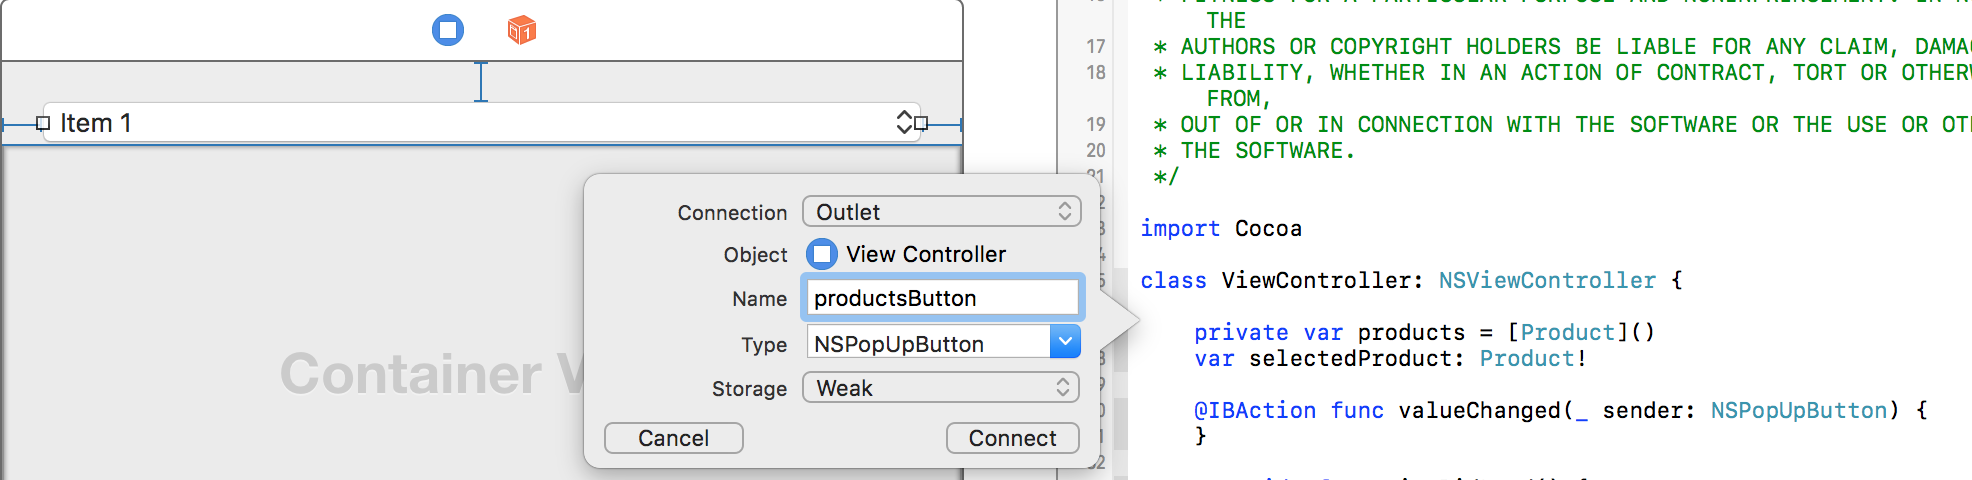
Open Main.storyboard, select View Controller Scene, and switch to the Assistant Editor. Make sure ViewController.swift is selected, and Control-drag from the pop-up button to ViewController.swift to create an outlet named productsButton. Make sure the type is NSPopUpButton.
Return to ViewController.swift and add the following code to the end of viewDidLoad :
//1
productsButton.removeAllItems()
//2
for product in products {
  productsButton.addItem(withTitle: product.title)
}
//3
selectedProduct = products[0]
productsButton.selectItem(at: 0)
This piece of code does the following:
- It removes all items in the pop-up button, getting rid of the Item1 and Item2 entries.
- It adds an item for every product, showing its title.
- It selects the first product and the first item of the pop-up button. This makes sure that everything is consistent.
The final piece in this puzzle is reacting to the pop-up button selection changes. Find valueChanged and add the following lines:
if let bookTitle = sender.selectedItem?.title,
  let index = products.index(where: {$0.title == bookTitle}) {
  selectedProduct = products[index]
}
This code tries to get the selected book title and searches in the products for the index of the title. With this index, it sets selectedProduct to the correct product.
Now you only need to inform OverviewController when the selected product changes. For this you need a reference to the OverviewController. You can get a reference within code, but first you have to add another property to ViewController.swift to hold that reference. Add the following code inside the ViewController implementation:
private var overviewViewController: OverviewController?
You can get the instance of OverviewController inside prepare(for:sender:), which is called by the system when the view controllers are embedded in the container view. Add the following method to the ViewController implementation:
override func prepare(for segue: NSStoryboardSegue, sender: Any?) {
  guard let tabViewController = segue.destinationController
    as? NSTabViewController else { return }

  for controller in tabViewController.childViewControllers {

    if let controller = controller as? OverviewController {
      overviewViewController = controller
      overviewViewController?.selectedProduct = selectedProduct
    }
    // More later
  }
}
This code does the following:
- Gets a reference to the Tab View controller if possible.
- Iterates over all its child view controllers.
- Checks if the current child view controller is an instance of
OverviewController, and if it is, sets itsselectedProductproperty.
Now add the following line in the method valueChanged, inside the if let block.
overviewViewController?.selectedProduct = selectedProduct
Build and run to see how the UI updates when you select a different product.
