How To Use Git Source Control with Xcode 9
In this tutorial, you’ll learn how to use git source control with Xcode 9; whether committing or reverting, branching or merging, this tutorial has you covered. By Richard Critz.
Whether you’re a solo developer or working on a team, if you’re not using source control for your projects, you should be. Source control is amazing because it helps you more easily revert to older versions of your code, add new features without risk to your working app, see how your code has changed over time, and work as a team. And one of the best source control systems is built right into Xcode – Git!
Git is a distributed version control system initially developed by Linus Torvalds, the principal force behind the development of the Linux kernel. The nice thing about Git is there doesn’t have to be any central repository – everyone can have his or her own view of the code, and pull in changes from other sources.
In this tutorial, you’ll get hands on experience with Git and learn how to use it directly inside Xcode.
Gitting Started
Rather than ramble on about the theory of Git, you’re going to dive right in and try it out. You’ll create a new Xcode project and try some tasks that you will typically do on a day-to-day basis with Git source control.
Fire up Xcode and create a new Single View Application project.
Fill in the template options as follows:

- Product Name: GitUseExample
- Team: Your Apple Developer team if you have one, or None
- Organization Name: Your name
- Organization identifier: As the name indicates, it’s your organization’s identifier, if you have one. Otherwise, type whatever.
- Language: Swift
- Device family: iPhone
- Use Core Data, Include Unit Tests, and Include UI Tests: not checked
Now click Next. The following dialog allows you to choose where to save your project. Choose a location and make sure Create git repository on My Mac is selected before proceeding. Once you do that, click Create.

Xcode will create your new project along with a new Git repository.
All source control systems, including Git, store their data into a repository so that they can manage your project versions and keep track of changes throughout the development cycle. Think of a repository as a database for versions.

In the course of working on your project, you’ll add files, modify code, and change your project many times.
After you make a big set of changes and your project is in a “known good” state (typically one or more times per day), it’s a good idea to check your changes into the repository. This gives you a record of “known good” states that you can always return to.
But what about the code that was created by the project template?
Your project still contains only the template files. There is nothing yet for you to commit because Xcode did it for you when you created your project. :]
To check that, open the Source Control navigator (Command-2 is the keyboard shortcut). Now, make sure the Source Control inspector (Command-Option-3) is open as well. Option-click the disclosure triangle next to GitUseExample in the left pane to reveal all of the Branches, Tags and Remotes configured in your repository. Click on the master branch, then click the Initial commit in the editor window and you will see the details of Xcode’s automatic commit.

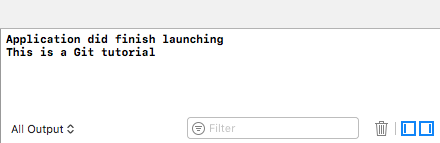
Now, make some changes to your project. Open AppDelegate.swift and change the method application(_:didFinishLaunchingWithOptions:) to the following:
func application(_ application: UIApplication,
        didFinishLaunchingWithOptions launchOptions: [UIApplicationLaunchOptionsKey: Any]?) -> Bool {
  print("Application did finish launching")
  return true
}
After you save the file, you will note that AppDelegate.swift now has an “M” badge next to the filename:

The “M” badge stands for “modified.” It means you have modified the file but have not yet committed the changes to your local Git repository.
Next, open ViewController.swift and add the following code after viewDidLoad():
@IBAction func buttonClicked(_ sender: UIButton) {
  print("This is a Git tutorial")
}
Now, open Main.storyboard and drag a button to the screen from the Object library. Change the button’s displayed text to whatever you want as shown in the screenshot below.

The last thing to do is to connect the action to the button. Click the yellow View Controller icon in the View Controller scene. From the Connections Inspector (last tab on the right sidebar), click the open circle next to buttonClicked: in the Received Actions panel and drag it to the button in the Storyboard Editor. Choose Touch Up Inside from the pop-up menu.

If you check the Project navigator, you will notice that all three of the files you have edited have an “M” badge.

Build and run to make sure the project works. Verify that when you click the button you see the “This is a Git tutorial” message logged to the console.
w00t – your code is now in a “known good” state! It’s time to commit.
Making Some Commit-ments
Committing files is easy! Select Source Control\Commit… from the menu.

A new window will show, similar to the following:

As you can see, the screen is split into two panes. The left pane shows the file in its current state with all changes made since the last commit. Since this is your first commit, you will see all changes made since the creation of the project.
The right pane shows the file before you made your changes.

Look more closely at what Xcode presents in the Commit window.
The left panel (1) shows all of the files in your project with uncommitted changes. By default, Xcode assumes you want to include all of them in this commit and checks their boxes. If you want to exclude a file from this commit, uncheck it. As you will see in a moment, you can also decide which individual changes within a file to include in this commit.
Notice the blue highlights in the code panes. These indicate changes you have made. Any change, even if it only adds or removes blank space, is tracked and will be marked with these blue highlights.
Try it for yourself. Click Cancel, open ViewController.swift, and add several new lines at the end of the file. Now select Source Control\Commit… again. Your results should be similar to the following:

As you can see, Git carefully tracks every single change you make throughout your development cycle.
In the area between the two source panes, all of your changes are enumerated by Xcode (labeled “2” above).
Each change is checked by default. To exclude a specific change from this commit, uncheck it.
For example, change 3 is not important since it consists only of the blank lines you added earlier. Uncheck it so that this change isn’t committed.

Notice the indicator has turned gray to make it clear this change is now excluded from the commit.
Another way to exclude an individual change is to click on the arrow next the change number. Two options will appear: Don’t Commit (or Commit in case the change is unchecked) and Discard Change. In this case, select Don’t Commit.

Before you can complete a commit, Xcode requires you to enter a commit message in the bottom part of the screen (labeled “3” above). These messages help you better understand at a glance the purpose of each commit.

Now click Commit 3 Files. Congrats, you have made your first commit! If you go back to the Source Control navigator and select the master branch as before, you’ll see it.

This simple process of making changes and committing them is what you’ll be doing 90% of the time. Pretty easy, right? Now you have no excuse not to do it! :]