2D Skeletal Animation with Spine Tutorial
Learn how to make an animated elf for your games in this 2D skeletal animation with Spine tutorial. By .
Assembling Your Character
To create your character, you’re going to need to enroll in some anatomy and fine art classes at your local university. Just kidding! Since this tutorial provides the art for you, all you need to do is drag and drop the images onto the stage.
Select the body label in the Images folder and then drag it onto the stage.


As far as I can tell, there’s no way to drag the canvas itself around. So to get the view of the canvas where you want it, you have to zoom out (using the mouse scroll wheel), and then zoom in to the portion of the canvas you want to look at. If anyone finds a better way to do this, let me know. Update: @mig_akira pointed out that you can move the canvas by right-clicking somewhere and moving the mouse. Thanks!
Now drag the head label onto the stage.

Drag the lArm, lLeg, rArm and rLeg labels onto the stage, but not head2 or head3.

If you accidentally dragged head2 and/or head3 onto the stage, don’t worry. Ctrl+Z or Cmd+Z will undo any mistakes you make. Although you may be bold enough to work without saving, even the toughest of the tough still use the undo hotkey!
Now you need to assemble your elf. You can build him better, stronger and faster. Select the Translate tool in the Transform toolbar and then select the elf’s head.

Drag the elf’s head to the top of his body. If your stage isn’t big enough, you can either use your mouse scroll wheel to zoom out or use the zoom tool on the left side of Spine.

Using the same Translate tool, drag the elf’s arms and legs to their appropriate positions.

Wait a second… why are his left arm and leg on top of his torso instead of behind it? It looks like you need to adjust the order of body parts.
Changing the Draw Order
Above the Images folder, you’ll see a listing called Draw Order. If you’re familiar with Adobe Photoshop or Sketchbook Pro, think of the draw order as layers. The artwork on the top of the list appears on top of the artwork below it.

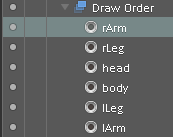
To rearrange the draw order, simply drag and drop a label up or down the list. Rearrange the order from top to bottom to be like this: rArm, rLeg, head, body, lLeg and lArm.
Your elf should now look like this:

Now that’s a good-looking elf! The final step in setting up your elf is to align his feet with the horizon line in Spine. You can do this by moving each body part one-by-one—or you can select everything and do it in one swoop, which is much easier.
Select all of the elf’s body parts in the Draw Order folder by Shift+clicking.

While still using the Translate tool, drag the elf so that he’s standing right on the horizon line.

You might be wondering what you’re supposed to do with those other two head images. After all, head2 and head3 have just been sitting there, patiently waiting for you to use them.
Multiple Images for One Body Part
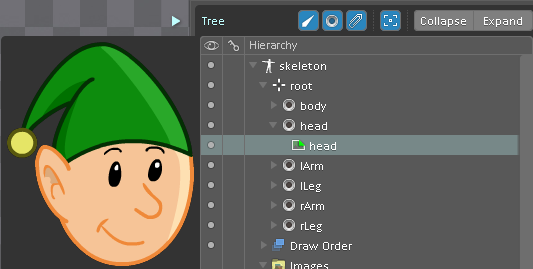
Above the Draw Order folder, there is a listing for root. Click the drop-down arrow next to root and you’ll see all of the body parts listed.

Click on the drop-down arrow next to head and you’ll see the image of the head that is attached to this body part.
You can add multiple images to each body part and switch between them to animate your character. Drag head2 from the images folder and drop it under head in the root listing.

Note that when you drag head2 on to the canvas, it might default to the origin. If that happens, just move the head back to where it belongs.
Do the same for head3.

If you want to toggle between the elf’s different faces, click the dots under the eye in the Tree panel.

Now that you’re using all of the artwork, you can build your elf’s bones!
Bone Up!: Adding a Skeleton
It’s time to give your elf some bones. How else is he going to move if he doesn’t have a skeleton?
In the Tree window, select the root listing.

Then select the Create tool from the Tools window at the bottom of Spine.

Click on the middle of the elf’s chest. This creates a new bone called bone1 (or maybe just bone).

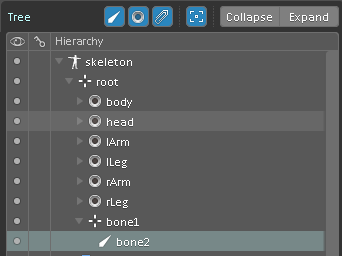
Now click and drag from the bottom of the elf’s head to his hat. This creates a new joint where his neck would be.

The attached bone is called bone2 and appears under bone1 in the Tree window because bone2 is a child of bone1. That means if you were to move bone1, bone2 and any other children of bone1 would also move.
In the Tree window, select bone1. This will make the next bone you create also a child of bone1.

Click and drag from the point where the elf’s left arm meets his torso down to his elbow to create bone3.

Repeat the same procedure for the elf’s right arm and both legs. First, click bone1 in the Tree window.

Then click the point where the elf’s right arm meets his torso and drag down to his right elbow.

Go back and click bone1 in the Tree window again.

Next, click the point where his left leg meets his body and drag down to his knee.

Do the same for the elf’s right leg.
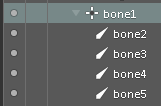

The elf’s skeleton is now complete. The head bone’s connected to the… body bone! The arm bone’s connected to the… body bone! The leg bone’s connected to the… body bone! And that’s the way it goes.
Note: You can create more complex skeletons depending on your character’s needs. You can have bones for shoulders, elbows, wrists, ankles, tails and even clothing. If you were to add an upper arm and forearm, you’d want to parent the forearm to the upper arm and the upper arm to the torso. That way, all pieces of the arm would be tied together.