Make Your First Android App: Part 2/3
Learn to enhance the app you created in the first part on how to make your first Android app and to add new UI controls to add new functionality. By Matt Luedke.
Involving the Keyboard
Now it’s time to get some user input… by introducing an EditText. This is a special subclass of TextView that opens the keyboard and displays what the user types as its content.
Add the EditText XML to activity_main.xml as a sibling to the TextView and the horizontal LinearLayout. Be careful not to get it caught inside the nested layout! Instead, add it right after the closing for the embedded linear layout.
<!-- Displays keyboard when touched -->
<EditText
    android:id="@+id/main_edittext"
    android:layout_width="wrap_content"
    android:layout_height="wrap_content"
    android:layout_marginTop="20dp"
    android:layout_marginLeft="20dp"
    android:hint="@string/hint" />
Notice the special attribute, hint. You’re using this text as a placeholder in the input field. The app will overwrite it once the user starts typing.
As usual, you need to define the string resource for your hint in res/values/strings.xml:
<string name="hint">A Name</string>
Now open MainActivity.java and add a new variable for the EditText (below the other two existing variables):
EditText mainEditText;
As before, remember to use Option-Enter to automatically add the missing imports.
Next, add the following code to the end of onCreate:
	// 3. Access the EditText defined in layout XML
	mainEditText = (EditText) findViewById(R.id.main_edittext);
The above code, similar to the previous code, simply gets a reference to the EditText control and saves it in the assigned variable.
Now that you have a reference to the EditText control, you need to do something with user input. Replace the current contents of onClick with the following:
	// Take what was typed into the EditText
	// and use in TextView
	mainTextView.setText(mainEditText.getText().toString()
			+ " is learning Android development!");
Run your app, and try typing a few things!
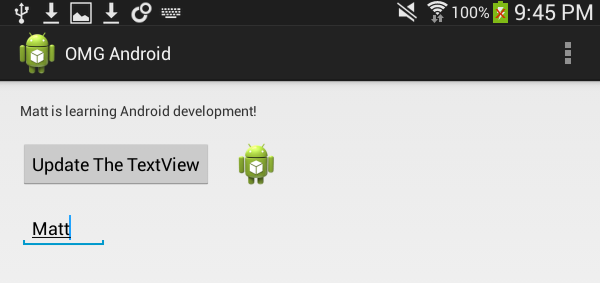
Now you receive user input with an EditText, submit it with a Button, and display it in a TextView. Very nice! But how about visualizing more than one piece of data at a time?
The ListView
The ListView is a useful control that visualizes a list of items. It’s analogous to a UITableView in iOS.
You define a ListView just as you would any other view in your XML. Add one to activity_main.xml as a sibling to the TextView, the horizontal LinearLayout, and the EditText by adding the following lines after the lines for the EditText control:
<!-- List whose dataset is defined in code with an adapter -->
<ListView
    android:id="@+id/main_listview"
    android:layout_width="match_parent"
    android:layout_height="0dp"
    android:layout_weight="1"
    android:layout_marginTop="20dp" />
Wait… what? How in the world could setting layout_height to 0dp be a good idea? After all, no matter what screen you’re on, 0 is always going to scale to 0.
Well, take a look at what directly follows: a layout_weight. Since you haven’t given anything else in your layout a weight yet, the ListView is going to expand to fill as much space as possible, no matter what value you give the layout_height.
The general practice, then, is to use a value of 0 so the layout inflater has one fewer dimension to think about and can get the job done a bit quicker.
Now open MainActivity.java and, as before, add a new variable to hold a reference to the ListView:
ListView mainListView;
ArrayAdapter mArrayAdapter;
ArrayList mNameList = new ArrayList();
You’ll note that instead of a single variable, the above code adds three new variables. The one for the ListView makes sense. But what about the others? The others are for supplying the ListView with data to display. All will be explained in a bit :]
But first, add the following code to the end of onCreate:
	// 4. Access the ListView
	mainListView = (ListView) findViewById(R.id.main_listview);

	// Create an ArrayAdapter for the ListView
	mArrayAdapter = new ArrayAdapter(this,
			android.R.layout.simple_list_item_1,
			mNameList);

	// Set the ListView to use the ArrayAdapter
	mainListView.setAdapter(mArrayAdapter);
Some of that looks familiar by now: finding the ListView using its id. But what else is going on?
mArrayAdapter is an example of an adapter, which is basically a go-between so your ListView can get the data it needs.
The Adapter, then, is the enterprising Object that is able to code-switch between the rough language of the datasource and the refined dialect of the ListView.
ListView as being a picky sort, as far as Objects go. It’s great at what it does but doesn’t want to get its hands dirty with any real data. It’s all got to be prepared for it or else it’ll throw a fit.
When you create mArrayAdapter, you have to specify the datasource (mNameList) and the target XML view for the data (simple_list_item_1).
But hang on, you didn’t write anything with an id of simple_list_item_1! So where is that coming from?
Notice the android.R.layout part before simple_list_item_1. There are several important concepts here, but let’s look at the R bit first. R (or, R.java, if you prefer) is a dynamically created class which gives you access to the resources in your project. If interested, you can read more about accessing resources via the R class, here.
As the linked article above explains, you can use the R class to get a resource ID by specifying a resource type and a resource name. The resource type would be something like string, drawable, or layout – matching the various resource types you see in your project. And thus, the layout part in android.R.layout.simple_list_item_1 simply specifies that you are referring to a layout resource.
But what about the android prefix? Why is it there? It is an indicator that you didn’t create the view; it’s already part of the Android platform. It represents a simple TextView that a default list cell can use.
The datasource in this case is mNameList, which is simply a list of Strings. It’s initialized, but empty. So the next step is to add some data that the ListView can display.
Add the following code to the end of onClick:
	// Also add that value to the list shown in the ListView
	mNameList.add(mainEditText.getText().toString());
	mArrayAdapter.notifyDataSetChanged();
You simply add whatever the user typed into the EditText to the list of names and then shoot a signal to the adapter to update what’s shown in the ListView.
Now run your app.

You should be able to type a name into the EditText, then see the name used in the TextView and added to a new row in the ListView when you press the Button. Cool!