Sketch Tutorial for iOS Developers
In this Sketch tutorial for iOS developers, you’ll get a quick tour of how to use Sketch to create iOS app mockups, icons, and more! By Robert Chen.
Layer List
The Layer List in the left pane contains all the layers in your file. Layers that appear higher in the list overlap the ones below. Think of it as the View Hierarchy in the Storyboard.
Groups organize layers logically. You can move multiple layers as a unit if they are Grouped together. You can also export a Group of layers as a single image. In the Layer List, Groups are represented as folder icons.
Here’s a list of common shortcuts for managing the Layer List:
- ⌘G: Group multiple shapes together. Use ⌘-Shift-G to ungroup.
- ⌘R: Rename the selected item.
- ⌘-Option-Up/Down: Move an item up or down in the Layer List.
- ⌘-Shift-L: Lock a layer in place so it becomes unclickable. This is useful in the next section.

Pro tip: It’s good practice to rename layers to something meaningful, like “Tab Bar.” As it gets buried underneath other layers, you can easily find it in the Layer List. Then you can use ⌘-Option-Up to bring it to the forefront. Try not to use drag-and-drop to rearrange layers because you might wind up combining them unintentionally. Trust me, it happens!
Try grouping some of the layers you added to your iPhone mockup, and give them a descriptive name.
Vector Tool
Drawing circles, squares, and lines is fun, but pretty limiting. But with the Vector Tool, you can make any shape you want!
Shapes With Straight Lines
You can create any polygon just by clicking: the spots where you click become the corners of a shape.
Let’s make a polygon:
- Type V to activate the Vector Tool.
- Start clicking the corners of a trapezoid.
- Close the shape by clicking on the starting point.
- Click the Edit button, and drag individual vector points around to reposition them.
- Add a Fill color.
- Remove the Border.
Thankfully, since Sketch lets you reposition each vector point after the fact, you don’t need to have great drawing skills to use the Vector Tool. The mouse also snaps to the red guidelines as you drag.
Rotate Copies
A simple trapezoid might not look like much, but you can use it to derive other shapes using the Rotate Copies feature. Rotate Copies creates multiple copies of your shape and fans them out in a circle, like the petals of a flower. Let’s try it:
- Select Layer\Paths\Rotate Copies.
- Type in 3 copies (counting the original shape, you’ll end up with 4 total).
- Drag the white dot, which represents the center of the circle, to create icons like a bank logo, a shuriken, or a pinwheel.

Sketch automatically combines your rotated copies into a single shape. This tutorial will cover shape combination in a later section.
Scissors
Right above Rotate Copies is a menu option called Scissors. There’s a neat trick where you can create a WatchKit activity ring using the Scissors tool:
- Create a circle (remember, use the O key and hold Shift and click to drag a circle).
- Remove the Fill.
- Increase the Border thickness to 25.
- Select Layer\Paths\Scissors.
- Snip open the circle by clicking the top left portion.
- Next to Borders, click the Gear button to reveal a popup menu.
- Select the rounded ends option.
Notice that a circle is really just a vector path made up of four points, and that vector paths can be open like the arc of a circle.
Pro tip: You can make the ring any length by adding an additional point to the circle before you snip. To do so, click the Edit button and single-click anywhere along the circle’s path.
Modes and Handles
Sketch represents a circle using four vector points. You can see this by drawing a circle, and then clicking Edit in the toolbar.
But wait a minute — a rectangle also has four vector points. What’s going on? The difference between the two is in the use of Bezier Curves.

Bezier Curves are lines you can bend into curves using control points. Sketch calls these control points handles. Each vector point comes with two handles that control the curvature on each side. This means that the curve of a line is determined by the handle at each of its ends. This isn’t as complicated as it sounds: in Sketch, you simply drag the handles until the curve looks good.
Sketch defines four different Modes based on the relative handle positions on a vector point.
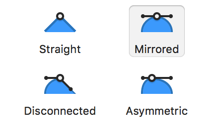
- Straight: The handles are retracted into the vector point, as if they didn’t exist. No handles means no curvature.
- Mirrored: The handles are the same length and form a straight line, like the wings of an airplane. Use this to create symmetric curves.
- Asymmetric: The handles form a straight line, but they can be different lengths.
- Disconnected: The handles are positioned independent of one another.
In practice, making curves is pretty simple. Just double-click on a vector point and click on Disconnected. Then you futz with each handle like the rabbit ears of a TV antenna until the curve looks right.
To learn more about modes and handles, this article is a great resource.
Bezier Curve Theory
You don’t really need to know the math behind Bezier curves in order to use the Vector Tool — I sure don’t! :] But I have a non-math analogy that helps me understand how the computer is drawing this stuff on screen.
Imagine a grand slam in baseball, but the umpire isn’t looking and the runners are cutting corners. Keep an eye on the red path.

First base and home plate represent vector points. Second and third represent handles. The path from first base to home plate is the Bezier curve.

Again, you don’t need to understand how Bezier curves work in order to use them, but if you’re interested, there’s an interactive visualization tool that simulates how the computer draws these things.
Vector Handles In Action
Enough mathing. Let’s use our new skills to create a map marker icon:
- Create a circle.
- Increase the Border thickness to 15.
- Click the Edit button and select the bottom vector point.
- Change the mode from Mirrored to Straight.
- Drag the bottom point downward to stretch it out.
- Drag the Corners slider to 35 to round out the corner.

The map marker shape is really just a circle with a corner as one of its points. Easy! You’ll revisit the map marker icon later on in the tutorial.