Reveal Tutorial: Live View Debugging
In this Reveal tutorial, learn how to debug the view hierarchy and constraints of your iOS app – in real-time. By Erik Kerber.
It’s also no secret that debugging user interfaces in iOS can be a pain.
While using LLDB is great for debugging code, it doesn’t really lend itself to debugging the visual hierarchy of your app.
Fortunately, there are tools for visual debugging. One such tool, Reveal, is an extremely powerful visual debugger built by the team at Itty Bitty Apps.
Much like how Safari’s web inspector allows you to inspect and manipulate the DOM of a webpage, Reveal allows you to do the same with the view hierarchy of your app.
This tutorial will show you how to leverage Reveal for inspecting and debugging a complex interface, and will feature Artsy – an app made by a team of engineers that includes fellow tutorial team member Orta Therox!
Getting Started
First you’ll download and compile the source for Artsy from Github.
To do this, open the Terminal app, switch to the directory of your choice, and enter the following commands:
git clone https://github.com/artsy/eigen.git
cd eigen
git checkout 0590e315e3246b88209003885f8466af30c6dc0b
bundle install
make oss
bundle exec pod install
open Artsy.xcworkspace
Note: This is a simplified version of the instructions found in the README file for Artsy. In order to build Arsty you’ll also need the following dependencies installed:
- CocoaPods: Learn about it in our Introduction to CocoaPods tutorial.
-
Bundler: Bundler is a dependency manager for Ruby and you can install it via the command
gem install bundlerafter you’ve installed Cocoapods
Note: If you have trouble installing nokogiri, this should fix it (courtesy StackOverflow):
brew install libxml2
bundle config build.nokogiri "--use-system-libraries --with-xml2-include=/usr/local/opt/libxml2/include/libxml2"
bundle install
brew install libxml2
bundle config build.nokogiri "--use-system-libraries --with-xml2-include=/usr/local/opt/libxml2/include/libxml2"
bundle install
The clone command will clone the Artsy repository, and checkout will point the Git repository to commit 2d9bfb8fba58e6ec0f2f3a18da7fbf45aaef6ba8 which is the commit I used at the time this tutorial was written, so there are no discrepancies between the latest version and the version I used to write this.
Once Artsy opens in Xcode, select the iPhone 6 Plus simulator and then build and run to verify everything works. You’ll see this splash screen:

Continue to use the iPhone 6 Plus simulator for the remainder of the tutorial as it’s provides the biggest screen and is therefore perfect for view debugging.
Next, you’ll learn how to connect Artsy to Reveal for view debugging.
Integrating Reveal
Head over to the Reveal download page and click Download Trial to grab the trial version of Reveal – or if you’re already sold on the idea at this point then go ahead and click Buy Now at the top-right side of the page. :]
Unzip the downloaded archive and then drag Reveal.app into your Applications folder.
Now open Reveal – a quick and easy way is to trigger Finder by pressing ⌘+space and typing in “Reveal” – and you’ll see a first-launch splash screen. If you’d like, take some of the guided tours — don’t worry, we’ll wait for you.
After dismissing the splash screen, you’ll see Reveal’s main interface. At the moment it’s empty:

You’ll remedy that in a moment when you integrate Reveal into the Artsy app.
In a nutshell, Reveal needs to run some code in your app so it’s able to communicate with it via Bonjour. There are a few options for adding the Reveal framework to your app:
- By statically linking the framework into your executable using Reveal.framework — this is the easiest and most common way to do this.
- By dynamically linking the framework into the app at runtime using libReveal.dylib — this can give you more control over when the library loads into your application.
- Using CocoaPods to import Reveal as a dependency.
For this tutorial, you’ll statically link the framework since it’s the most efficient approach. For detailed instructions on how to use the other methods, head on over to Reveal’s integration page.


- Make sure Reveal is the selected window and navigate to Help\Show Reveal Library in Finder. A Finder window will appear showing both the static library named Reveal.framework and the dynamic library named libReveal.dylib:
- Drag Reveal.framework into the Frameworks group in the Project Navigator in Xcode. Check Copy items if needed, and check the Artsy target. Finally click Finish:
- Select the Artsy project in the Project Navigator, then go to Build Phases\Link Binary with Libraries, and add libz.dylib by clicking the + in the lower-left corner. Enter libz into the search box, and then select libz.dylib and click Add:
- Delete the app from the simulator, then build and run. When it’s running you should see Artsy (iPhone Simulator) in the connection dropdown in the top-left of the Reveal app:
At this point, everything is ready for you to start debugging the view heirarchy.
In the connection dropdown, select Artsy (iPhone Simulator). The Reveal app will finally light up!

Refreshing Reveal
You’re currently looking at a layered view of Artsy’s current view hierarchy. It’s important to emphasize current because any changes to the app’s view hierarchy outside of Reveal won’t be reflected until you refresh the hierarchy.
To see this in action, tap the SIGN UP button in Artsy. You’ll see the app navigate to the sign up view, but Reveal still shows the original splash screen.
To remedy this, click the refresh button in the top-right corner of the Reveal app, and voila, the view hierarchy updates to show new sign up view.
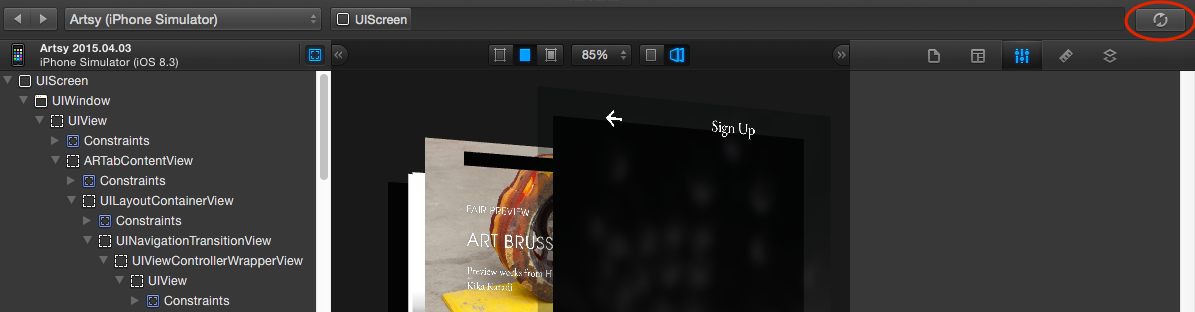
Tap the back button to return to the splash screen, and click Refresh again in Reveal. You’ll become very familiar with this navigate/refresh/debug cycle as you learn how to use Reveal.
A Quick Tour of Reveal
Next let’s take a quick tour of Reveal, looking in detail at the three panes that make up the window — the center pane, the left pane and the right pane.
The Center Pane
The center pane is the layered view of the current view hierarchy. Click+Drag anywhere in the center pane, and you’ll see the view hierarchy rotate in 3D. You’ll also notice Reveal adds a bit of space between each layer to help you visualize the view-subview relationships:

On the top of the center pane, you’ll also see 3 controls:
- A segmented control with three icons that look like picture frames. From left to right, these show View Wireframes, View Contents and View Both. A view’s wireframe is just a thin border around a view, and it’s useful when you want to understand how a view is positioned on the screen.
- A dropdown that shows the size of the view hierarchy’s future render; note that it’s relative to the native size.
- Another segmented control that switches between 2D and 3D perspectives. 3D is the default, and what allowed you to rotate the view heirarchy a few moments ago.