Reveal Tutorial: Live View Debugging
In this Reveal tutorial, learn how to debug the view hierarchy and constraints of your iOS app – in real-time. By Erik Kerber.
The Left Pane
The left pane shows the view hierarchy, where each entry is labelled by it’s subclass. Scan up and down and you’ll see a mix of instances of UIView and instances of private UIKit view subclasses:

Scroll to the top, and you’ll see the root of the entire hierarchy is an instance of UIScreen, which you can then trace down to any child view. Back in the center pane, tap the SIGN UP button on the splash screen to select it.
You’ll see the corresponding ARWhiteFlatButton is also selected in the left pane — this also works the other way around. Now find where that button lies by traversing up the heirarchy until you get back to the root UIScreen.
A few purple lines appeared when you tapped the SIGN UP button in the center pane. This is a new feature introduced in Reveal 1.5 that lets you visualize Auto Layout constraints. You’ll find out more about how those work shortly.

The Right Pane
The right pane is what you’ll use to edit or debug the view hierarchy, and the organization is similar to Interface Builder’s inspector panes:

The right pane has five tabs:
- Application Inspector: This provides application-wide information such as the device you’re connected to, the OS version, and even the current orientation!
- Identity Inspector: This shows the object of the node you select, such as class, memory location and accessibility information. One useful tool you’ll find here is View Controller, which displays the view controller that owns the selected view, provided it’s the root view within that view controller.
-
Attributes Inspector: This shows some of the public properties for every class in that object’s class hierarchy, much like Interface Builder. If it’s a
UILabel, for example, the top section will have attributes such as Text and Font. Further down — which ironically is actually moving up in the class hierarchy — you’ll see a section forUIResponderwhere you can see if the view is currently the first responder. - Layout Inspector: This is where you’ll see the frame, bounds, auto-resizing mask and Auto lLayout characteristics, such as content hugging values and intrinsic content size.
-
Layer Inspector: Like the name implies, this is where you access the view’s
CALayer. Here you can view and edit the layer’s border, corner radius, and even if the layer should rasterize it’s contents.
Viewing Layout Constraints
Select the SIGN UP button by tapping it in the center pane. Next, expand the node of the corresponding ARWhiteFlatButton in the left pane to view its children.
You’ll find a Constraints node, along with the rest of the view hierarchy, that contains the layout constraints belonging to that view. If you expand it, you’ll see the button has two constraints that pin it’s width to 280 points and it’s height to 44 points:

In the right pane, open the Layout Inspector – the fourth tab – and scroll to the bottom until you see the Participating Constraints section, which contains the same two constraints that belong to the LOG IN button, as well as two others that dictate the position of the UIButton:
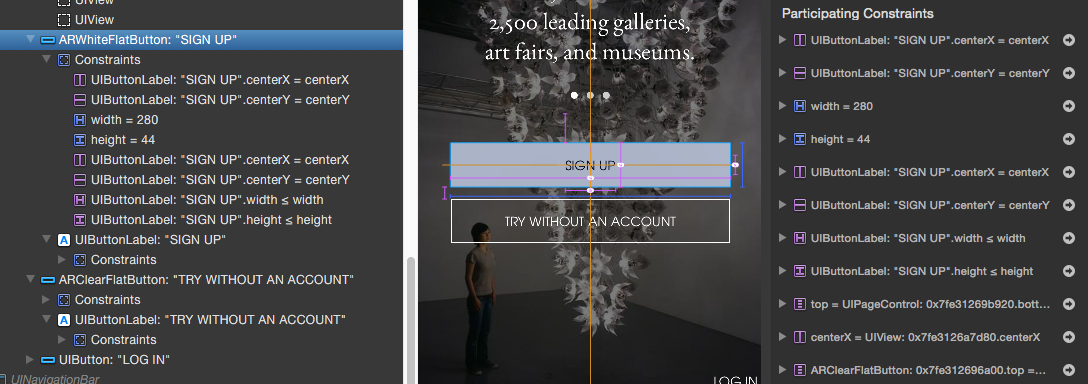
You may notice that the two size constraints are blue, and the other two constraints are purple.
- Blue: Represents constraints generated automatically
- Purple: Represents constraints added manually by the developer
In this case, blue represents the intrinsic content size of the button, which is why the system automatically created these constraints.
The purple constraints are created by the developer, and are related to the positioning of the label inside the button.
Inspecting Artsy’s Splash Screen
While a brief tour of Reveal is great for getting started, using it to debug a running app will really reveal the true value of this tool.

One of the best uses of Reveal is to help a developer understand the structure of an app’s interface. Since it’s likely you’re not overly familiar with Artsy, it’s a great example to demonstrate this.
Make sure Reveal is showing the Artsy splash screen, and providing you’ve not gone ahead and signed up, you’ll still see the the options to sign up or proceed without an account.
Select the 3D option at the top of the center pane, and make sure the zoom level is set so you can see the entire view hierarchy:

First, you need to find out what view controller is responsible for the current view.
Activate the Identity Inspector in the right pane – the second tab – and click somewhere in the background view of the splash screen. In the left pane, you’ll see this view is now highlighted in the hierarchy:

In the right pane, you’ll see the Identity Inspector populate with the selected view’s details. More importantly, toward the bottom of the pane, the View Controller field is populated with the name of the splash screen’s view controller: ARSignUpSplashTextViewController.

Note: The view you select when you click in the center pane will be the topmost view under your mouse pointer. This is, of course, not necessarily the root of a view controller; for example, it could be a background image that covers the view. Sometimes, you need to traverse up the hierarchy in the left pane to find the root view, and thus the corresponding view controller.
In the center pane, there are some images peeking out of the bottom of the hierarchy that aren’t visible when looking at the app. Get a better look by clicking and dragging to the left in the center pane until the views are rotated about 45 degrees:

Interesting. There’s quite a bit hiding beneath the covers! What you see is an entire view already rendered underneath the splash screen. So, what’s going on here?
The displayed hierarchy is a bit messy to behold with so many layers. It would be much easier to see what’s going on by flattening the splash screen to isolate what presents itself on screen as opposed to what lurks beneath.
To flatten, go to the left pane, locate the view for ARSignUpSplashTextViewController and traverse up the hierarchy. As you move up, collapse the views below by clicking the disclosure triangle to the left of each node:

Every time you collapse a node in the left pane, you’ll see the corresponding layers and borders around each layer merge in the center pane, making it a bit easier on the eyes. Continue to do this until you’ve collapsed everything up to UITransitionView:

Select UILayoutContainerView, go back to the Identity Inspector tab in the right pane, and you’ll see the view controller AROnboardingViewController that appears to manage the splash screen and the rest of the startup experience, including the login screen you visited briefly earlier.
As it turns out, the splash screen is presented over some hidden content. Drill down into it to learn how the splash screen is presented with this stunningly low-tech approach. :]
In Xcode, open the Find in Workspace search box by pressing ⇧ + ⌘ + F and search for AROnboardingViewController to find where it’s presented from.
In the search results, look for the instance where it’s created in ARAppDelegate.m. Click on that result and Xcode will navigate to it.
You’ll find the following four lines that create and present the instance of AROnboardingViewController:
AROnboardingViewController *onboardVC = [[AROnboardingViewController alloc] initWithState:state];
onboardVC.trialContext = context;
onboardVC.modalPresentationStyle = UIModalPresentationOverFullScreen;
[self.viewController presentViewController:onboardVC animated:NO completion:nil];
Ah-ha! AROnboardingViewController is actually presented by another view controller, but the interesting twist is the modalPresentationStyle is set to UIModalPresentationOverFullScreen.
This presentation mode was introduced in iOS 8, and the UIModalPresentationStyle documentation reads:
A presentation style where the content is displayed over only the parent view controller’s content. The views beneath the presented content are not removed from the view hierarchy when the presentation finishes. So, if the presented view controller doesn’t fill the screen with opaque content, the underlying content shows through.
Ah, so by using this presentation mode both the presenting view controller’s view heirarchy and the presented view controllers view heirarchy are drawn on screen. Good to know!