How to Make a Game Like Can Knockdown
Learn how to make a game like Can Knockdown using SceneKit and Swift. By Ryan Ackermann.
Adding the Ball
At the moment you aren’t able to interact with your game; you’re just left to stare at those pesky cans until they rust. Time to do something about that!
Add the following to the top of the file along with the other node properties just below baseCanNode:
var currentBallNode: SCNNode?
This will keep track of the current ball the player is interacting with.
Next add the following new function right after createLevelsFrom(baseNode:):
func dispenseNewBall() {
  // 1
  let ballScene = SCNScene(named: "resources.scnassets/Ball.scn")!

  let ballNode = ballScene.rootNode.childNode(withName: "sphere", recursively: true)!
  ballNode.name = "ball"
  let ballPhysicsBody = SCNPhysicsBody(
    type: .dynamic,
    shape: SCNPhysicsShape(geometry: SCNSphere(radius: 0.35))
  )
  ballPhysicsBody.mass = 3
  ballPhysicsBody.friction = 2
  ballPhysicsBody.contactTestBitMask = 1
  ballNode.physicsBody = ballPhysicsBody
  ballNode.position = SCNVector3(x: -1.75, y: 1.75, z: 8.0)
  ballNode.physicsBody?.applyForce(SCNVector3(x: 0.825, y: 0, z: 0), asImpulse: true)

  // 2
  currentBallNode = ballNode
  levelScene.rootNode.addChildNode(ballNode)
}
In this function:
- You create a ball from Ball.scn and configure it with a physics body that simulates a baseball.
- After the ball is positioned, you apply an initial force to launch the ball into view from the left.
To use this new function, add the following to the end of setupNextLevel():
// Delay the ball creation on level change
let waitAction = SCNAction.wait(duration: 1.0)
let blockAction = SCNAction.run { _ in
  self.dispenseNewBall()
}
let sequenceAction = SCNAction.sequence([waitAction, blockAction])
levelScene.rootNode.runAction(sequenceAction)
This will dispense the first ball after a short delay while the level sets itself up.
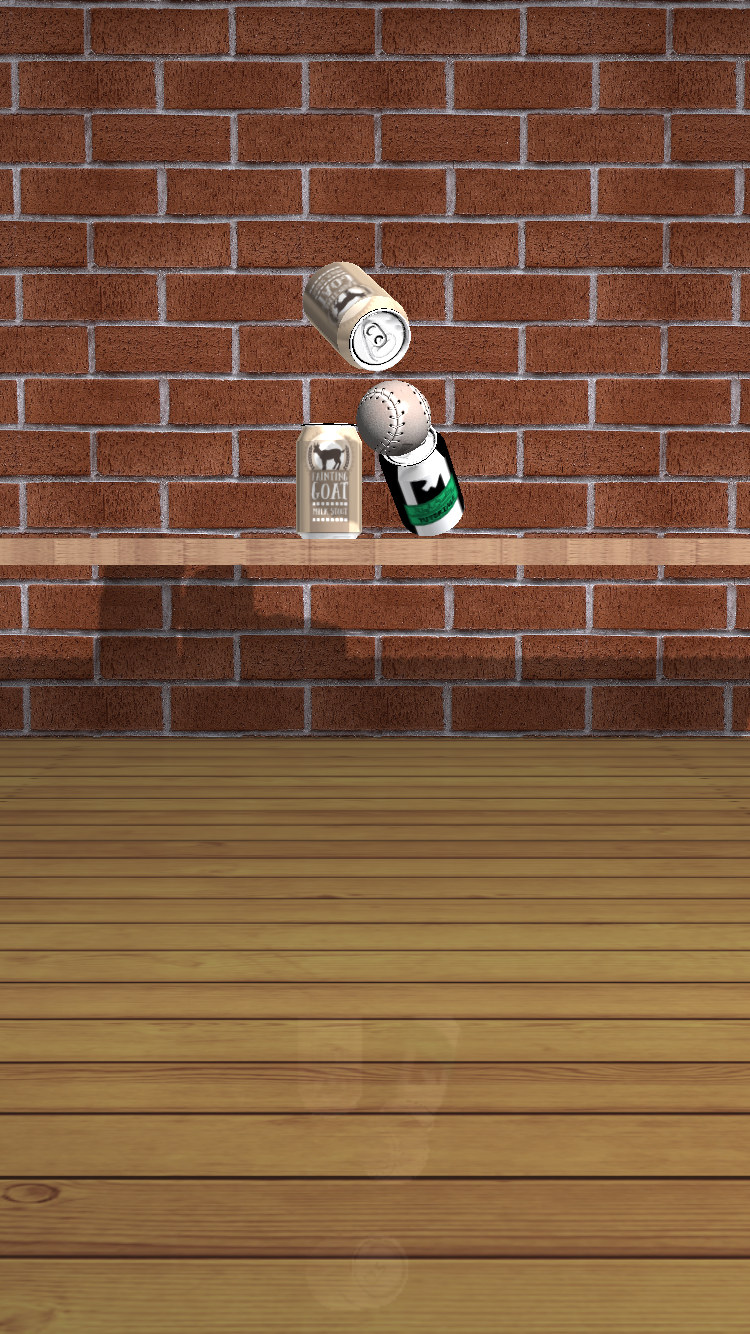
There’s a tiny problem with the physics in the level. Build and run to see it in action:

Tap the menu; you’ll see the the ball fall into view, then fall off the screen. Whoops!
The floor doesn’t have a physics body yet, so the ball doesn’t know that it should bounce off the floor and instead falls into oblivion.
Instead of adding the physics for the floor through code, you can add it in the SceneKit editor. This way with only a few clicks, you’ll get the ball bouncing as it should.
Adding Physics Using the SceneKit Editor
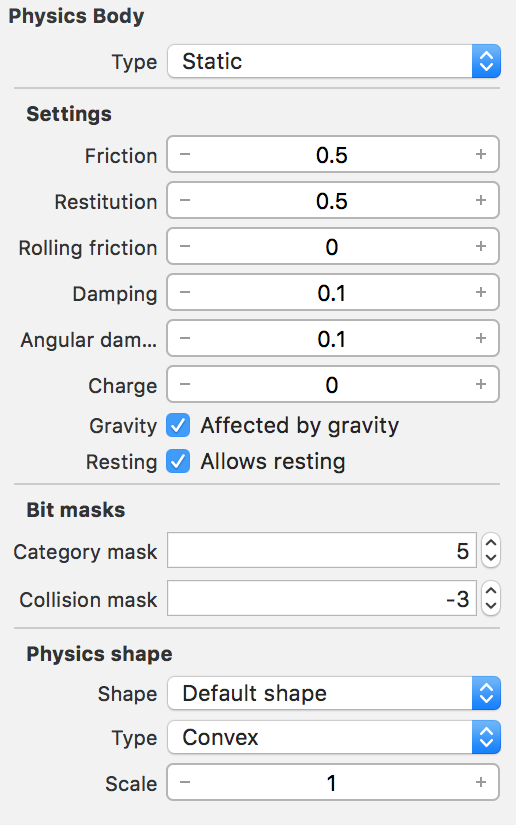
Head over to resources.scnassets/Level.scn and click on the floor node. Select the Physics Inspector and change Type to Static, then change the Category mask to 5.
That’s it for adding a physics body in the SceneKit Editor! The other settings can be tweaked to offer different behaviors, but the defaults are perfect for your game.
Build and run to see the ball bounce and roll right to the center, ready to be thrown:

Repeat the same steps to add a physics body to the wall as well, since you don’t want the ball disappearing through the back wall and off into the sunset.
Throwing the Ball
It’s now time to start bashing those cans around. Start off by adding the following properties to GameViewController:
// Ball throwing mechanics
var startTouchTime: TimeInterval!
var endTouchTime: TimeInterval!
var startTouch: UITouch?
var endTouch: UITouch?
The start and end touch times will help determine how quickly the player moved their finger across the screen. This lets you figure out how hard to thrust the ball towards those poor cans. The location of the touches are important as well so the the ball flies off in the right direction.
Next add the following function right after dispenseNewBall():
func throwBall() {
  guard let ballNode = currentBallNode else { return }
  guard let endingTouch = endTouch else { return }

  // 1
  let firstTouchResult = scnView.hitTest(
    endingTouch.location(in: view),
    options: nil
    ).filter({
      $0.node == touchCatchingPlaneNode
    }).first

  guard let touchResult = firstTouchResult else { return }

  // 2
  levelScene.rootNode.runAction(
    SCNAction.playAudio(
      helper.whooshAudioSource,
      waitForCompletion: false
    )
  )

  // 3
  let timeDifference = endTouchTime - startTouchTime
  let velocityComponent = Float(min(max(1 - timeDifference, 0.1), 1.0))

  // 4
  let impulseVector = SCNVector3(
    x: touchResult.localCoordinates.x,
    y: touchResult.localCoordinates.y * velocityComponent * 3,
    z: shelfNode.position.z * velocityComponent * 15
  )

  ballNode.physicsBody?.applyForce(impulseVector, asImpulse: true)
  helper.ballNodes.append(ballNode)

  // 5
  currentBallNode = nil
  startTouchTime = nil
  endTouchTime = nil
  startTouch = nil
  endTouch = nil
}
In this function:
- First, you apply a hit test to get the touch result located on the touch catching node you created earlier.
- Next, you play a whooshing sound effect to provide some audible feedback.
- You calculate the velocity from the time difference from the start and end of the player’s touch.
- Then you create a vector from the local coordinate of the touch result to the shelf’s location. You use the velocity to elongate the vector.
- Finally you clear out the throw’s properties for the next throw.
In order for that function to work, you need to modify the touch handling in the game.
Replace the entire touchesBegan(_:with:) with:
override func touchesBegan(_ touches: Set<UITouch>, with event: UIEvent?) {
  super.touchesBegan(touches, with: event)

  if helper.state == .tapToPlay {
    presentLevel()
  } else {
    guard let firstTouch = touches.first else { return }

    let point = firstTouch.location(in: scnView)
    let hitResults = scnView.hitTest(point, options: [:])

    if hitResults.first?.node == currentBallNode {
      startTouch = touches.first
      startTouchTime = Date().timeIntervalSince1970
    }
  }
}
At the beginning of a touch, if the game is in the playing state and the touch is on the current ball, then you record the beginning of a touch.
Next, replace touchesEnded(_: with:) to:
override func touchesEnded(_ touches: Set<UITouch>, with event: UIEvent?) {
  super.touchesEnded(touches, with: event)

  guard startTouch != nil else { return }

  endTouch = touches.first
  endTouchTime = Date().timeIntervalSince1970
  throwBall()
}
When the player lifts their finger off the screen, you’ll need to hold on to the end touch as well as the time since those are critical to throwing the ball in the right direction.
Build and run and try to bully those cans to the ground:
Collision Detection
You can throw the ball at the cans, and if your aim is any good, they’ll tumble to the ground. That’s great, but you can’t tell if all cans hit the ground so that you can advance to the next level.
SceneKit makes it really easy to handle this type of collision detection. The SCNPhysicsContactDelegate protocol defines a few useful collision handling functions:
-
physicsWorld(_:didBegin:): This gets called when two physics bodies come into contact with each other. -
physicsWorld(_:didUpdate:): This gets triggered after contact has begun and provides additional information about an ongoing collision between two bodies. -
physicsWorld(_:didEnd:): This gets called when the contact between bodies comes to an end.
While all are useful, physicsWorld(_:didBeginContact:) is really the only function you’ll have to worry about in your game.