SceneKit Tutorial With Swift Part 2: Nodes
In the second installment of our SceneKit With Swift tutorial, you’ll dive into coding your first 3D iOS game, Geometry Fighter, by learning about nodes. By Chris Language.
Adding a Background Image
Once your splash screen disappears, you’re dumped back to the blank screen of opportunity. Time to add a nice clean background so you don’t feel like you’re staring into a black hole.
To do this, add the following line of code to the bottom of setupScene() in GameViewController.swift:
scnScene.background.contents = "GeometryFighter.scnassets/Textures/Background_Diffuse.png"
This line of code instructs the scene to load the Background_Diffuse.png image from the asset catalog and use it as the material property of the scene’s background.
Build and run; you should now see a blue background image once the game starts:

That’s it! You’ve finished all the basic housekeeping tasks for your project. Your game now has a flashy app icon, a splash screen and a pretty background that’s all ready to display the nodes you’re about to add to the scene.
The SceneKit Coordinate System
Before you can start adding nodes to the scene, you first need to understand how SceneKit’s coordinate system works so you can position your nodes where you want them.
In a 2D system such as UIKit or SpriteKit, you use a point to describe the position of a view or a sprite on the x and y axes. To place an object in 3D space, you also need to describe the depth of the object’s position on the z-axis.
Consider the following simple illustration:

SceneKit uses this three-axis system to represent position in 3D space. The red blocks are placed along the x-axis, the green blocks along the y-axis and the blue blocks along the z-axis. The grey cube in the very center of the axis indicates the origin, which has coordinates of (x:0, y:0, z:0).
SceneKit uses the SCNVector3 data type to represent coordinates in three dimensions as a three-component vector. Here’s how you create a vector in code:
let position = SCNVector3(x: 0, y: 5, z: 10)
This declares the variable position with a vector of (x:0, y:5, z:10). You can easily access individual properties of the vector like so:
let x = position.x
let y = position.y
let z = position.z
If you’ve worked with CGPoint before, you can easily draw comparisons between it and SCNVector3.
(x:0, y:0, z:0), which is always relative to the parent node. To place a node at the desired location, you need to adjust the position of the node relative to its parent (local coordinates) — not the origin (world coordinates).
Cameras
Now that you understand how to position nodes in SceneKit, you’re probably wondering how to actually display something onscreen. Think back to the analogy of the movie set from Part 1 of this tutorial series. To shoot a scene, you’d position a camera looking at the scene and the resulting image of that scene would be from the camera’s perspective.
SceneKit works in a similar fashion; the position of the node that contains the camera determines the point of view from which you view the scene.
The following illustration demonstrates how a camera works in SceneKit:

There are a few key points in the previous diagram:
- The camera’s direction of view is always along the negative z-axis of the node that contains the camera.
- The field of view is the limiting angle of the viewable area of your camera. A tight angle provides a narrow view, while a wide angle provides a wide view.
- The viewing frustum determines the visible depth of your camera. Anything outside this area — that is, too close or too far from the camera — will be clipped and won’t appear on the screen.
A SceneKit camera is represented by SCNCamera, whose xPov and yPov properties let you adjust the field of view, while zNear and zFar let you adjust the viewing frustum.
One key point to remember is that a camera by itself won’t do anything unless it’s a part of the node hierarchy.
Adding a Camera
Time to try this out. Open GameViewController.swift and add the following property below scnScene:
var cameraNode: SCNNode!
Next, add the following method below setupScene():
func setupCamera() {
  // 1
  cameraNode = SCNNode()
  // 2
  cameraNode.camera = SCNCamera()
  // 3
  cameraNode.position = SCNVector3(x: 0, y: 0, z: 10)
  // 4
  scnScene.rootNode.addChildNode(cameraNode)
}
Taking a closer look at the code:
-
First, you create an empty
SCNNodeand assign it tocameraNode. -
Next, you create a new
SCNCameraobject and assign it to thecameraproperty ofcameraNode. -
Then, you set the position of the camera at
(x:0, y:0, z:10). -
Finally, you add
cameraNodeto the scene as a child node of the scene’s root node.
Finish things off by calling the method you just added in viewDidLoad(), right below setupScene():
setupCamera()
There is no need to build and run. Even though you just added a camera to the scene, there’s still nothing to look at, which means you won’t see anything different. But that’s about to change!
Geometry
In order to create visible content, you need to add a geometry object to a node. A geometry object represents a three-dimensional shape and is created out of many points known as vertices that defines polygons.
Additionally, a geometry object can contain material objects that modify the appearance of a geometry’s surface. Materials let you specify information such as the color and texture of the geometry’s surface, and how the geometry should respond to light along with other visual effects. A collection of vertices and materials is known as a model or a mesh.
SceneKit includes the following built-in geometric shapes:
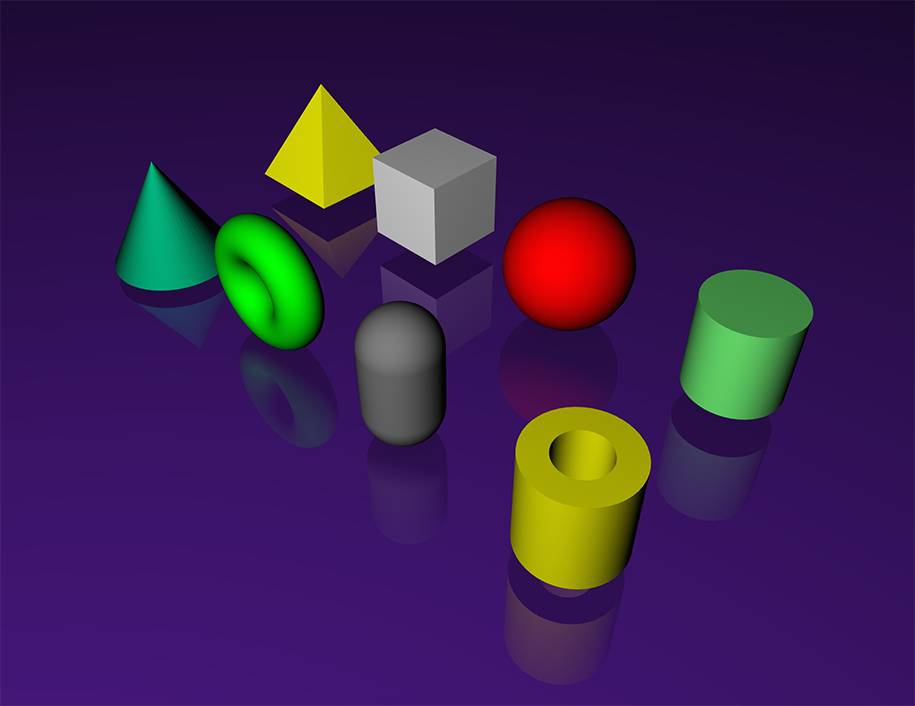
In the front row, starting from the left, you have a cone, a torus, a capsule and a tube. In the back row, again starting from the left, you have a pyramid, a box, a sphere and a cylinder.
Adding ShapeTypes
Before you start adding geometric shapes to the scene, create a new Swift file to define a ShapeType enum for the different shapes you’ll use in the game.
Right-click on the GeometryFighter group and select New File…. Select the iOS/Source/Swift File template and click Next:

Name the file ShapeType.swift, make sure it’s included in your project, then click Create.
Once the file’s been created, open ShapeType.swift and replace its contents with the following:
import Foundation

// 1
enum ShapeType:Int {

  case box = 0
  case sphere
  case pyramid
  case torus
  case capsule
  case cylinder
  case cone  case tube

  // 2
  static func random() -> ShapeType {
    let maxValue = tube.rawValue
    let rand = arc4random_uniform(UInt32(maxValue+1))
    return ShapeType(rawValue: Int(rand))!
  }
}
The code above is relatively straightforward:
-
You create a new enum named
ShapeTypethat enumerates the various shapes. -
You also define a static method named
random()that generates a randomShapeType. This feature will come in handy later on in your game.