Unity 2D Techniques: Build a 2D Pinball Game
In this tutorial, you’ll learn how to use Unity’s 2D techniques to build an old-school pinball game using sorting groups, the mesh editor and more. By Ben MacKinnon.
Code the Float
Now, you’ll set the float duration. In Assets/RW/Scripts, double-click Floatpiece.cs to launch the file in the code editor.
Declare the following variables below the existing ones:
private BuoyancyEffector2D floatEffector;
public float floatingTime = 0f; // floating duration
private float runningTime = 0f; // the current duration since startTime
private float startTime = 0f;
At the end of Start, add:
floatEffector = GetComponent<BuoyancyEffector2D>(); // assign component to this instance
Replace the code inside the if block in OnTriggerEnter2D with the following:
// on enter zone, start float
floatEffector.density = 50;
// start timer
if (startTime == 0f)
{
    startTime = Time.time;
    sound.bonus.Play();
    scoreBoard.gamescore += 10;
    golightRenderer.sprite = golightAniController.spriteSet[0];
    StartCoroutine(BeginFloat());
}
And replace the entire BeginFloat method with the following:
IEnumerator BeginFloat()
{
    while (true)
    {
        // calculate current duration
        runningTime = Time.time - startTime;

        // play animation loop
        int index = (int)Mathf.PingPong(handcamAniController.fps *
                    Time.time, handcamAniController.spriteSet.Length);
        handcamRenderer.sprite = handcamAniController.spriteSet[index];
        yield return new WaitForSeconds(0.1f);

        // when time is up
        if (runningTime >= floatingTime)
        {
            // stop float and reset timer
            floatEffector.density = 0;
            runningTime = 0f;
            startTime = 0f;

            // stop sound & animation
            sound.bonus.Stop();
            golightRenderer.sprite = golightAniController.spriteSet[1];
            handcamRenderer.sprite = handcamAniController.spriteSet
                          [handcamAniController.spriteSet.Length - 1];
            break;
        }
    }
}
Click Save and return to Unity.
That was the most code you’ll need to write in this whole tutorial! A lot of it was calling things already defined for you.
First, you declared some variables, a reference to the BuoyancyEffector2D component that you added in the scene and some timers.
You’ll call OnTriggerEnter when the ball enters the Float Area. You start the timer, start some sound and animation effects and award the player some points. Then you start the BeginFloat coroutine.
In BeginFloat, you keep track of how long the ball has been in the Float Area and run some sprite animations.
When the time is up, you reset all the timers, stop all animations and sound effects and reduce the BuoyancyEffector2D.density to 0. This causes the ball to fall out of the Float Area and back into play!
Implementing the Float Area
Go to Assets/RW/Prefabs and drag floatEffects into the Float Piece Area object in the Hierarchy to create a child instance. Click the arrow icon beside floatEffects to expand the contents.
Select Float Area in the Hierarchy. Click Add Component and select Scripts ▸ Floatpiece. In the Inspector, assign floatEffects to Handcam Obj and StaticLight to Golight Obj. Set the Floating Time value to 2.

Now press Play again to test.

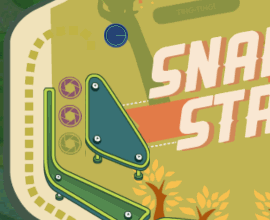
Triangle Bumpers
You’re almost done with your pinball game! All that’s left is to enhance gameplay with point effectors and a physics material.
To do this, you’ll add bumpers to your game. If the ball hits any of these bumpers, it’ll shoot in the opposite direction.
To create these bumpers, go to Assets/RW/Prefabs and drag bumperTriangleLeft into Bumpy Parts in the Hierarchy. Place the ball instance in front of the bumper.
Click Play to see how the ball just rolls off the slope.

In Unity, to add momentum to animated objects on collision, you have two options:


Feel free to play with both options. Experiment with different settings to find the optimal impact for the different colliding elements in the game.
- Physics Material 2D: Velocity remains consistent throughout the entire object surface, regardless of the point of impact.
- Point Effector 2D: Velocity depends on the object’s center of mass and its point of impact.
Select bumperTriangleLeft in the Hierarchy. Find Polygon Collider 2D in the Inspector and enable Is Trigger and Used By Effector.
Next, click Add Component and select Physics 2D ▸ Point Effector 2D. Set Force Magnitude to 500 and adjust the Damping settings to Drag: 5000 and Angular Drag: 1000.

Now, drag bumperTriangleRight from Assets/RW/Prefabs into Bumpy Parts. Set it up the exact same way as the left bumper.
Then set the ball instance’s Transform Position to (X:-1.6, Y:-1.6, Z:0). Click Play to test your new bumpers.
Look! The ball’s so fast, you can’t see it.
Adding More Bumpers
There are two more prefabs you can try to explore more of the 2D Physics engine: bumperCircles and bumperDividers. To add them to your pinball game, drag them into Bumpy Parts in the Hierachy.
The starter project has already set these up for you. However, you can tweak the impact of the collision using either Point Effectors 2D or Physics Material 2D.
Finally, set the position of the ball instance to (X:2.8, Y:-1, Z:0).
Click Play and enjoy playing Snap and Strike!

Where to Go From Here?
Download the final project files by clicking the Download Materials button at the top or bottom of the tutorial.
To expand this game, you could build a menu system and limit the player to only three balls to go for a high score. Or you could hook it up with Facebook and setting up a High Score table to challenge your friends.
I hope you found this tutorial useful. If you have any questions or comments, or you’ve put together some other cool effects using Unity’s 2D techniques, tell us about them in the comments section below!