How To Make A Game Like Color Switch with SpriteKit and Swift
Learn how to make a game like Color Switch using SpriteKit and Swift. By Brian Broom.
The Rest of the Circle
You could add the other parts of the circle by plotting out the points and angles like you did for the first section, but it turns out there is a shortcut. The center of the first SKShapeNode is at the center of the screen. That means that all you have to do is rotate it 90°, or π/2 radians for it to match up as the upper-right quarter of the circle.
Rotating the yellow section gives you the red section.
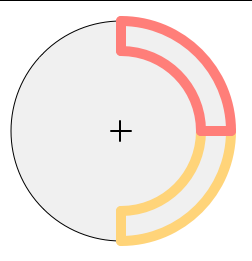
Add the following to the end of addCircleObstacle() in GameScene.swift:
let section2 = SKShapeNode(path: path.cgPath)
section2.position = CGPoint(x: size.width/2, y: size.height/2)
section2.fillColor = .red
section2.strokeColor = .red
section2.zRotation = CGFloat(M_PI_2);
addChild(section2)
You already have the path built, so you just need another SKShapeNode set to a different color, rotated by changing the zRotation property.
Build and run the project to verify your progress. You’re halfway there!
Woo! Halfway.

Avoiding Code Duplication
There is some repeated code used to create these two sections of the circle, which will only get worse if you draw the rest of the circle this way. To avoid this duplication, you’ll write a method that takes in a path that defines a quarter-section of an obstacle, and duplicates the path four times around with different colors.
First, add a property at the top of GameScene.swift, inside the class, but before the didMove(to:) method:
let colors = [SKColor.yellow, SKColor.red, SKColor.blue, SKColor.purple]
This array defines the colors that will be used in the four sections of an obstacle.
Next, add the new method after the closing brace of addCircleObstacle():
func obstacleByDuplicatingPath(_ path: UIBezierPath, clockwise: Bool) -> SKNode {
  let container = SKNode()

  var rotationFactor = CGFloat(M_PI_2)
  if !clockwise {
    rotationFactor *= -1
  }

  for i in 0...3 {
    let section = SKShapeNode(path: path.cgPath)
    section.fillColor = colors[i]
    section.strokeColor = colors[i]
    section.zRotation = rotationFactor * CGFloat(i);

    container.addChild(section)
  }
  return container
}
This method uses a for loop to repeat the SKShapeNode creation four times, rotating 90° each time. Each of the different sections are added to a blank container node; that way you’ll be able to perform actions on the container and have it act on all the child nodes at the same time.
Now, clean up addCircleObstacle() by using this new function. It should look like this:
func addCircleObstacle() {
  let path = UIBezierPath()
  path.move(to: CGPoint(x: 0, y: -200))
  path.addLine(to: CGPoint(x: 0, y: -160))
  path.addArc(withCenter: CGPoint.zero,
              radius: 160,
              startAngle: CGFloat(3.0 * M_PI_2),
              endAngle: CGFloat(0),
              clockwise: true)
  path.addLine(to: CGPoint(x: 200, y: 0))
  path.addArc(withCenter: CGPoint.zero,
              radius: 200,
              startAngle: CGFloat(0.0),
              endAngle: CGFloat(3.0 * M_PI_2),
              clockwise: false)

  let obstacle = obstacleByDuplicatingPath(path, clockwise: true)
  obstacle.position = CGPoint(x: size.width/2, y: size.height/2)
  addChild(obstacle)
}
obstacleByDuplicatingPath(_:clockwise) returns a container node containing the four sections of the obstacle. The obstacle is then positioned in the center of the screen and added to the scene.
Container nodes are a great way to organize related nodes so you can position, hide, or animate them as a single entity.
Build and run the project to see the completed circle.
We’ve come full circle.

Rotating the Obstacle
SKActions are a very common and powerful way to move and animate nodes in SpriteKit. Add this to the end of addCircleObstacle()
let rotateAction = SKAction.rotate(byAngle: 2.0 * CGFloat(M_PI), duration: 8.0)
obstacle.run(SKAction.repeatForever(rotateAction))
Make sure you use the rotate(byAngle:duration) method, and not rotate(toAngle:duration). The first one rotates the node by the given angle, regardless of the current orientation. The second rotates until the angle matches the given angle, then stops. You are rotating the node by 2π, which is a full rotation. Repeating this action makes the node rotate continuously.
Shorter durations will make the circle rotate faster, but be careful as that will make the game more challenging.
Build and run the project to test out the rotation.
Rock and roll!

Add the Player
It’s not much of a game without a player, so that’s a good next step. Add this property to the top of GameScene.swift, just after colors:
let player = SKShapeNode(circleOfRadius: 40)
Next, add the following method after setupPlayerAndObstacles():
func addPlayer() {
  player.fillColor = .blue
  player.strokeColor = player.fillColor
  player.position = CGPoint(x: size.width/2, y: 200)

  addChild(player)
}
Finally, add a line to call the new method to the beginning of setupPlayerAndObstacles()
addPlayer()
Build and run to see the new player node. Next, it’s time to make it move.
Just resting.

Adding Physics
Player movement in this game comes in two parts. The player moves upward when the screen is tapped, and drops back down due to gravity between taps. You’ll add these parts now.
First, add this struct to the top of GameScene.swift above the properties:
struct PhysicsCategory {
  static let Player: UInt32 = 1
  static let Obstacle: UInt32 = 2
  static let Edge: UInt32 = 4
}
And add the following code to the end of didMove(to:):
let playerBody = SKPhysicsBody(circleOfRadius: 30)
playerBody.mass = 1.5
playerBody.categoryBitMask = PhysicsCategory.Player
playerBody.collisionBitMask = 4
player.physicsBody = playerBody

let ledge = SKNode()
ledge.position = CGPoint(x: size.width/2, y: 160)
let ledgeBody = SKPhysicsBody(rectangleOf: CGSize(width: 200, height: 10))
ledgeBody.isDynamic = false
ledgeBody.categoryBitMask = PhysicsCategory.Edge
ledge.physicsBody = ledgeBody
addChild(ledge)
The categoryBitMask values identify different types of objects, so that you can specify which objects interact with each other, and which do not. You define these categories, so using a struct with constant values helps keep things consistent and easier to maintain.
The collisionBitMask determines which objects are solid to the player. The player node needs to collide with the ledge so that the player doesn’t drop off the bottom of the screen. You don’t want the player to collide with the obstacle, since it needs to be able to pass through unharmed if the colors match.
You set the isDynamic property of the ledge to false to make it a static object, that way it will not move due to gravity nor when the player collides with it.
Next, add this method to GameScene.swift:
override func touchesBegan(_ touches: Set<UITouch>, with event: UIEvent?) {
  player.physicsBody?.velocity.dy = 800.0
}
When the screen is tapped, you want the player to jump up, and then start to fall back down due to gravity. You achieve the jump by setting the dy component of the player’s velocity.
Physics bodies already have gravity by default, but the current value is a bit weak for this object and gameplay. Make it stronger by adding this line at the bottom of didMove(to:):
physicsWorld.gravity.dy = -22
Some trial and error is required to get the motion to feel and work right for your games.
Build and run the project. Try moving the player node around the screen.
Wheeeee!
