MapKit Tutorial: Getting Started
Learn to use the powerful MapKit framework to build an interactive map, displaying location details and launching Maps for driving directions. By Andrew Tetlaw.
The Map View Delegate
All that’s left is setting ViewController as the delegate of the map view. You can do this in Main.storyboard, but it’s more visible if you do it in code. In ViewController.swift, add this line to viewDidLoad(), before the statement that creates artwork:
mapView.delegate = self
And that’s it! Build and run. Tap the marker to pop up the callout bubble:

mapView(_:viewFor:) configures the callout to include a detail disclosure info button on the right side, but tapping that button doesn’t do anything yet. You could implement it to show an alert with more info or to open a detail view controller.
Here’s a neat third option. When the user taps the info button, your app launches the Maps app, complete with driving, walking and transit directions to get from the simulated user location to the artwork!
Launching the Maps App
To provide this great user experience, open Artwork.swift and add this import statement, below the other two:
import Contacts
This adds the Contacts framework, which contains dictionary key constants such as CNPostalAddressStreetKey, for when you need to set the address, city or state fields of a location.
To tell the Maps app where to go, you must pass it an MKMapItem. This class describes a point of interest on the map. To create one, you must first create an MKPlacemark to describe the point.
Next, add the following property to the class:
var mapItem: MKMapItem? {
  guard let location = locationName else {
    return nil
  }

  let addressDict = [CNPostalAddressStreetKey: location]
  let placemark = MKPlacemark(
    coordinate: coordinate,
    addressDictionary: addressDict)
  let mapItem = MKMapItem(placemark: placemark)
  mapItem.name = title
  return mapItem
}
You use your existing location information as the address to create an MKPlacemark. You then create and configure the MKMapItem you need for communicating with Maps.
Handling the Callout
Next, you have to tell MapKit what to do when the user taps the callout button. Open ViewController.swift, and add this method to the MKMapViewDelegate extension:
func mapView(
  _ mapView: MKMapView,
  annotationView view: MKAnnotationView,
  calloutAccessoryControlTapped control: UIControl
) {
  guard let artwork = view.annotation as? Artwork else {
    return
  }

  let launchOptions = [
    MKLaunchOptionsDirectionsModeKey: MKLaunchOptionsDirectionsModeDriving
  ]
  artwork.mapItem?.openInMaps(launchOptions: launchOptions)
}
When the user taps a map annotation marker, the callout shows an info button. If the user taps this info button, iOS calls mapView(_:annotationView:calloutAccessoryControlTapped:).
In this method, you grab the Artwork object this tap refers to, then launch Maps by creating an associated MKMapItem and calling openInMaps(launchOptions:) on the map item.
Notice you’re passing a dictionary to this method. This allows you to specify a few different options. Here, the DirectionsModeKey is set to Driving.
This causes Maps to show driving directions from the user’s current location to this location. Neat!
MKMapItem documentation to see other launch option dictionary keys, and the openMaps(with:launchOptions:) method that lets you pass an array of MKMapItem objects.
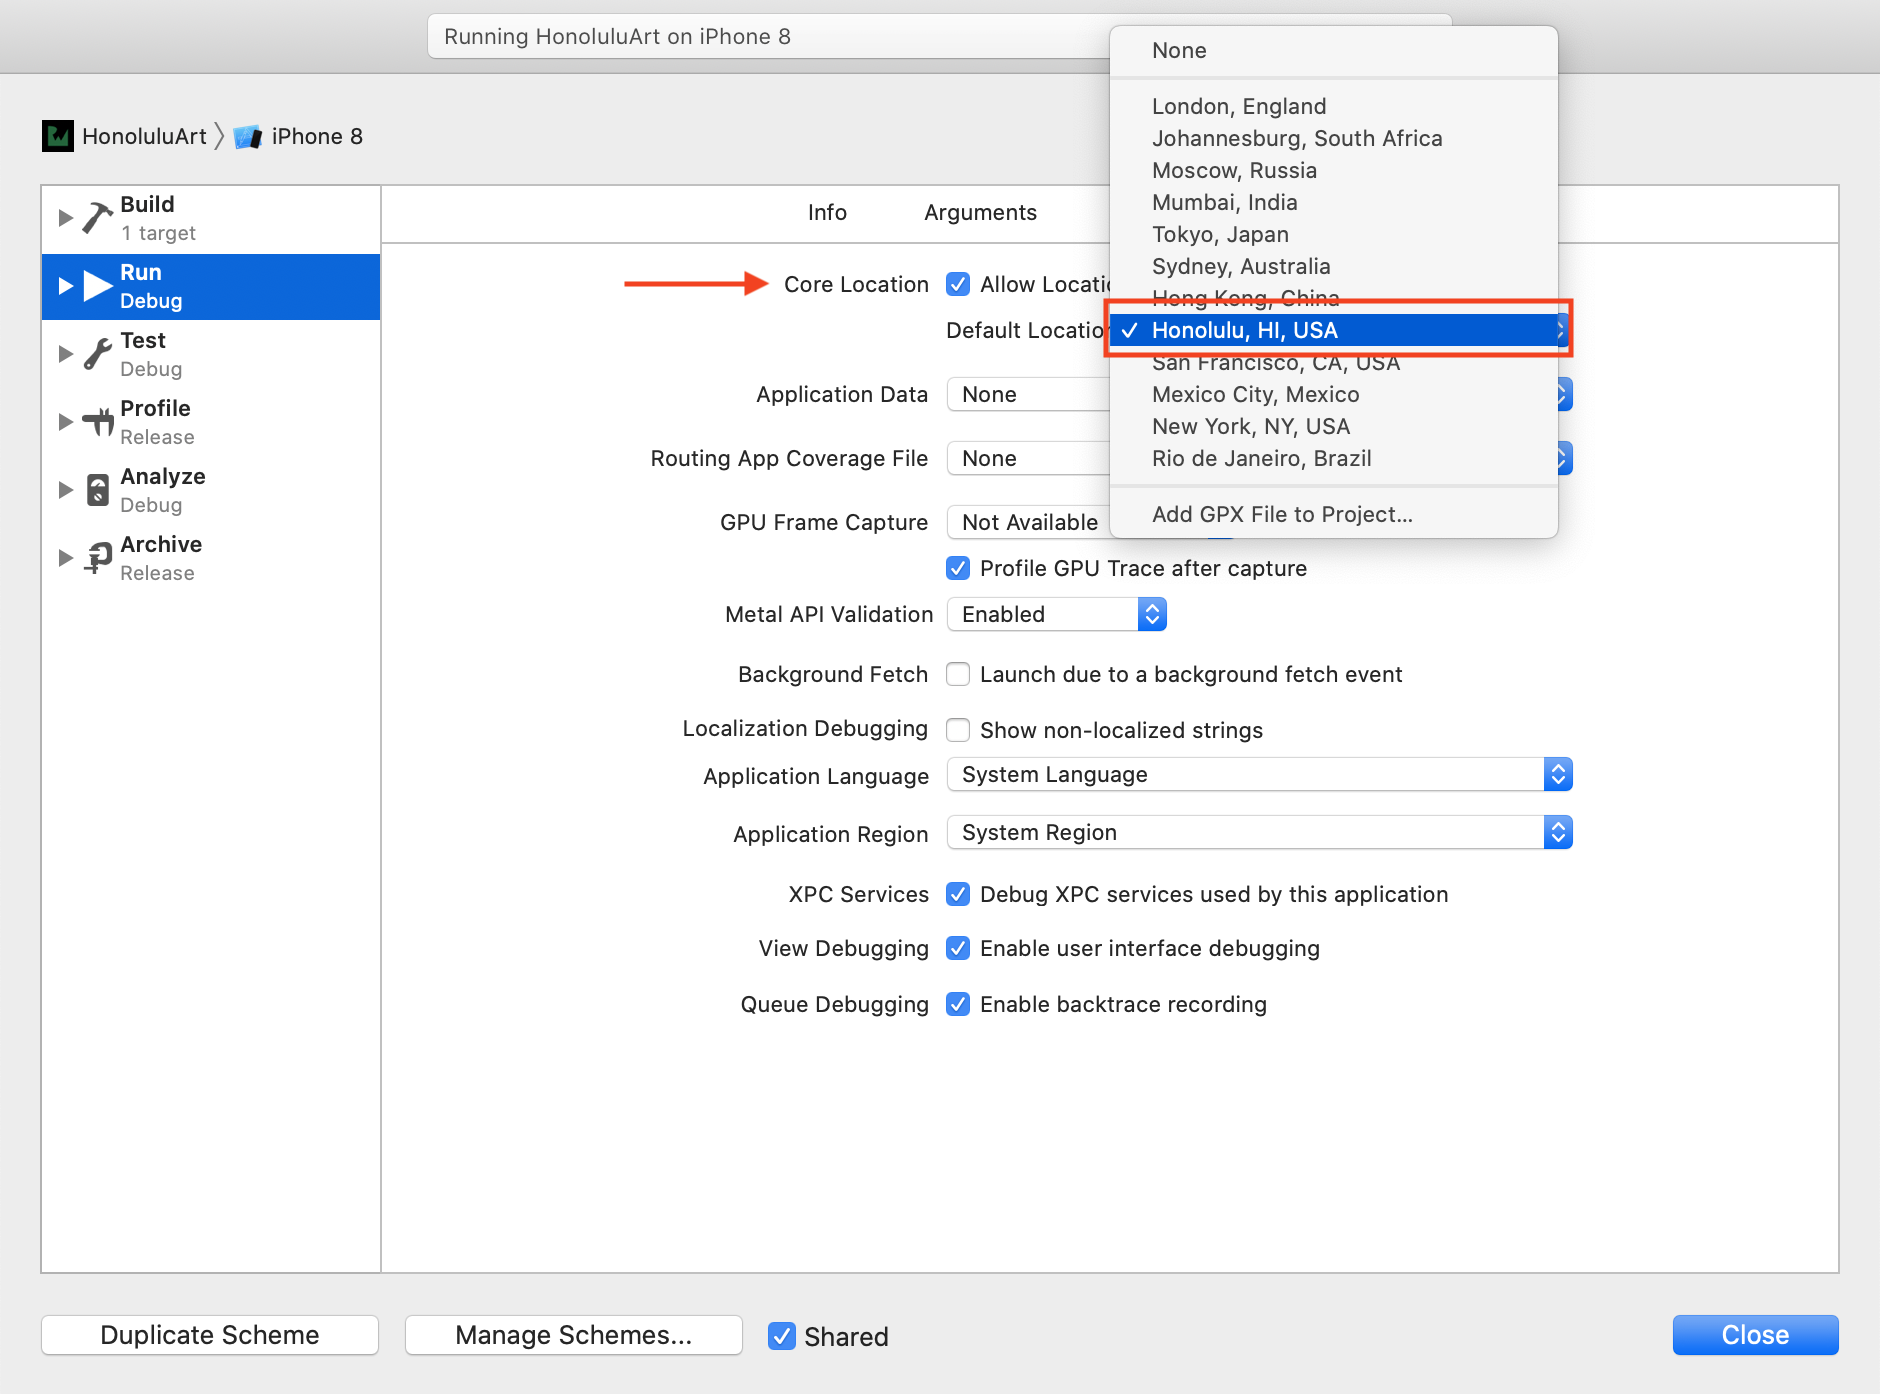
Setting Your Simulated Location
Before you build and run, you should move to Honolulu. Well, just set your simulated location to Honolulu.:]
In Xcode, go to Product ► Scheme ► Edit Scheme…, select Run from the left menu, then select the Options tab. Check Allow Location Simulation and select Honolulu, HI, USA as the Default Location. Then click the Close button:
Build and run. You’ll see the map zoom in on Waikiki, as before. Tap the marker, then tap the info button in the callout and watch it launch Maps to show the statue’s location and driving directions to it:

This calls for a celebration with your favorite tropical drink!
Decoding GeoJSON with MKGeoJSONDecoder
Now that you know how to show one artwork on the map and how to launch Maps from the marker’s callout info button, it’s time to parse the dataset into an array of Artwork objects. Then you’ll add them as annotations to the map view to display all artworks located in the current map region.
MapKit has MKGeoJSONDecoder, a super-useful feature. It can decode GeoJSON data and return an array of objects that implement the MKGeoJSONObject protocol. MapKit also provides one concrete class that implements this protocol: MKGeoJSONFeature, which is all you’ll need for this tutorial.
Add this failable initializer to Artwork.swift, below the initializer:
init?(feature: MKGeoJSONFeature) {
  // 1
  guard
    let point = feature.geometry.first as? MKPointAnnotation,
    let propertiesData = feature.properties,
    let json = try? JSONSerialization.jsonObject(with: propertiesData),
    let properties = json as? [String: Any]
    else {
      return nil
  }

  // 3
  title = properties["title"] as? String
  locationName = properties["location"] as? String
  discipline = properties["discipline"] as? String
  coordinate = point.coordinate
  super.init()
}
Here’s what you’re doing:
-
MKGeoJSONFeaturehas ageometryproperty representing one or more shapes associated with the feature. All the features in PublicArt.geojson are point locations and MapKit helpfully creates aMKPointAnnotationfor you. This is where you’ll find the coordinate as aCLLocationCoordinate2D. - Next, you read the feature’s
properties, which is of typeData?and contains a serialized JSON dictionary. You useJSONSerializationto decode the data into a Swift dictionary. - Now that the properties are decoded, you can set the appropriate
Artworkproperties from the dictionary values.
Making Annotations
To use this initializer, open ViewController.swift and add the following property, an array to hold the Artwork objects from the GeoJSON file, to the class:
private var artworks: [Artwork] = []
Next, add the following helper method to the class:
private func loadInitialData() {
  // 1
  guard
    let fileName = Bundle.main.url(forResource: "PublicArt", withExtension: "geojson"),
    let artworkData = try? Data(contentsOf: fileName)
    else {
      return
  }

  do {
    // 2
    let features = try MKGeoJSONDecoder()
      .decode(artworkData)
      .compactMap { $0 as? MKGeoJSONFeature }
    // 3
    let validWorks = features.compactMap(Artwork.init)
    // 4
    artworks.append(contentsOf: validWorks)
  } catch {
    // 5
    print("Unexpected error: \(error).")
  }
}
Here’s what you’re doing in this code:
- To begin, you read PublicArt.geojson into a
Dataobject. - You use
MKGeoJSONDecoderto obtain an array of GeoJSON objects but only keep instances ofMKGeoJSONFeatureusingcompactMap. - You transform the
MKGeoJSONFeatureobjects intoArtworkobjects using its failable initializer you added andcompactMapagain. - You append the resulting
validWorksto theartworksarray. - Because
MKGeoJSONDecoder‘sdecode(_ :)method canthrowan error, you catch it and print the error to the Xcode console.