Creating a Mind-Map UI in SwiftUI
In this tutorial, you’ll learn how to create an animated spatial UI in SwiftUI with support for pan and zoom interactions. By Warren Burton.
Handling Changes to the Drag State
Now, you need a little help to process changes to the drag state. Add this extension to the end of SurfaceView.swift:
private extension SurfaceView {
  // 1
  func distance(from pointA: CGPoint, to pointB: CGPoint) -> CGFloat {
    let xdelta = pow(pointA.x - pointB.x, 2)
    let ydelta = pow(pointA.y - pointB.y, 2)

    return sqrt(xdelta + ydelta)
  }

  // 2
  func hitTest(point: CGPoint, parent: CGSize) -> Node? {
    for node in mesh.nodes {
      let endPoint = node.position
        .scaledFrom(zoomScale)
        .alignCenterInParent(parent)
        .translatedBy(x: portalPosition.x, y: portalPosition.y)
      let dist =  distance(from: point, to: endPoint) / zoomScale

      //3
      if dist < NodeView.width / 2.0 {
        return node
      }
    }
    return nil
  }

  // 4
  func processNodeTranslation(_ translation: CGSize) {
    guard !selection.draggingNodes.isEmpty else { return }
    let scaledTranslation = translation.scaledDownTo(zoomScale)
        mesh.processNodeTranslation(
          scaledTranslation,
          nodes: selection.draggingNodes)
  }
}
This extension provides some low-level helper methods for asking questions about the drag action.
Scaling the MapView
Animating the Links
Editing the View
Where to Go From Here?
Adding a Drag Gesture
Testing Your Code
Using Animatable Pairs
Building the application
Start working your way up the processing stack and add these methods inside the same extension:
These methods do the work of turning the drag actions into changes in the Mesh.
You can now add a DragGesture to SurfaceView. In body, look for the comment line add drag gesture later. Delete the line, and add this modifier:
Here, you add a DragGesture to the ZStack that contains MapView. The gesture hands off the state changes of onChanged and onEnded to the methods you added previously.
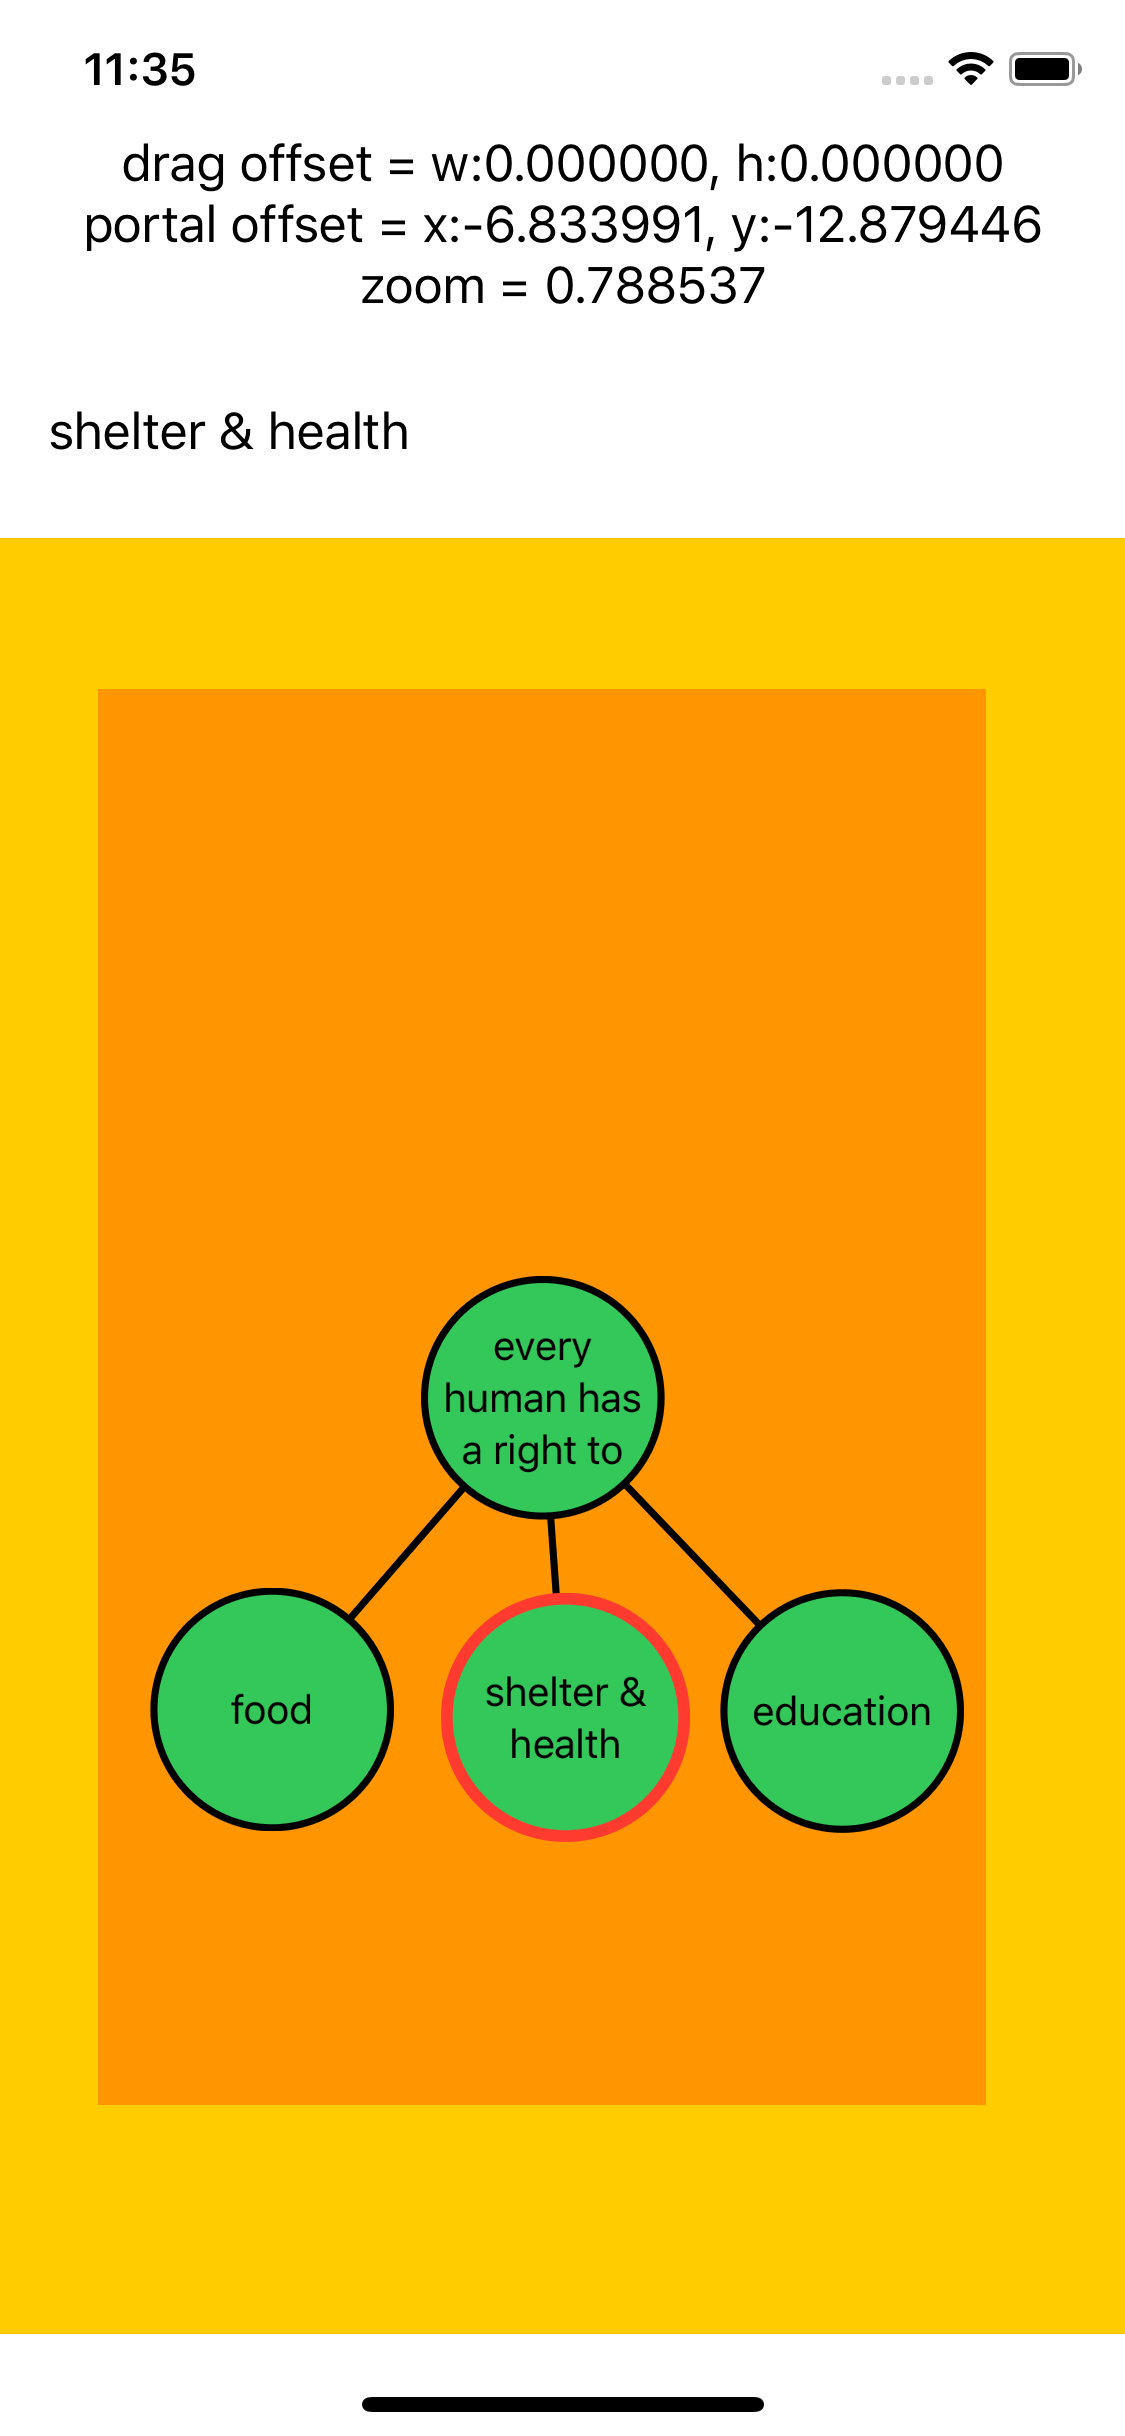
That's a big set of code to get your head around, so now's a good time to play with what you've created. Refresh the canvas and enter preview mode by pressing the Play button.
Drag any NodeView by starting your drag action on top of the NodeView; drag the MapView by starting your drag anywhere else. See how the origin of the orange MapView changes. The text at the top of the view will give you a numerical sense of what's happening.

You'll notice the links between nodes aren't animating. NodeView instances animate, but EdgeView's' don't. You'll fix this soon.
You did most of the ground work for magnification in the previous section. The drag helper functions already use the value of zoomScale. So, all that's left is to add a MagnificationGesture to manipulate zoomScale and to apply that scaling to MapView.
First, add the following method to the private SurfaceView extension from earlier:
You only want to modify the portalPosition when you also modify zoomScale. So, you pass didClamp in the return tuple value of clampedScale(_:initialValue:) back to processScaleChange(_:).
Now, add a MagnificationGesture to the ZStack that contains MapView. Locate the marker comment line add magnification gesture later. Delete the comment and replace it with this:
Here's what's going on in this code:
The last thing to do is use the zoomScale on MapView. In the body property of SurfaceView, locate the comment line insert scale here later. Delete the comment and replace it with this:
Finally, you'll crank up the preview display to 11.
In SurfaceView_Previews, locate the line:
And replace it with:
This action creates a much larger, randomly-generated mesh for the preview.
Refresh the canvas and place it in Live Preview mode.
Now, when you use a pinch gesture on the screen, the entire orange MapView will scale itself up and down around the center of the screen. You can also drag the nodes outside of the orange bounds. Artificial borders cannot contain you. :]

You've already seen that EdgeView doesn't participate in the animation cycle when you drag a NodeView. To fix this, you need to give the rendering system information about how to animate the EdgeView.
Open EdgeView.swift.
EdgeView is a Shape and Shape conforms to Animatable. The declaration for Animatable is:
You need to supply a value that conforms to VectorArithmetic in the property animatableData.
You have four values to animate.
So, how do you do that? You need an animatable pear.

Well, actually, you need an AnimatablePair. Since you have four values, you want a pair of pairs. Think of it as a system without peer, if you will. :]
Add the following type declarations below import SwiftUI in EdgeView.swift:
This declaration bundles up the two typed pairs into one name AnimatableCorners. Types in AnimatablePair must conform to VectorArithmetic. CGPoint doesn't conform to VectorArithmetic, which is why you break the two endpoints into their CGFloat components.
Inside EdgeView, add this code to the end of the struct:
Here, you define animatableData as an instance of AnimatableCorners and construct the nested pairs. SwiftUI now knows how to animate EdgeView.
Open SurfaceView.swift and refresh the canvas. Try dragging the nodes around now and you'll see that the links animate in sync with the nodes.
You now have a working 2D infinite surface renderer that handles zooming and panning!
So far, you've used pre-defined models, but an effective UI should allow the user to edit the model. You've shown that you can edit the position of the node, but what about the text?
In this section, you'll add a TextField to the interface.
Still in SurfaceView.swift, locate the comment insert TextField here in the body of SurfaceView and add this code to define a field for editing:
Again, SelectionHandler acts as the persistent memory for the view. You bind editingText to TextField.
Refresh the canvas and start Live Preview mode. Edit a node by tapping it then editing the TextField at the top of the window. Your edits will display in the view when you press Return.

Congratulations, you've dealt with all the major hurdles in creating a visual UI. Give yourself a round of applause!
The final act for you is to put your work into a running application. In the project navigator locate the folder Infrastructure and open the file SceneDelegate.swift.
Find the line:
and replace the line with your work:
Build and run and you can play with your app on a real device.
You can download the completed version of the project using the Download Materials button at the top or bottom of this tutorial.
You've just built the core of a draggable spatial UI. In doing so, you've covered:
- The helper
distance(from:to:)is an implementation of the Pythagorean theorem. It calculates the distance between two points. - In
hitTest(point:parent:), you convert a point in the reference system ofSurfaceViewto the reference system ofMapView. The conversion uses the currentzoomScale, the size ofSurfaceViewand the current offset ofMapView. - If the distance between the
positionof aNodeand the input point is less than the radius ofNodeView, then the touched point is inside theNodeView. -
processNodeTranslation(_:)uses the currentzoomScaleto scale the translation. It then asks theMeshto move nodes using information fromSelectionHandler. - In
processDragChange(_:containerSize:), you figure out if this is the first change notification received. There are two possible drag actions in this view: You can drag aNodeViewor you can drag the entireMapView, changing which part of theMapViewwill be shown. You usehitTest(point:parent:)to determine which action is appropriate. - If you're dragging a node, you ask the
SelectionHandlerto start the drag action for the selected nodes.SelectionHandlerstores a reference to the node and the initial position of the node. - You apply the drag
translationvalue todragOffsetif panning theMapView— or pass the translation toprocessNodeTranslation(_:). -
processDragEnd(_:)takes the final translation value and applies that value to the dragged nodes or panned map. It then resets the tracking properties for next time. - Scales a
CGPointvalue. - Makes sure that the calculated scale is between
0.1and2.0. - Uses the two methods below to adjust
zoomScaleandportalPosition. - Store the initial
zoomScaleandportalPositionon the first change notification. Then, pass the change toprocessScaleChange(_:). - Apply the last change and reset the tracking variables to
nil.
func processDragChange(_ value: DragGesture.Value, containerSize: CGSize) {
  // 1
  if !isDragging {
    isDragging = true

    if let node = hitTest(
      point: value.startLocation,
      parent: containerSize
    ) {
      isDraggingMesh = false
      selection.selectNode(node)
      // 2
      selection.startDragging(mesh)
    } else {
      isDraggingMesh = true
    }
  }

  // 3
  if isDraggingMesh {
    dragOffset = value.translation
  } else {
    processNodeTranslation(value.translation)
  }
}

// 4
func processDragEnd(_ value: DragGesture.Value) {
  isDragging = false
  dragOffset = .zero

  if isDraggingMesh {
    portalPosition = CGPoint(
      x: portalPosition.x + value.translation.width,
      y: portalPosition.y + value.translation.height)
  } else {
    processNodeTranslation(value.translation)
    selection.stopDragging(mesh)
  }
}
.gesture(DragGesture()
.onChanged { value in
  self.processDragChange(value, containerSize: geometry.size)
}
.onEnded { value in
  self.processDragEnd(value)
})
//<-- add magnification gesture later
// 1
func scaledOffset(_ scale: CGFloat, initialValue: CGPoint) -> CGPoint {
  let newx = initialValue.x*scale
  let newy = initialValue.y*scale
  return CGPoint(x: newx, y: newy)
}

func clampedScale(_ scale: CGFloat, initialValue: CGFloat?)
    -> (scale: CGFloat, didClamp: Bool) {
  let minScale: CGFloat = 0.1
  let maxScale: CGFloat = 2.0
  let raw = scale.magnitude * (initialValue ?? maxScale)
  let value =  max(minScale, min(maxScale, raw))
  let didClamp = raw != value
  return (value, didClamp)
}

func processScaleChange(_ value: CGFloat) {
  let clamped = clampedScale(value, initialValue: initialZoomScale)
  zoomScale = clamped.scale
  if !clamped.didClamp,
     let point = initialPortalPosition {
    portalPosition = scaledOffset(value, initialValue: point)
  }
}
.gesture(MagnificationGesture()
  .onChanged { value in
    // 1
    if self.initialZoomScale == nil {
      self.initialZoomScale = self.zoomScale
      self.initialPortalPosition = self.portalPosition
    }
    self.processScaleChange(value)
}
.onEnded { value in
  // 2
  self.processScaleChange(value)
  self.initialZoomScale = nil
  self.initialPortalPosition  = nil
})
.scaleEffect(self.zoomScale)
let mesh = Mesh.sampleMesh()
let mesh = Mesh.sampleProceduralMesh()
/// A type that can be animated
public protocol Animatable {
  /// The type defining the data to be animated.
  associatedtype AnimatableData : VectorArithmetic

  /// The data to be animated.
  var animatableData: Self.AnimatableData { get set }
}
typealias AnimatablePoint = AnimatablePair<CGFloat, CGFloat>
typealias AnimatableCorners = AnimatablePair<AnimatablePoint, AnimatablePoint>
var animatableData: AnimatableCorners {
  get {
    return AnimatablePair(
      AnimatablePair(startx, starty),
      AnimatablePair(endx, endy))
  }
  set {
    startx = newValue.first.first
    starty = newValue.first.second
    endx = newValue.second.first
    endy = newValue.second.second
  }
}
TextField("Breathe…", text: $selection.editingText, onCommit: {
  if let node = self.selection.onlySelectedNode(in: self.mesh) {
    self.mesh.updateNodeText(node, string: self.self.selection.editingText)
  }
})
let contentView = BoringListView(mesh: mesh, selection: selection)
let contentView = SurfaceView(mesh: mesh, selection: selection)
- In
processDragChange(_:containerSize:), you figure out if this is the first change notification received. There are two possible drag actions in this view: You can drag aNodeViewor you can drag the entireMapView, changing which part of theMapViewwill be shown. You usehitTest(point:parent:)to determine which action is appropriate. - If you're dragging a node, you ask the
SelectionHandlerto start the drag action for the selected nodes.SelectionHandlerstores a reference to the node and the initial position of the node. - You apply the drag
translationvalue todragOffsetif panning theMapView— or pass the translation toprocessNodeTranslation(_:). -
processDragEnd(_:)takes the final translation value and applies that value to the dragged nodes or panned map. It then resets the tracking properties for next time.
- Scales a
CGPointvalue. - Makes sure that the calculated scale is between
0.1and2.0. - Uses the two methods below to adjust
zoomScaleandportalPosition.
- Store the initial
zoomScaleandportalPositionon the first change notification. Then, pass the change toprocessScaleChange(_:). - Apply the last change and reset the tracking variables to
nil.
func processDragChange(_ value: DragGesture.Value, containerSize: CGSize) {
  // 1
  if !isDragging {
    isDragging = true

    if let node = hitTest(
      point: value.startLocation,
      parent: containerSize
    ) {
      isDraggingMesh = false
      selection.selectNode(node)
      // 2
      selection.startDragging(mesh)
    } else {
      isDraggingMesh = true
    }
  }

  // 3
  if isDraggingMesh {
    dragOffset = value.translation
  } else {
    processNodeTranslation(value.translation)
  }
}

// 4
func processDragEnd(_ value: DragGesture.Value) {
  isDragging = false
  dragOffset = .zero

  if isDraggingMesh {
    portalPosition = CGPoint(
      x: portalPosition.x + value.translation.width,
      y: portalPosition.y + value.translation.height)
  } else {
    processNodeTranslation(value.translation)
    selection.stopDragging(mesh)
  }
}
.gesture(DragGesture()
.onChanged { value in
  self.processDragChange(value, containerSize: geometry.size)
}
.onEnded { value in
  self.processDragEnd(value)
})
//<-- add magnification gesture later
// 1
func scaledOffset(_ scale: CGFloat, initialValue: CGPoint) -> CGPoint {
  let newx = initialValue.x*scale
  let newy = initialValue.y*scale
  return CGPoint(x: newx, y: newy)
}

func clampedScale(_ scale: CGFloat, initialValue: CGFloat?)
    -> (scale: CGFloat, didClamp: Bool) {
  let minScale: CGFloat = 0.1
  let maxScale: CGFloat = 2.0
  let raw = scale.magnitude * (initialValue ?? maxScale)
  let value =  max(minScale, min(maxScale, raw))
  let didClamp = raw != value
  return (value, didClamp)
}

func processScaleChange(_ value: CGFloat) {
  let clamped = clampedScale(value, initialValue: initialZoomScale)
  zoomScale = clamped.scale
  if !clamped.didClamp,
     let point = initialPortalPosition {
    portalPosition = scaledOffset(value, initialValue: point)
  }
}
.gesture(MagnificationGesture()
  .onChanged { value in
    // 1
    if self.initialZoomScale == nil {
      self.initialZoomScale = self.zoomScale
      self.initialPortalPosition = self.portalPosition
    }
    self.processScaleChange(value)
}
.onEnded { value in
  // 2
  self.processScaleChange(value)
  self.initialZoomScale = nil
  self.initialPortalPosition  = nil
})
.scaleEffect(self.zoomScale)
let mesh = Mesh.sampleMesh()
let mesh = Mesh.sampleProceduralMesh()
/// A type that can be animated
public protocol Animatable {
  /// The type defining the data to be animated.
  associatedtype AnimatableData : VectorArithmetic

  /// The data to be animated.
  var animatableData: Self.AnimatableData { get set }
}
typealias AnimatablePoint = AnimatablePair<CGFloat, CGFloat>
typealias AnimatableCorners = AnimatablePair<AnimatablePoint, AnimatablePoint>
var animatableData: AnimatableCorners {
  get {
    return AnimatablePair(
      AnimatablePair(startx, starty),
      AnimatablePair(endx, endy))
  }
  set {
    startx = newValue.first.first
    starty = newValue.first.second
    endx = newValue.second.first
    endy = newValue.second.second
  }
}
TextField("Breathe…", text: $selection.editingText, onCommit: {
  if let node = self.selection.onlySelectedNode(in: self.mesh) {
    self.mesh.updateNodeText(node, string: self.self.selection.editingText)
  }
})
let contentView = BoringListView(mesh: mesh, selection: selection)
let contentView = SurfaceView(mesh: mesh, selection: selection)
- Panning with drag gestures and creating movable content.
- Using hit testing to make decisions about a drag response.
- Magnification and its effects on the coordinate system.
- Providing animatable data for types that don't natively support animation.
This interface type can be fun and useful for your users, but be sure to consider whether it's appropriate when you create one. Not all situations demand a spatial UI.
If you want to learn more about SwiftUI and SwiftUI animations, check out our SwiftUI by Tutorials book and the SwiftUI video course.
If you have any questions, be sure to leave them in the comments below.